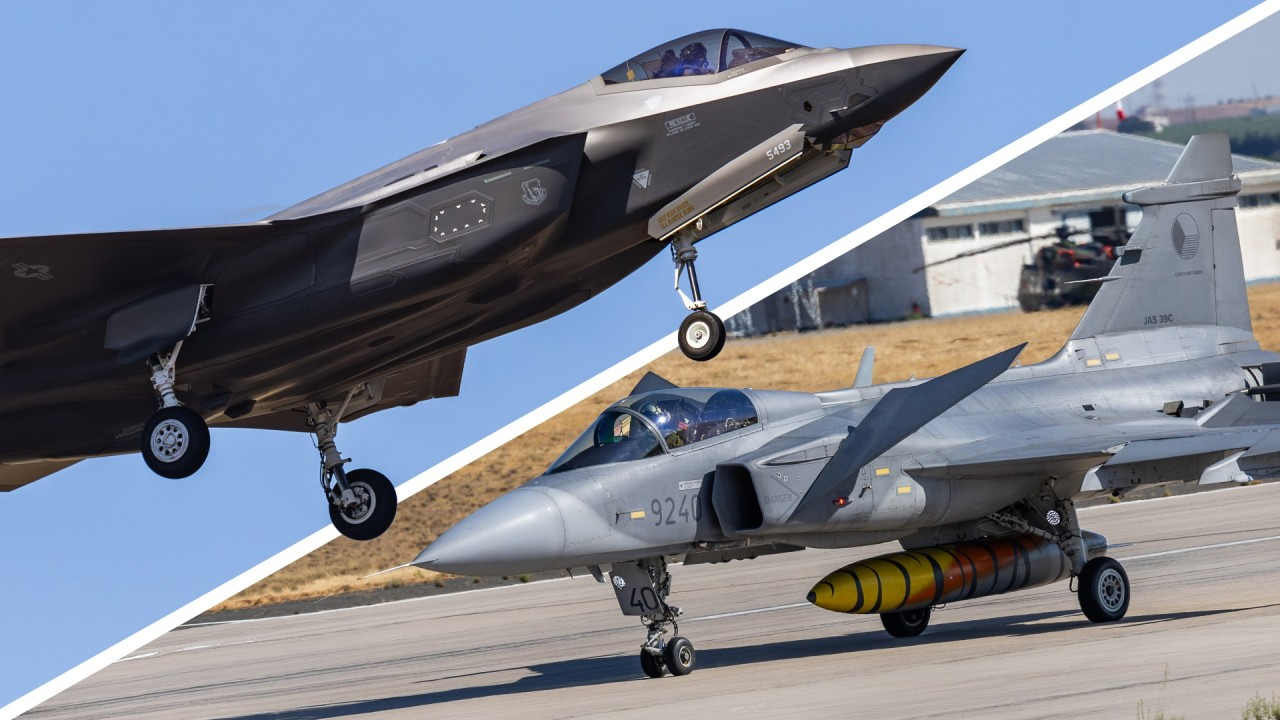
Aviation & Defense Photography Guide Season 1: From Gear Strategy to High-Speed Action
In military and aviation photojournalism, you rarely dictate the terms of your environment. You cannot control the harsh midday light on the tarmac, you cannot ask a fighter jet to repeat a low pass, and you certainly cannot pause a tactical exercise to adjust your settings. In this operational environment, the only thing you control is your camera.
Mastering your equipment in this field goes beyond simply achieving a "correct" exposure. When you are operating under pressure, your camera settings - Aperture, Shutter Speed, and ISSO - transition from being mere technical variables to vital storytelling choices.
Before we dive into the specific tactical applications and the gear that gets the job done, we need to recalibrate how we look at the foundational mechanics of photography.
The Exposure Triangle: A Tactical Baseline
We are not going to review basic photography 101, but we must establish how these three pillars interact specifically within the demanding constraints of military and aviation photography:
- Aperture (Light Gathering & Depth of Field): Aperture serves a critical dual purpose. Tactically, it is your primary valve for light. In low-light operational environments - like the killhouse training with Spec Opsat dusk or a dimly lit hangar - having "fast glass" (shooting wide open at f/2.8 or f/1.4) allows you to gather crucial ambient light without dropping your shutter speed to dangerous, motion-blurring levels. Narratively, it controls Depth of Field. Shooting wide open isolates your subject - a pilot, a specific piece of gear - from the chaotic background of a busy flight line. Conversely, stopping down (e.g., f/8 or f/11) is essential when the context matters as much as the subject, keeping both the troops in the foreground and the aircraft in the background sharp. We will explore this further in our composition breakdown.
- Shutter Speed (Controlling Time): This is how you dictate the perception of action. Fast shutter speeds freeze high-speed movement, ensuring critical sharpness. Slow shutter speeds introduce motion blur, conveying momentum and raw power. Choosing between the two is the difference between a static record and a dynamic narrative.
- ISO (The Misunderstood Variable): Let’s kill a persistent myth right now: ISO is not your enemy. In the past, pushing ISO meant ruining a shot with heavy digital noise. Today, many photographers still sacrifice critical shutter speed just to keep their ISO at 100, resulting in motion-blurred, unusable images. Remember this rule: A sharp photograph with grain is infinitely more valuable than a clean, blurred mistake. Modern full-frame mirrorless systems have exceptional low-light capabilities. When I shoot with my Canon EOS R or EOS R3, pushing the ISO above 12,800 in a dark cargo hold or during a night operation yields highly usable, professional-grade results. Don't let the fear of grain cost you the shot.
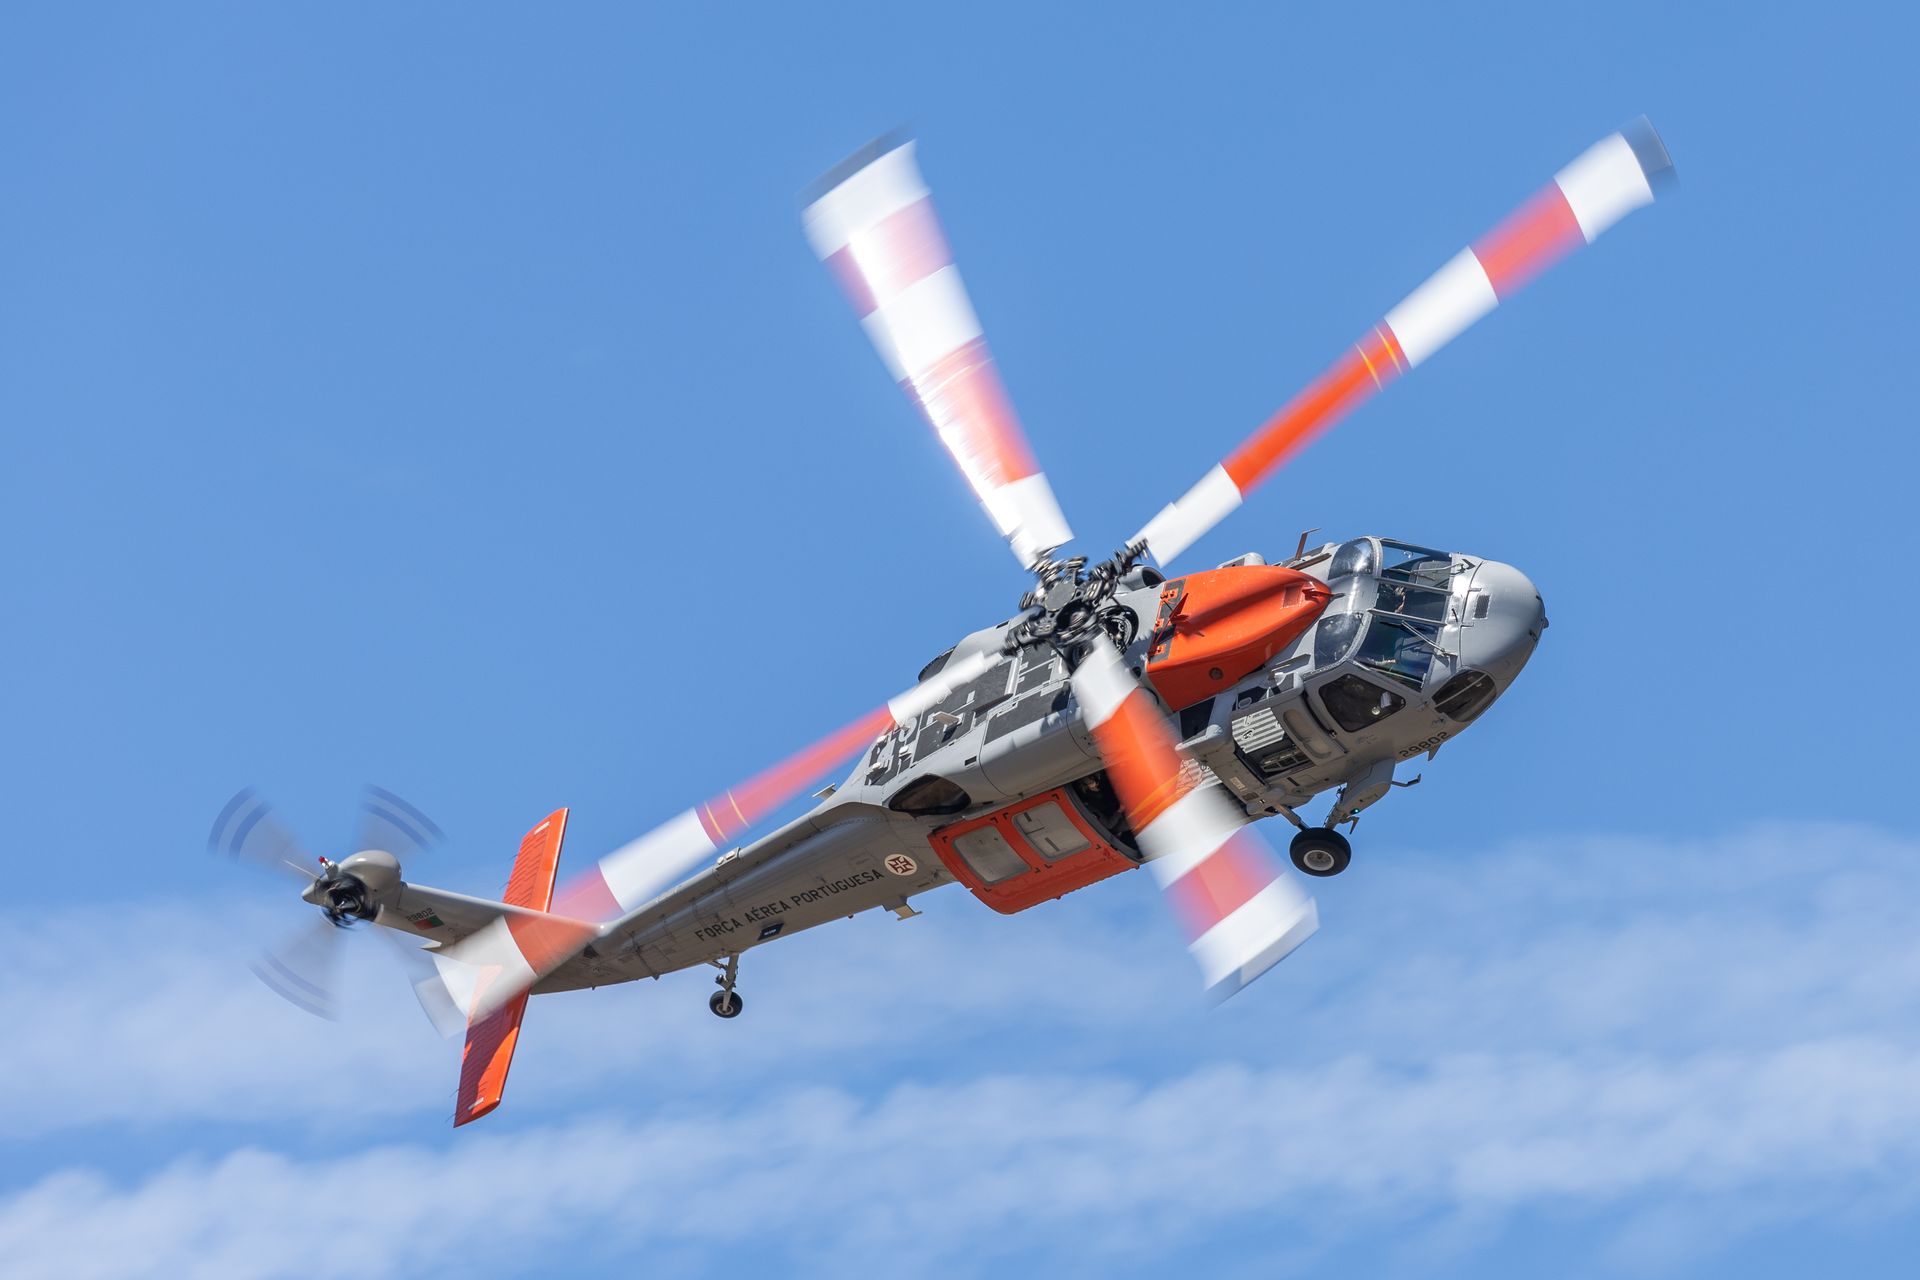
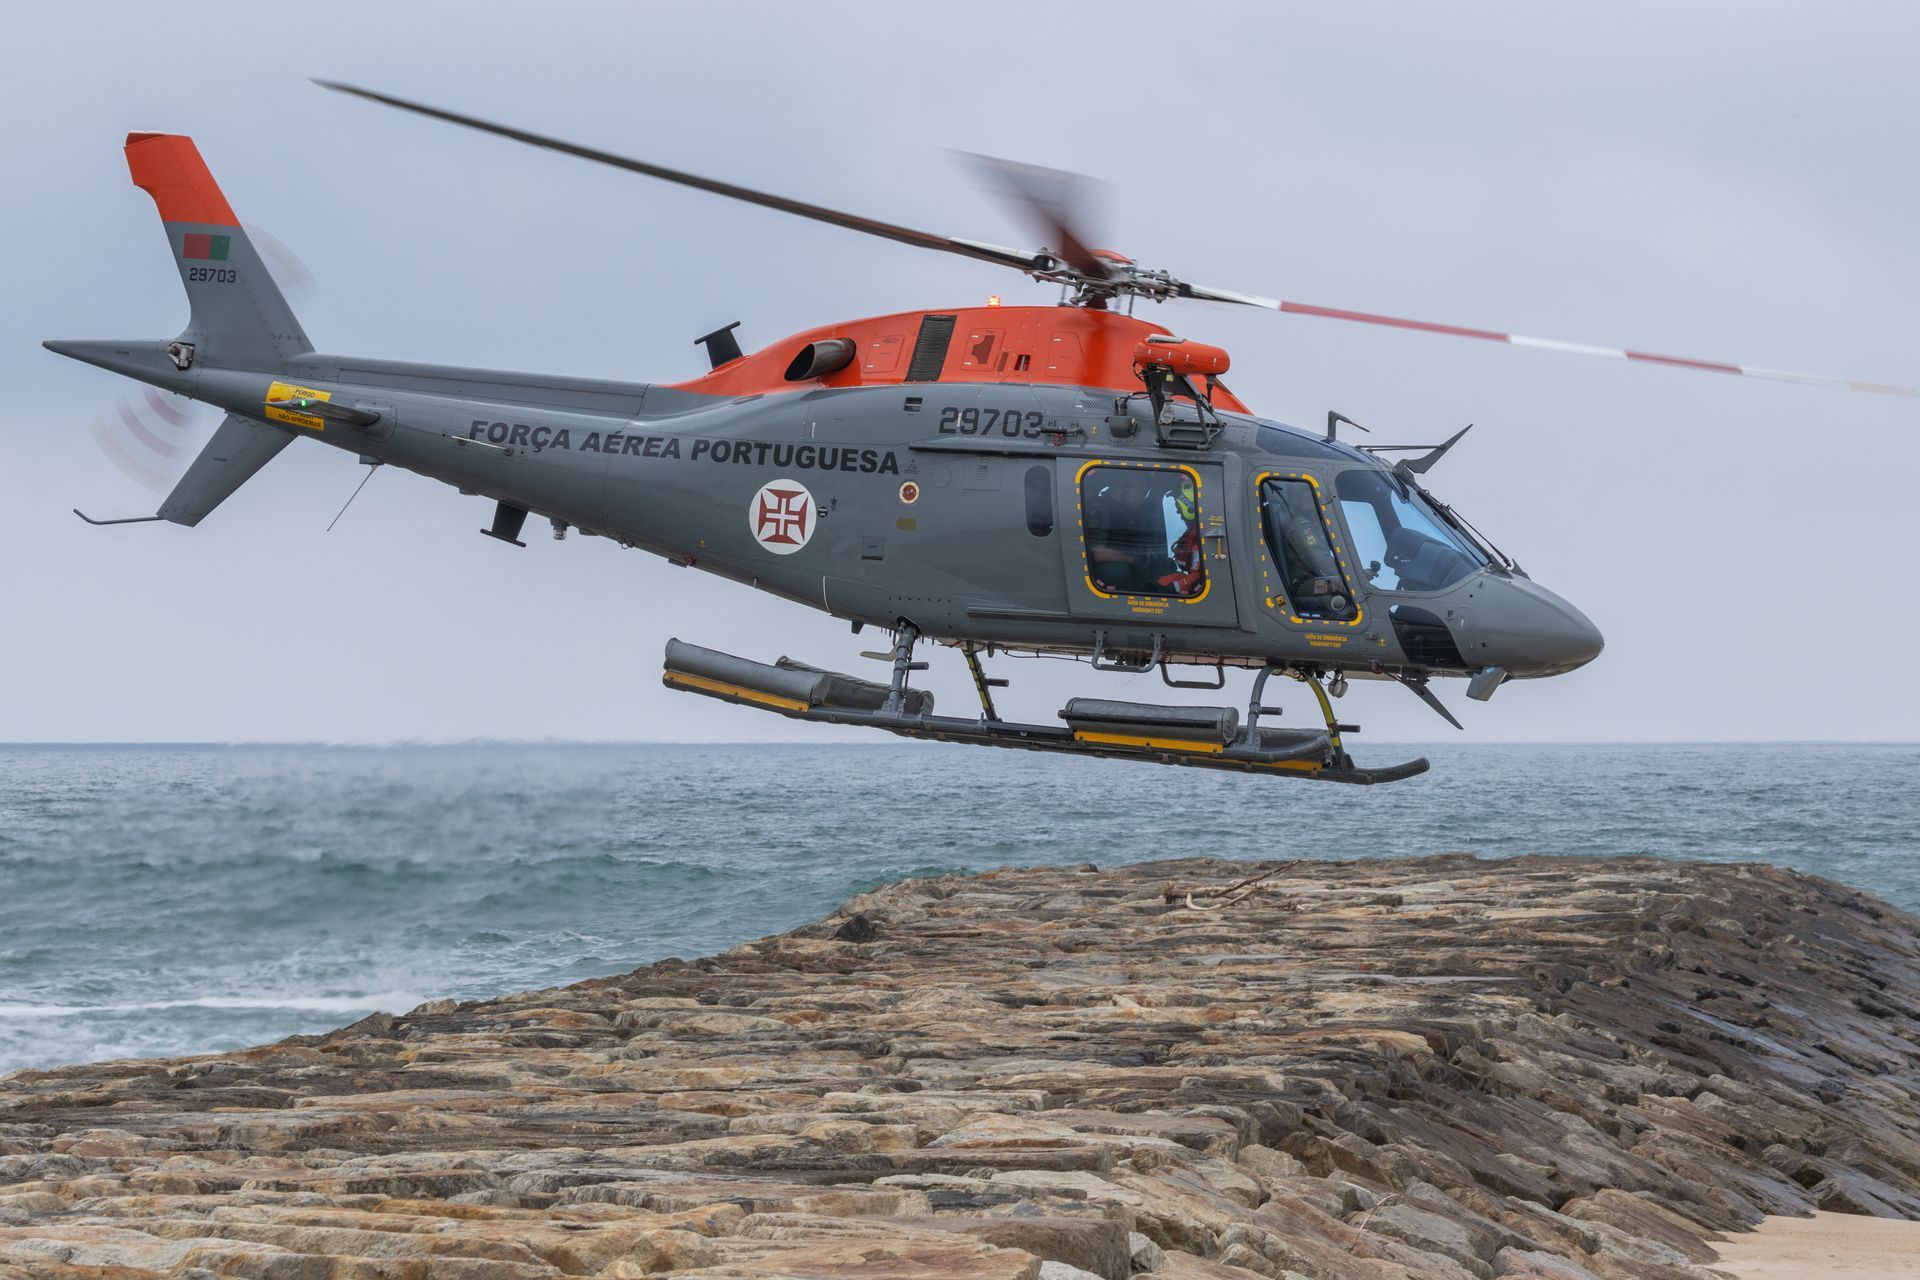
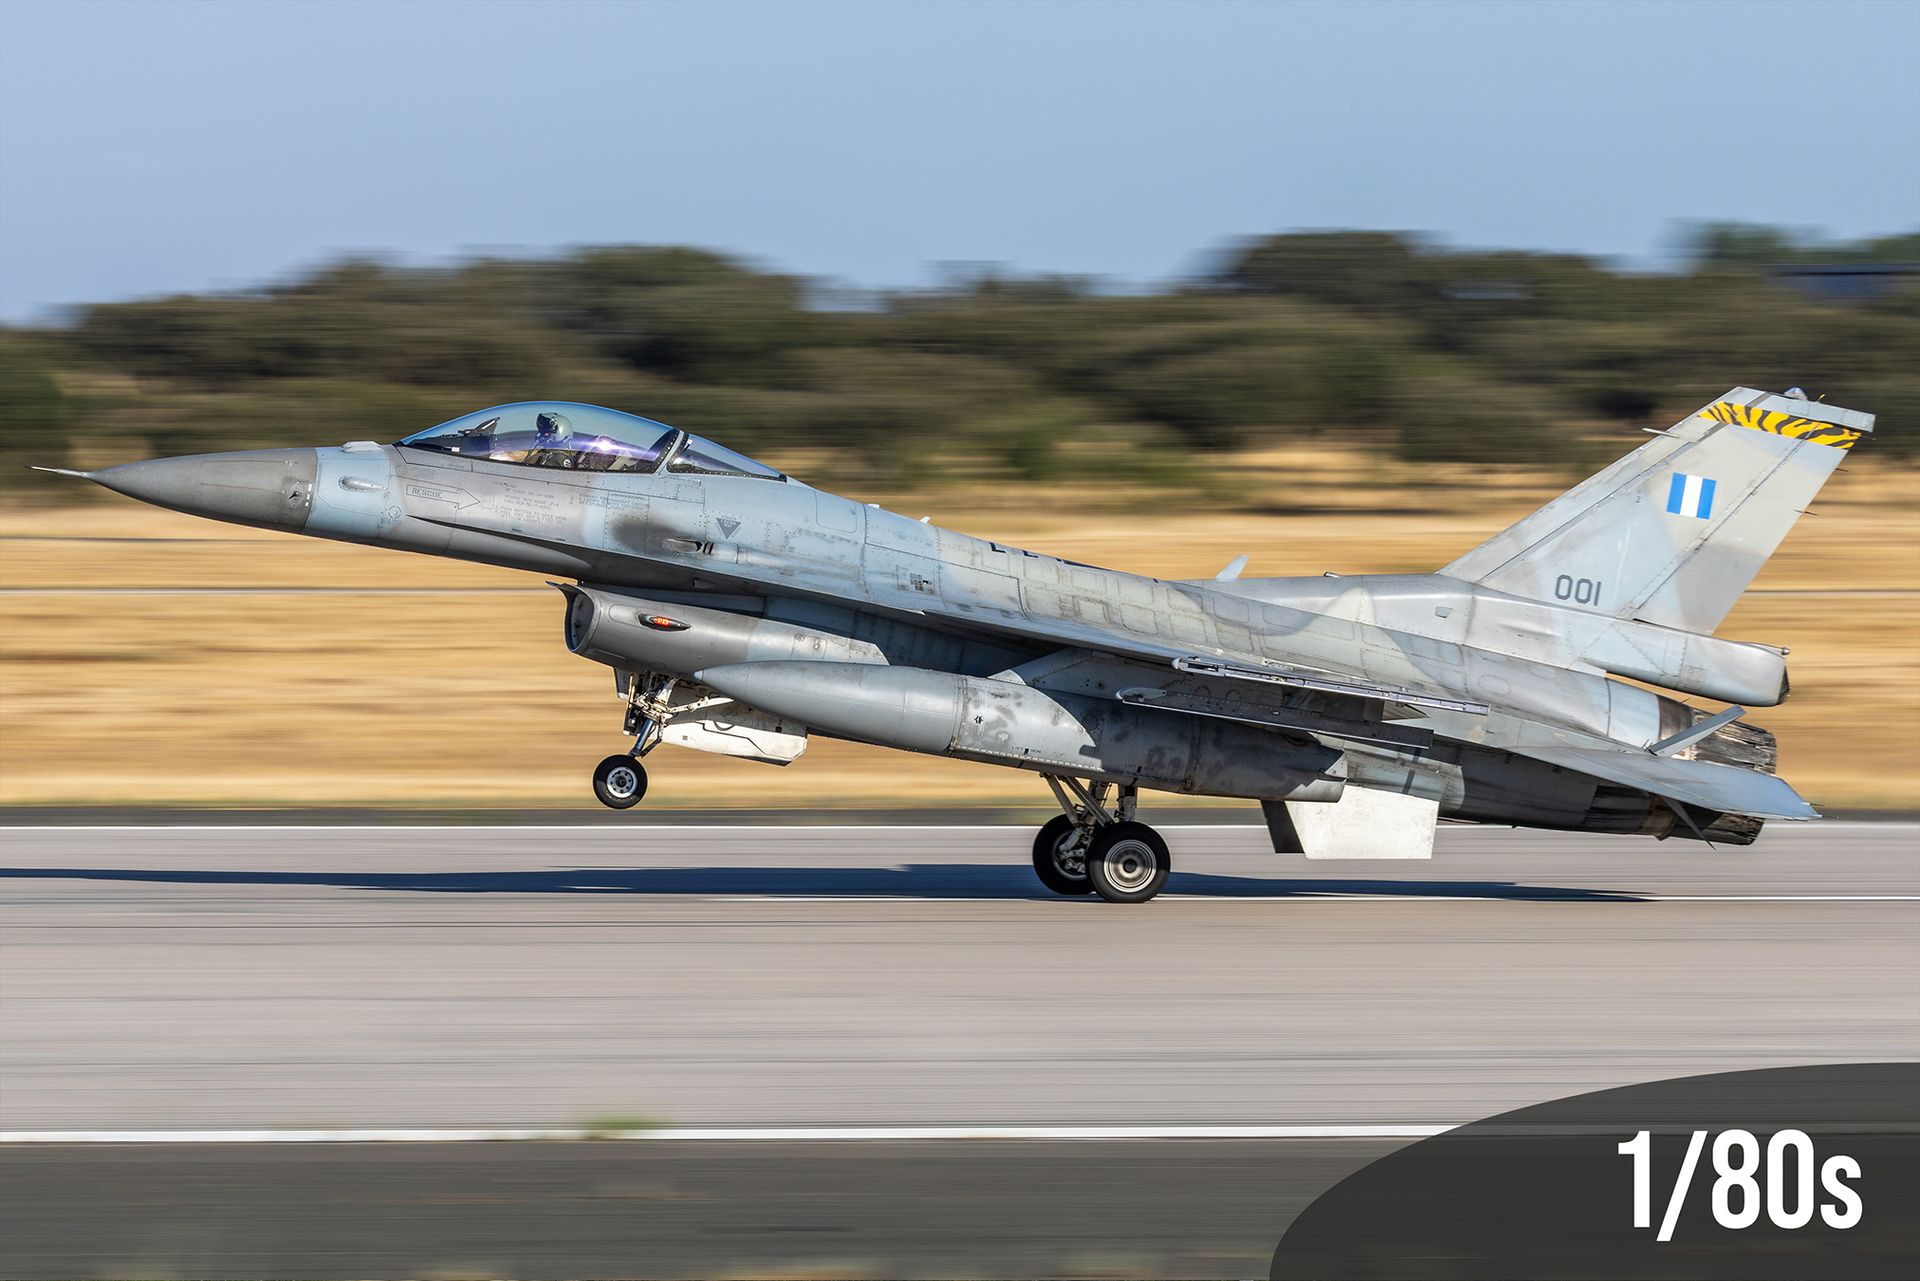
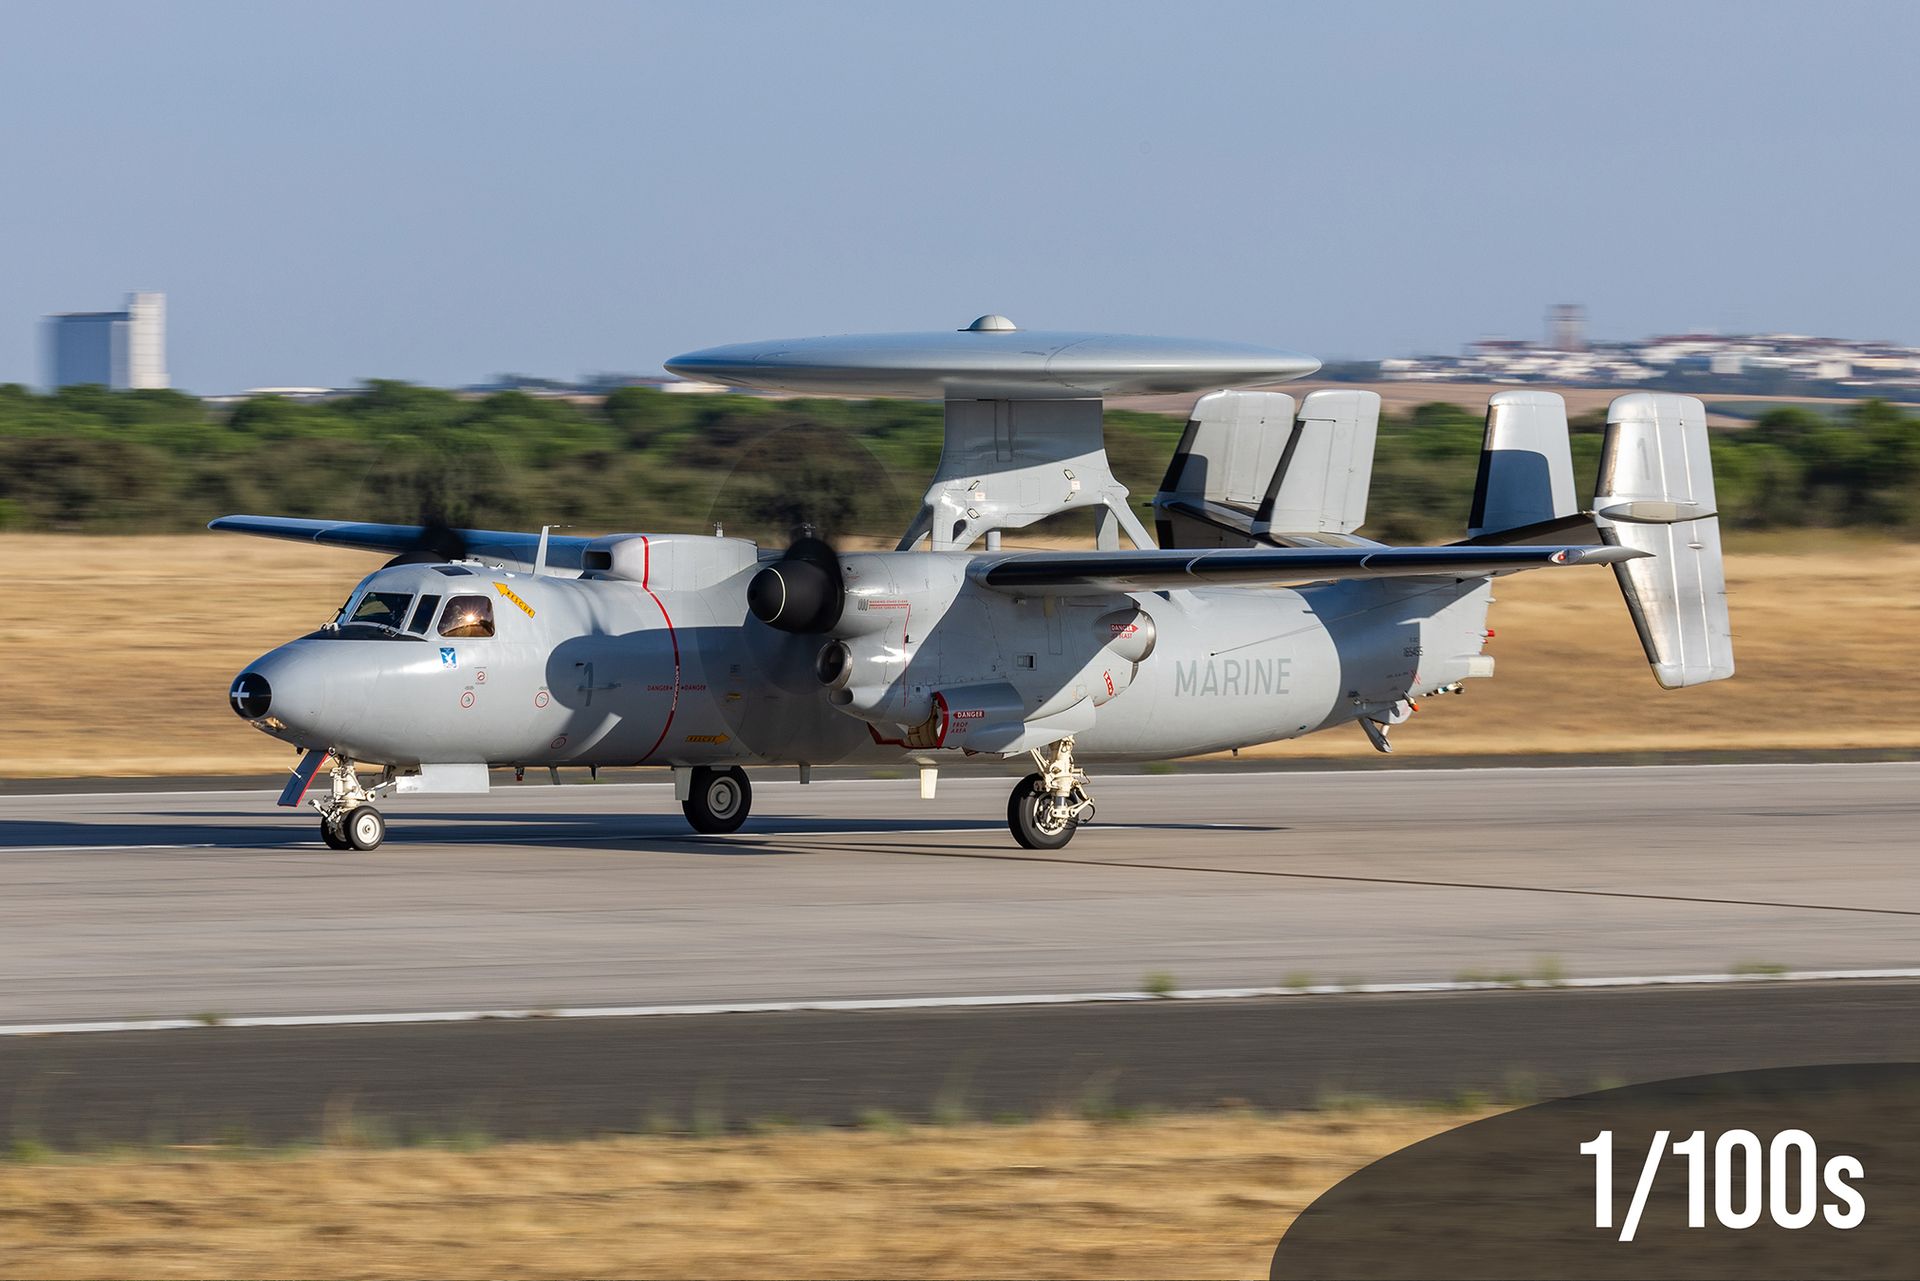
1. Shutter Speed: The "Frozen Rotor" Anomaly and the Pace of the Battlefield
When it comes to military and aviation photography, your shutter speed is the most critical narrative tool you possess. It dictates the kinetic energy of the scene - whether you are aiming at the sky or the dirt.
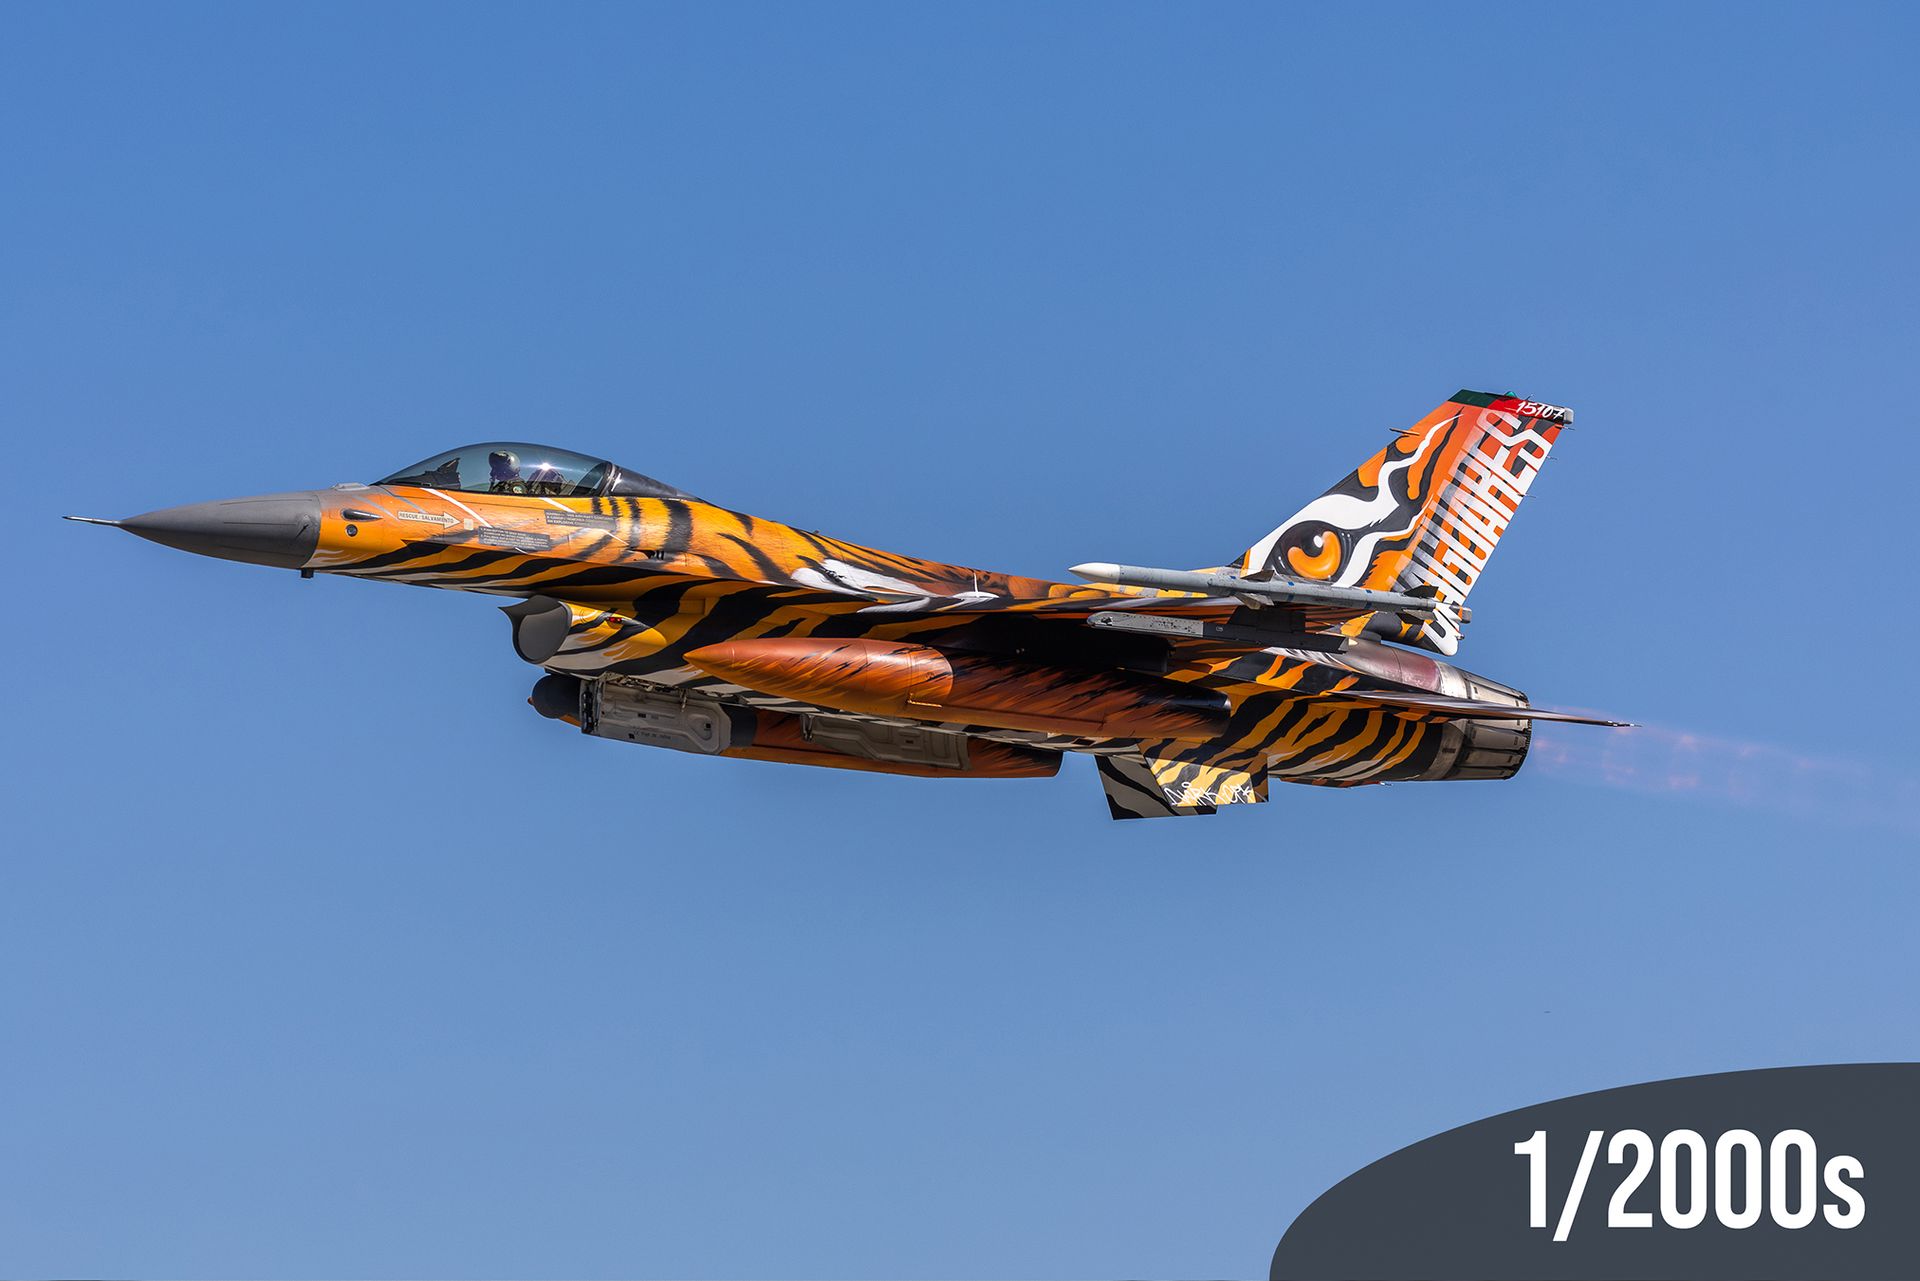
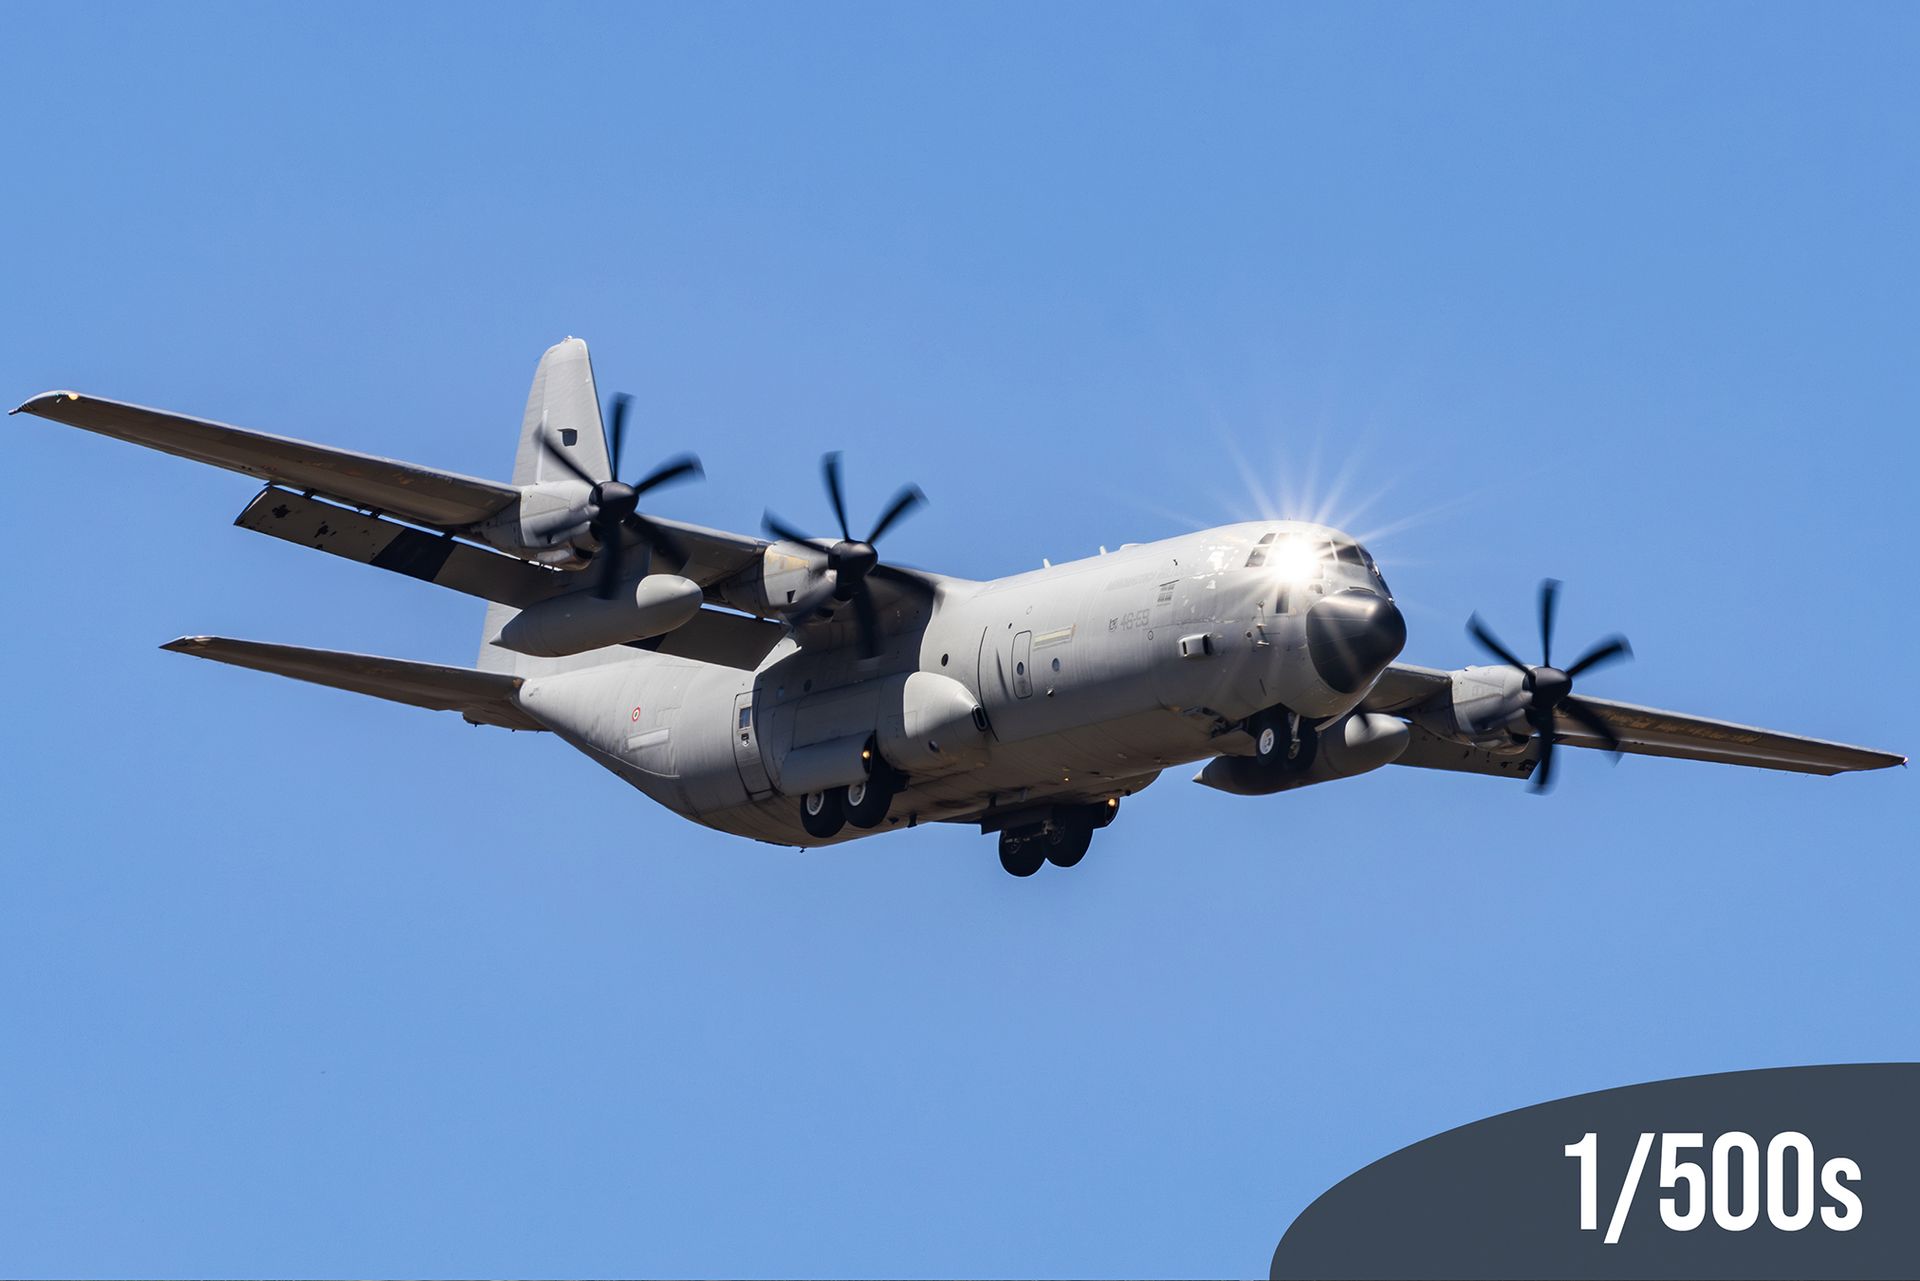
One of the most common, and glaring, mistakes made by newcomers is the instinctive urge to shoot at extremely high shutter speeds (like 1/2000s or faster) as a safety net to guarantee a sharp image. While this works perfectly to freeze a fighter jet passing at Mach 0.9 or an operator fast-roping from a hover, applying this blanket logic to helicopters, propeller-driven aircraft, or moving ground vehicles ruins the narrative.
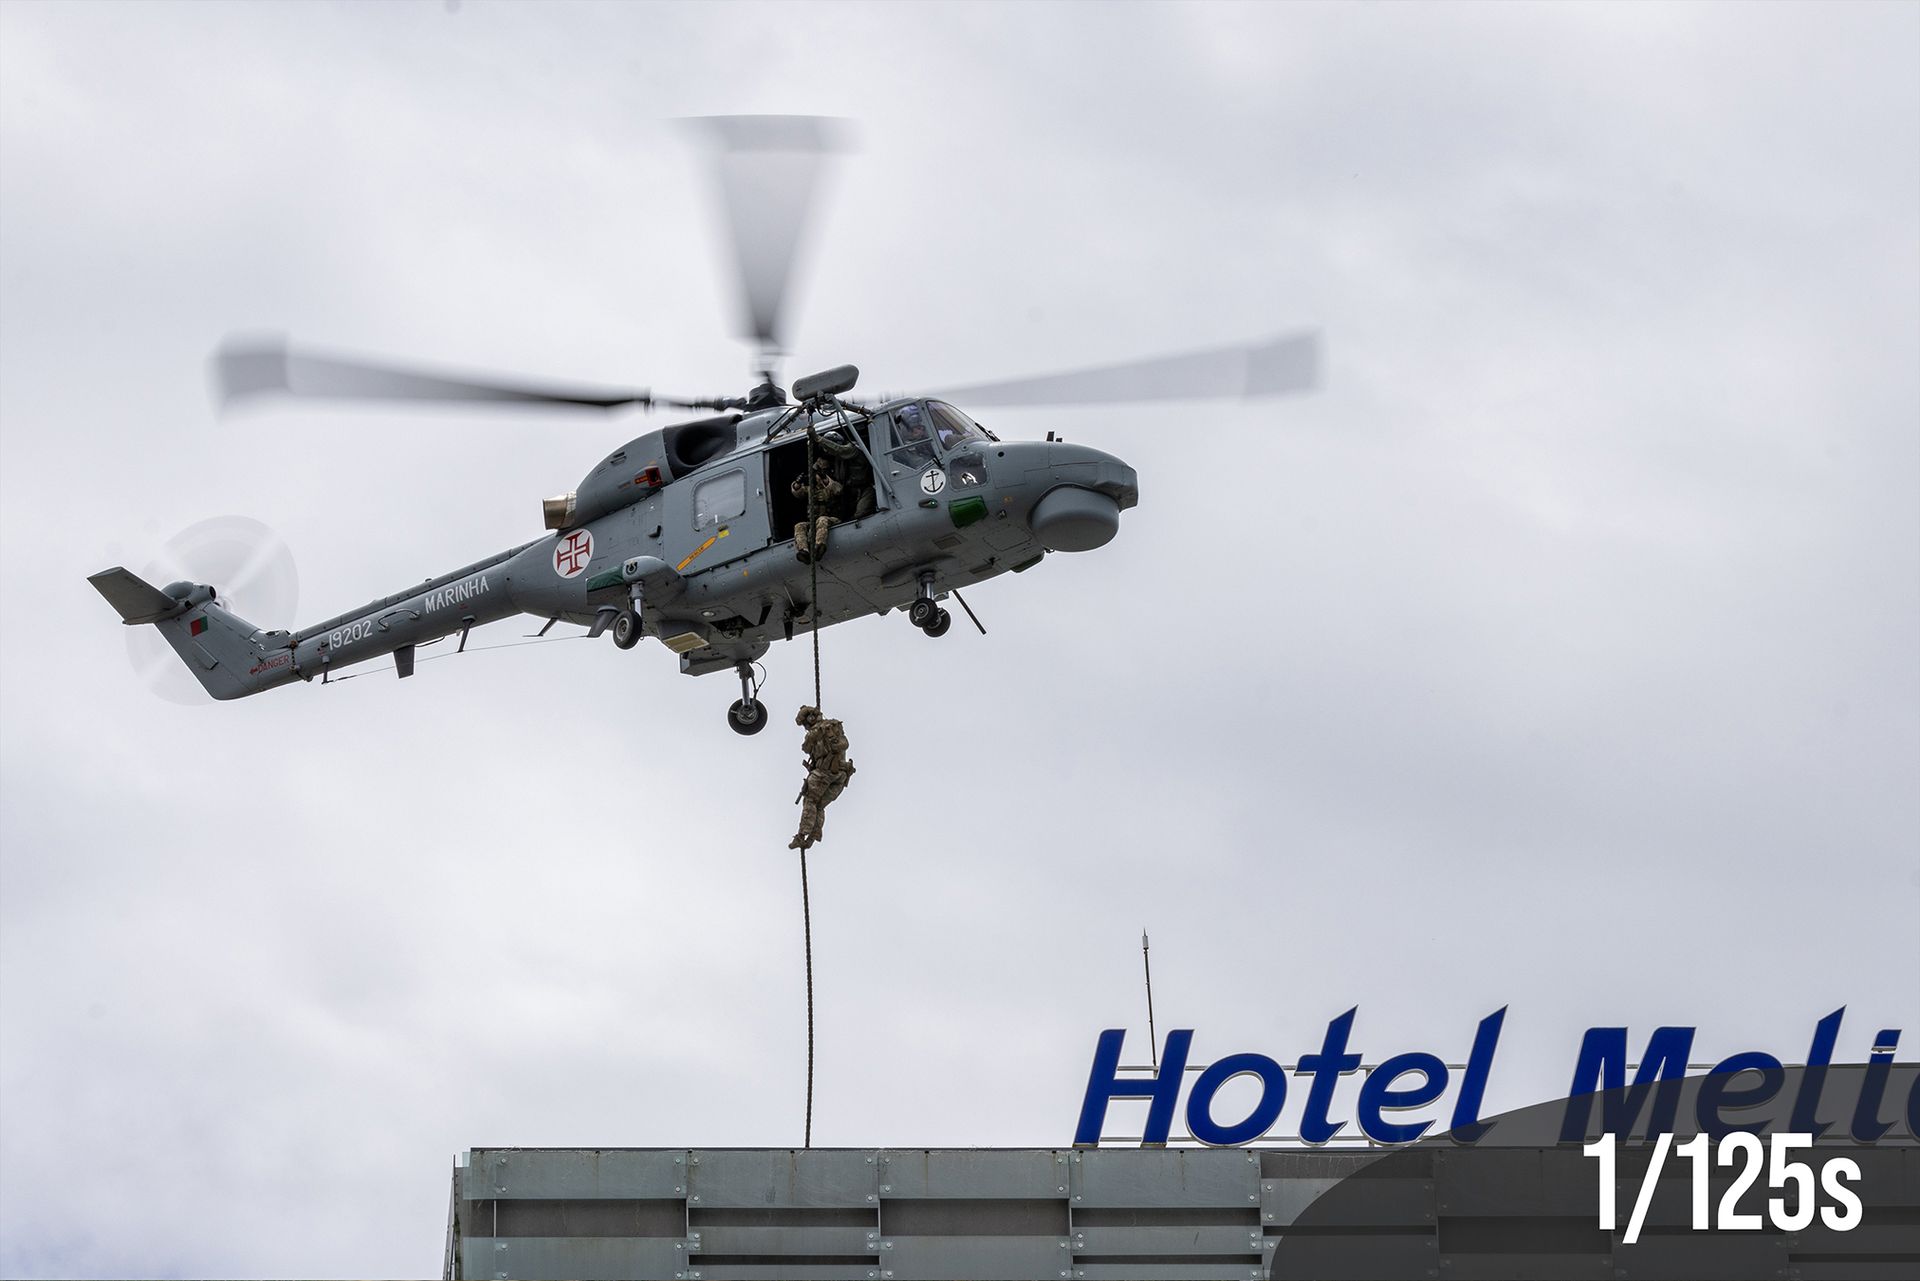
The "Frozen Rotor" Anomaly in Aviation
When you use a high shutter speed on a helicopter or a turboprop, you strip the machine of its energy. The aircraft suddenly looks like a plastic model magically suspended in mid-air, awkwardly hanging in the sky rather than powering through it. To convey raw power, you must intentionally introduce motion blur to the blades while keeping the fuselage tack-sharp through panning.
- Rotary Wings: The sweet spot usually lies between 1/60s and 1/125s. This creates a dynamic blur that tells the viewer the engines are screaming.
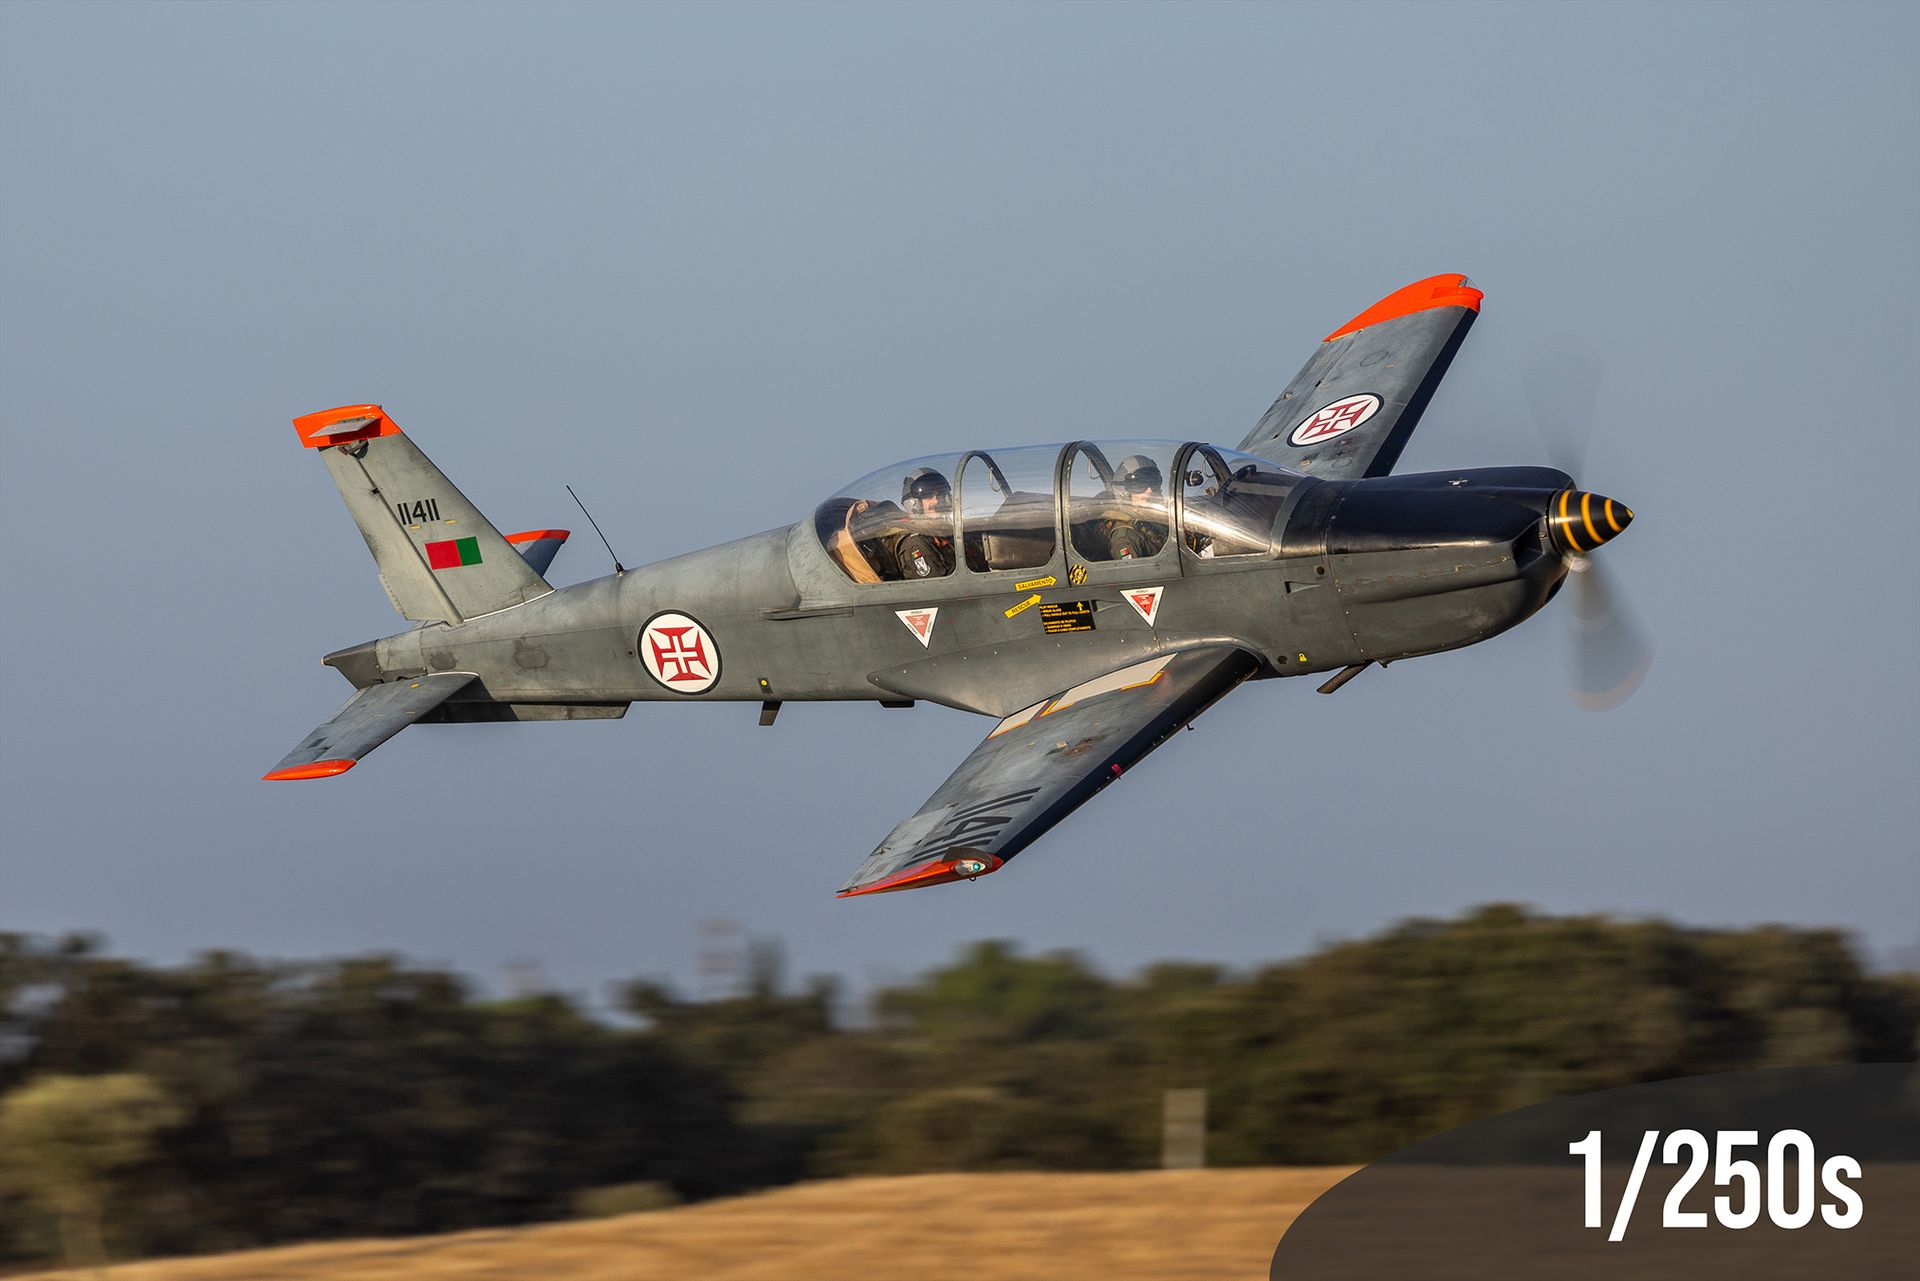
- Propeller Aircraft: You can often get away with slightly faster speeds, around 1/160s to 1/250s, to achieve a satisfying prop blur.
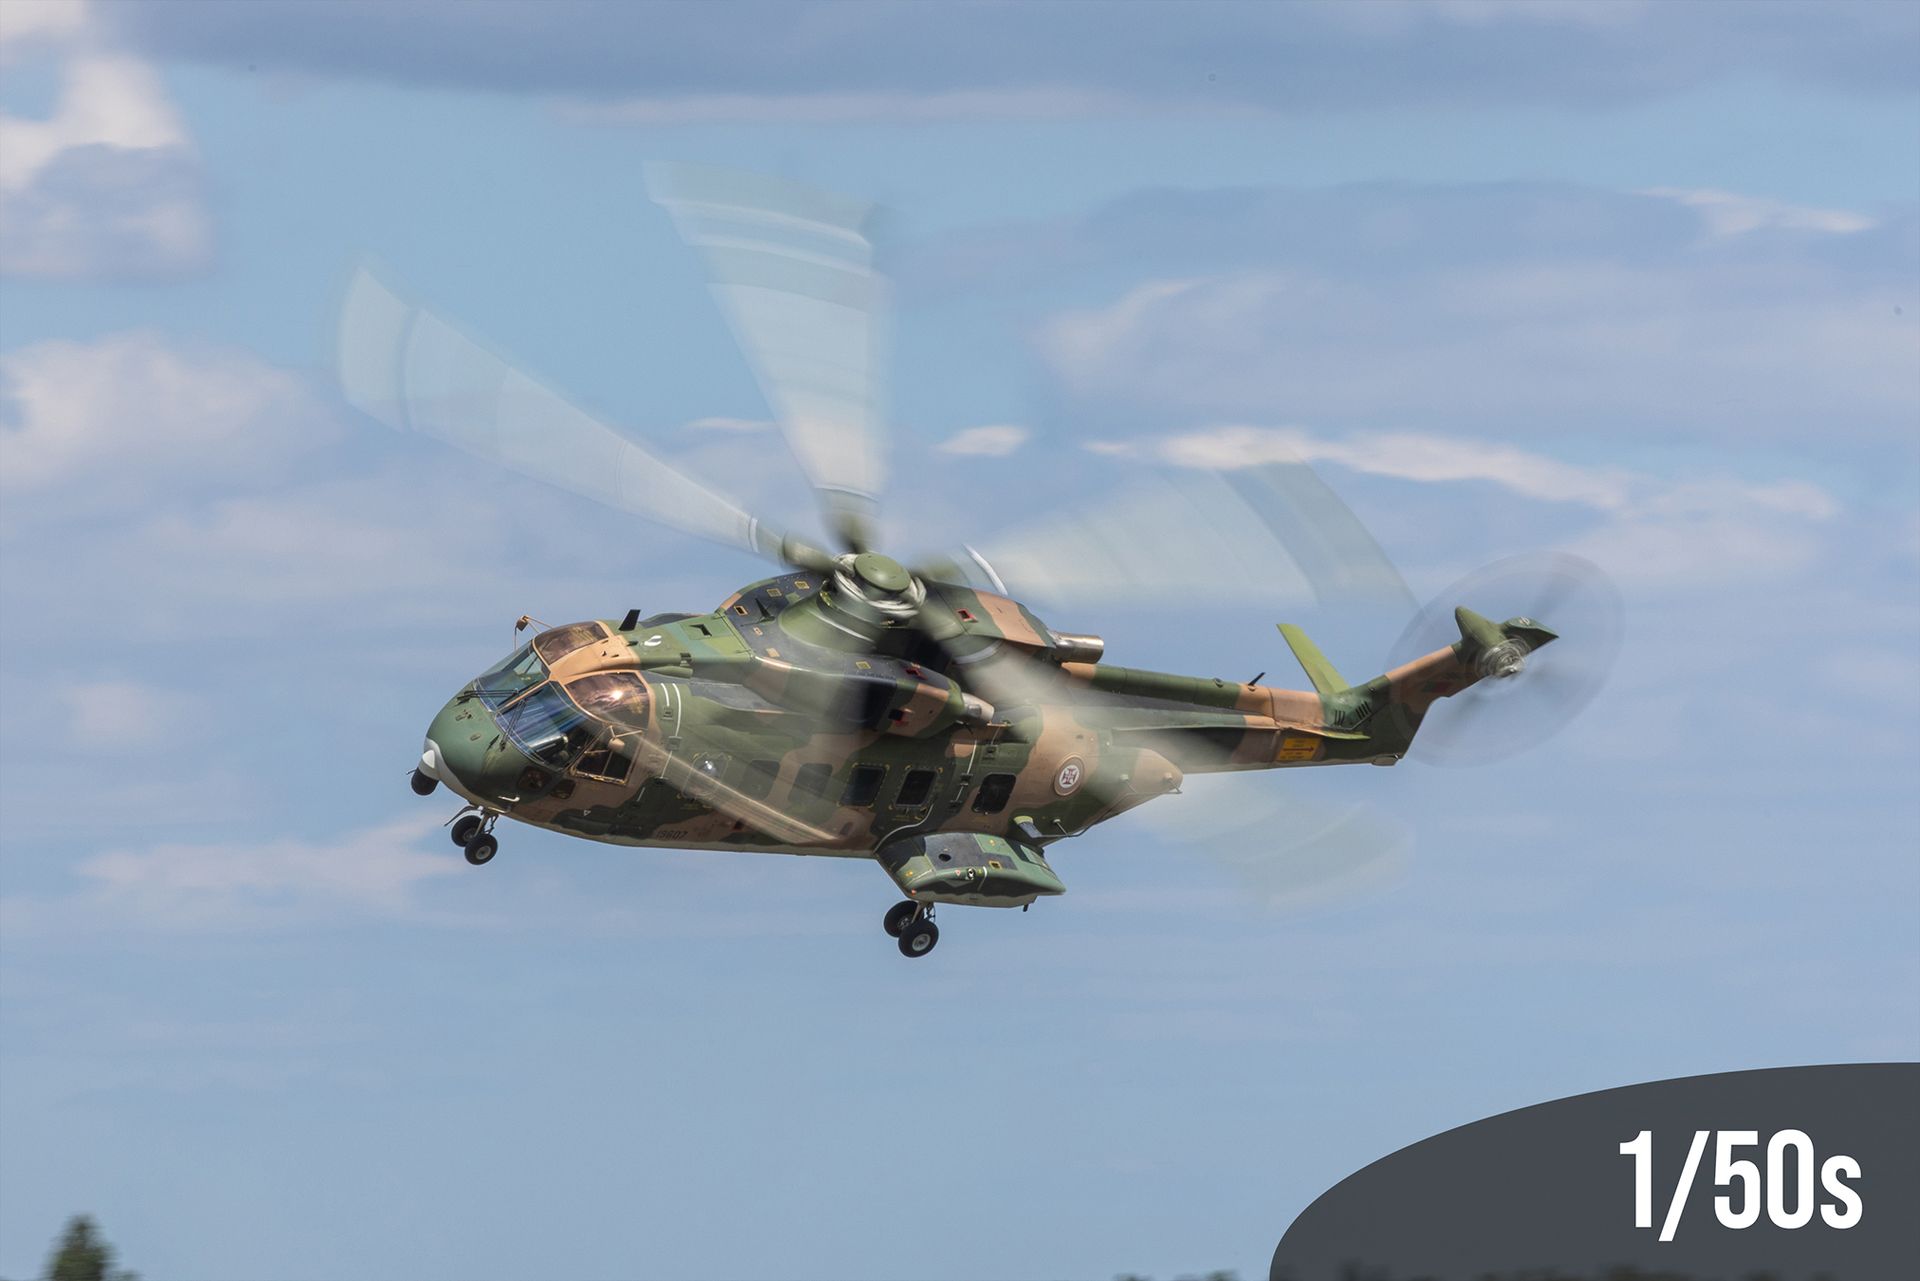
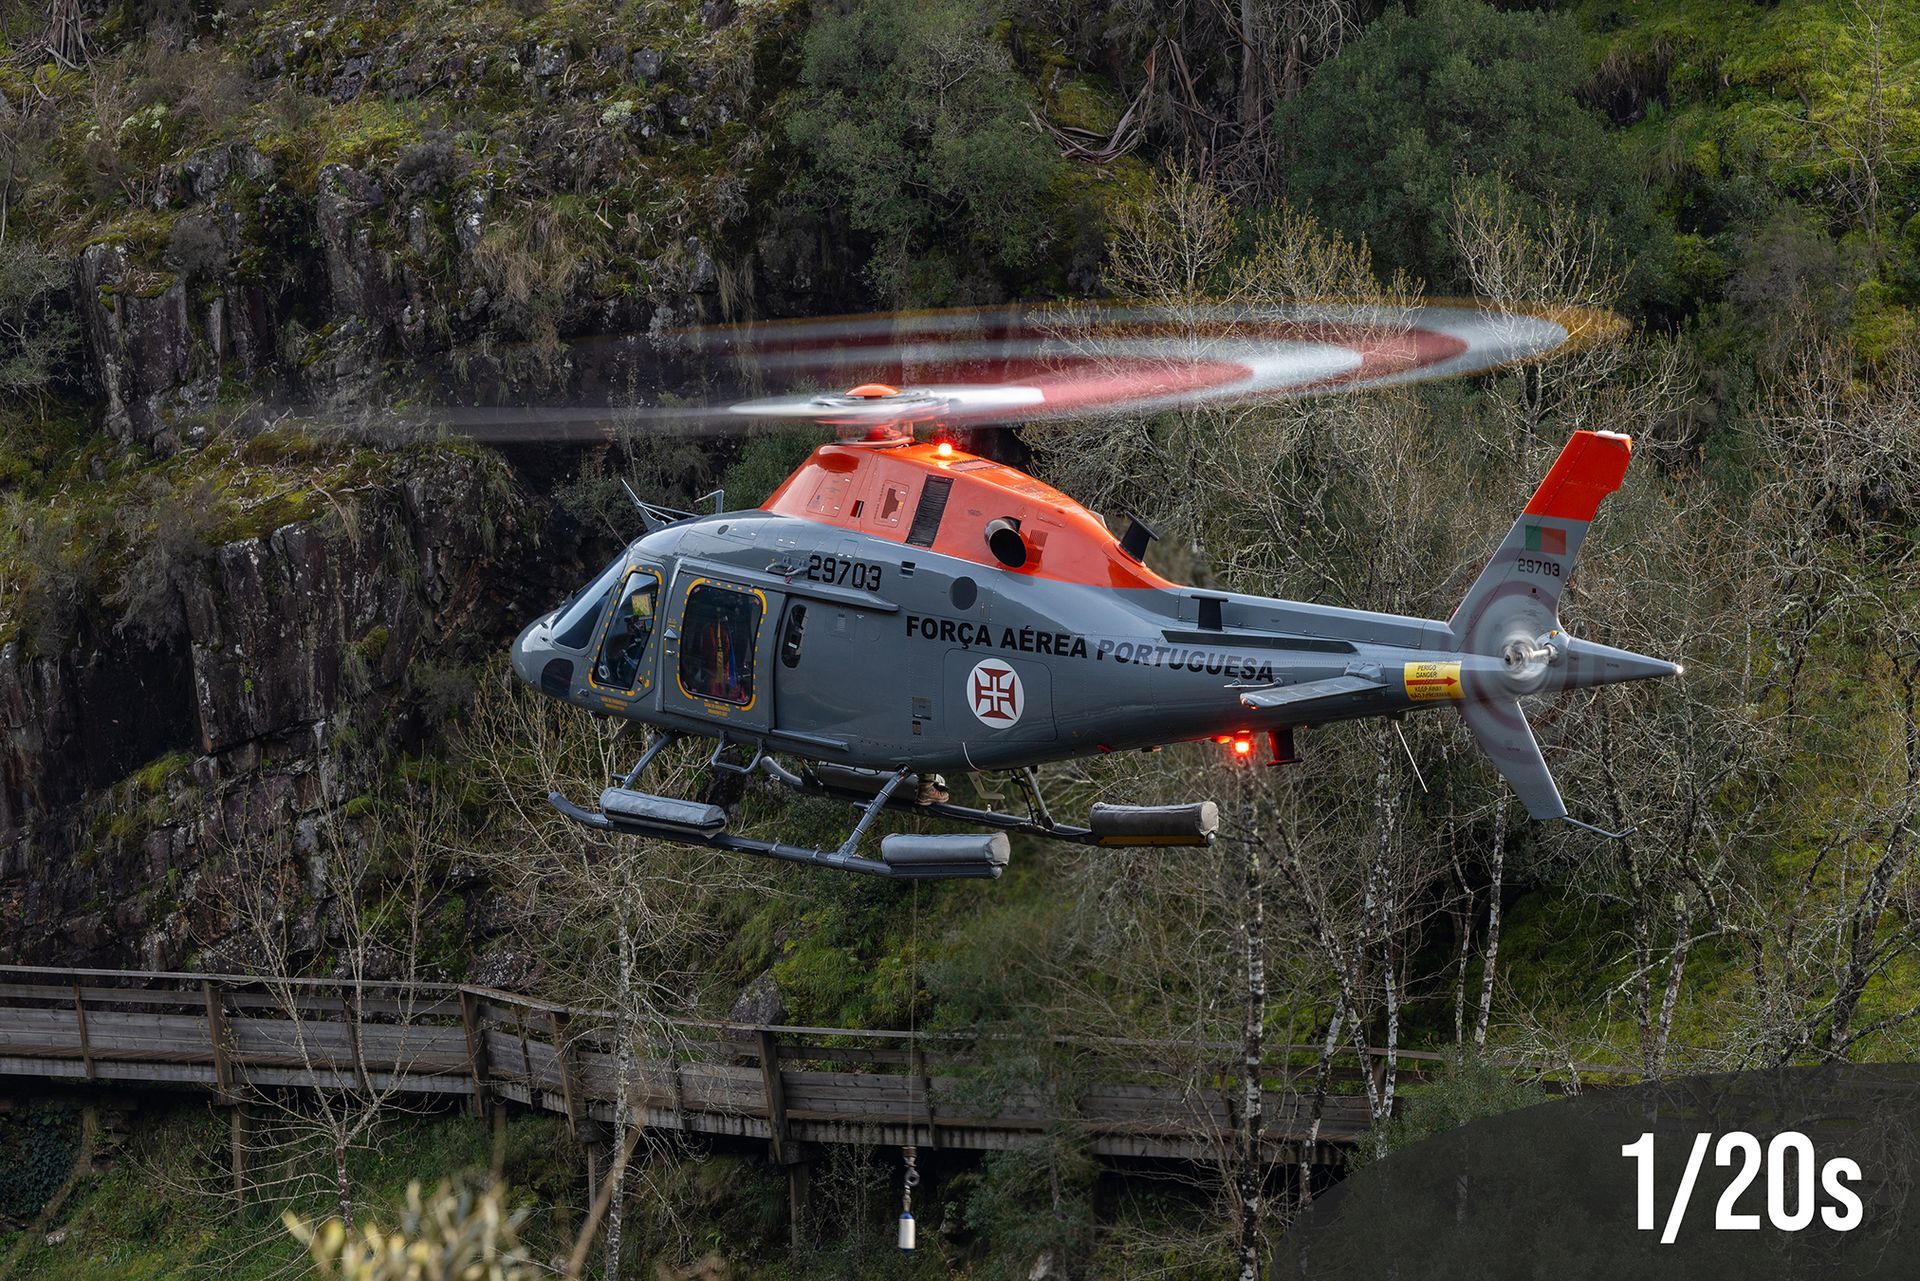
📋 Tactical Field Note: Rotor Blur Execution
If you are heading into an Airshow, a Spotters Day, or a live exercise, memorize this baseline configuration for helicopters:
- Shooting Mode: Shutter Priority (Tv on Canon / S on Nikon/Sony) to lock in your kinetic settings.
- Shutter Speed: Start at 1/250s and progressively step down as you dial in your panning rhythm.
- ISO: Start at 100 (Base ISO), but remember our previous rule - adjust as the light dictates.
- Autofocus Area: Single-Point AF. Pinpoint the cockpit or the main rotor mast. Do not let the camera guess.
- Autofocus Mode: Continuous AF (AI-Servo for Canon / AF-C for Nikon/Sony) to track the aircraft as it closes the distance.
- Execution: Smooth panning mechanics are mandatory. Lock onto the fuselage, follow its trajectory seamlessly, and let the blades drag.
Momentum on the Ground
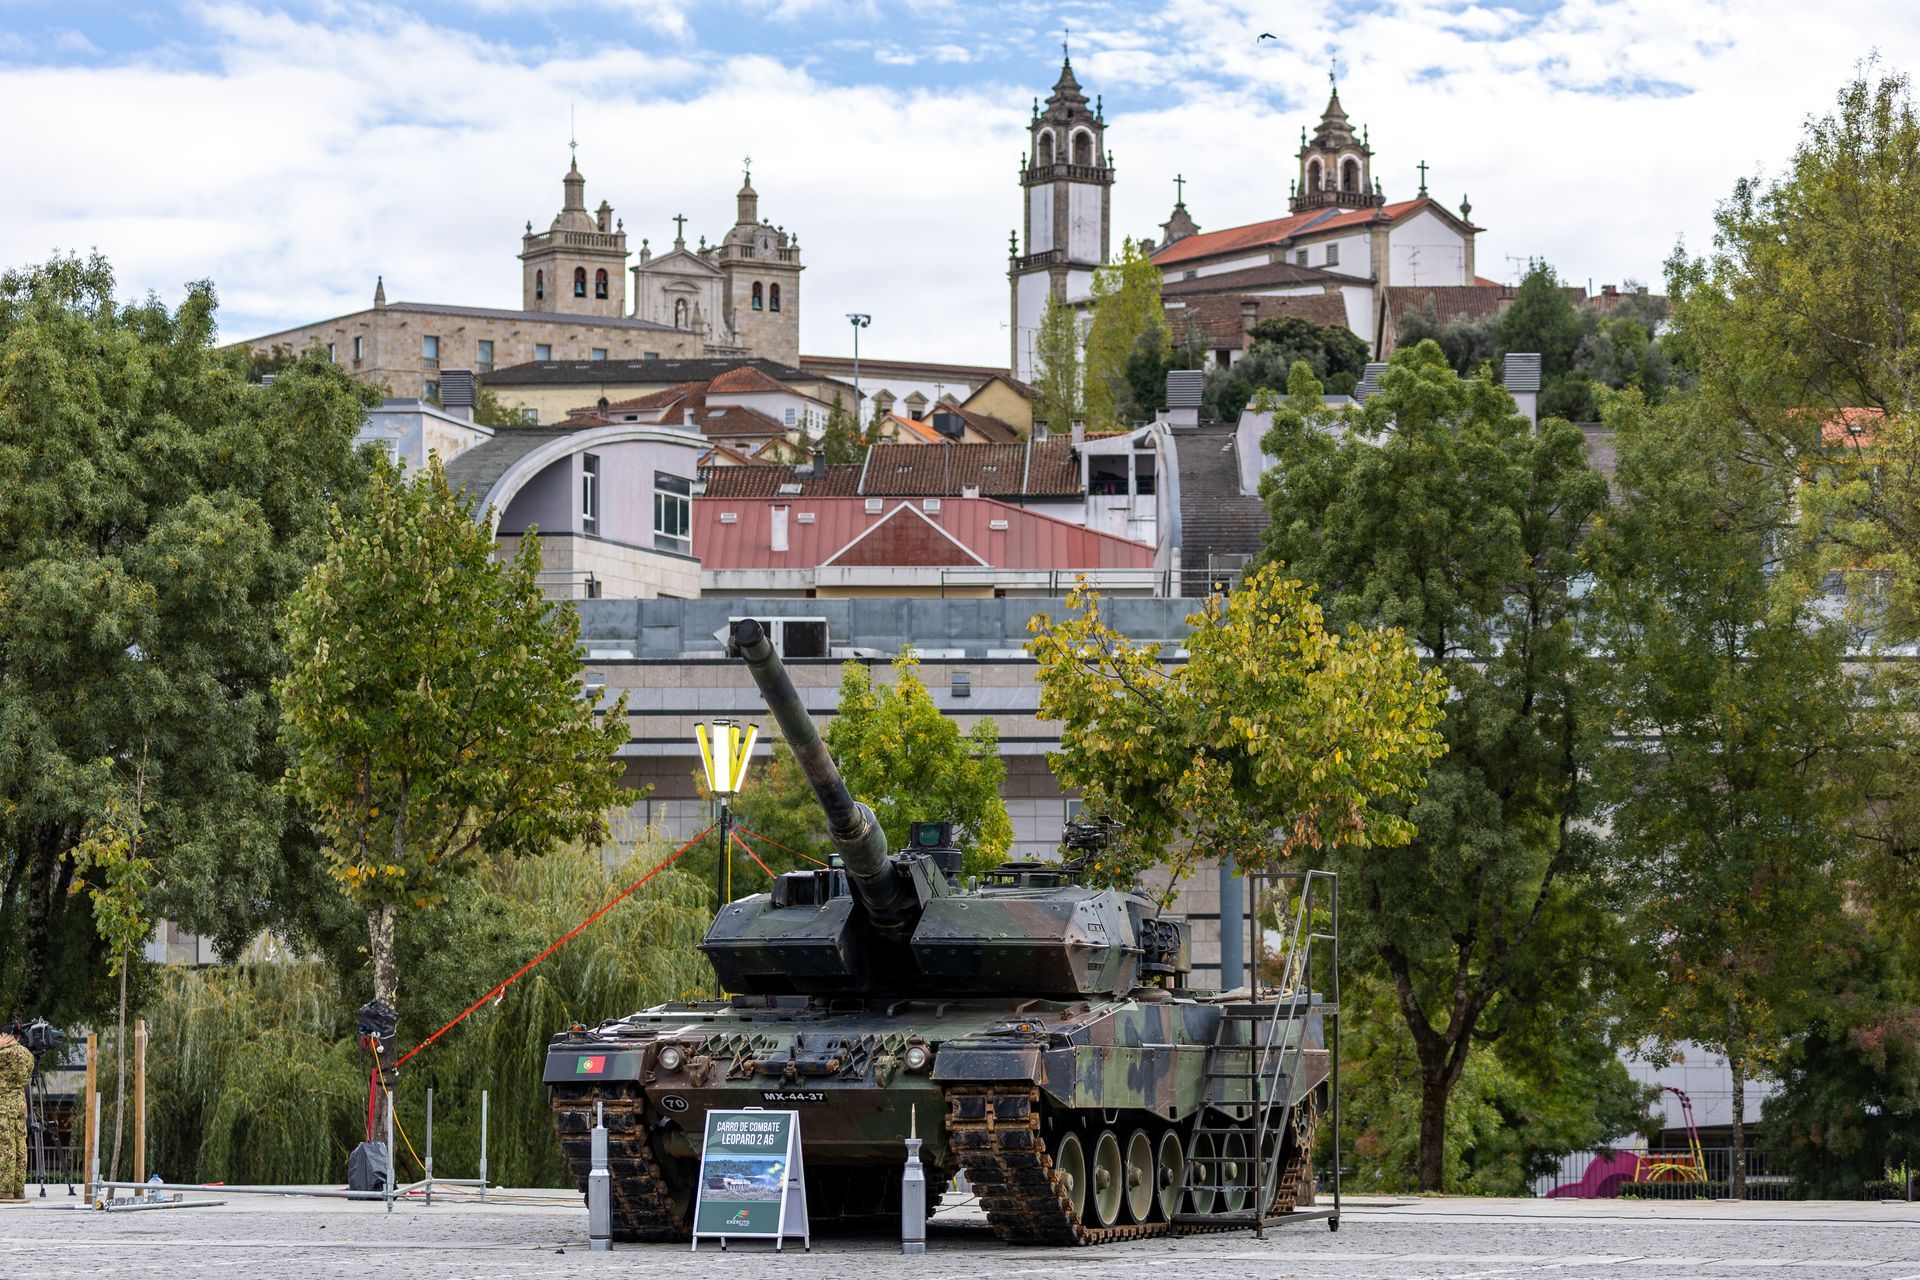
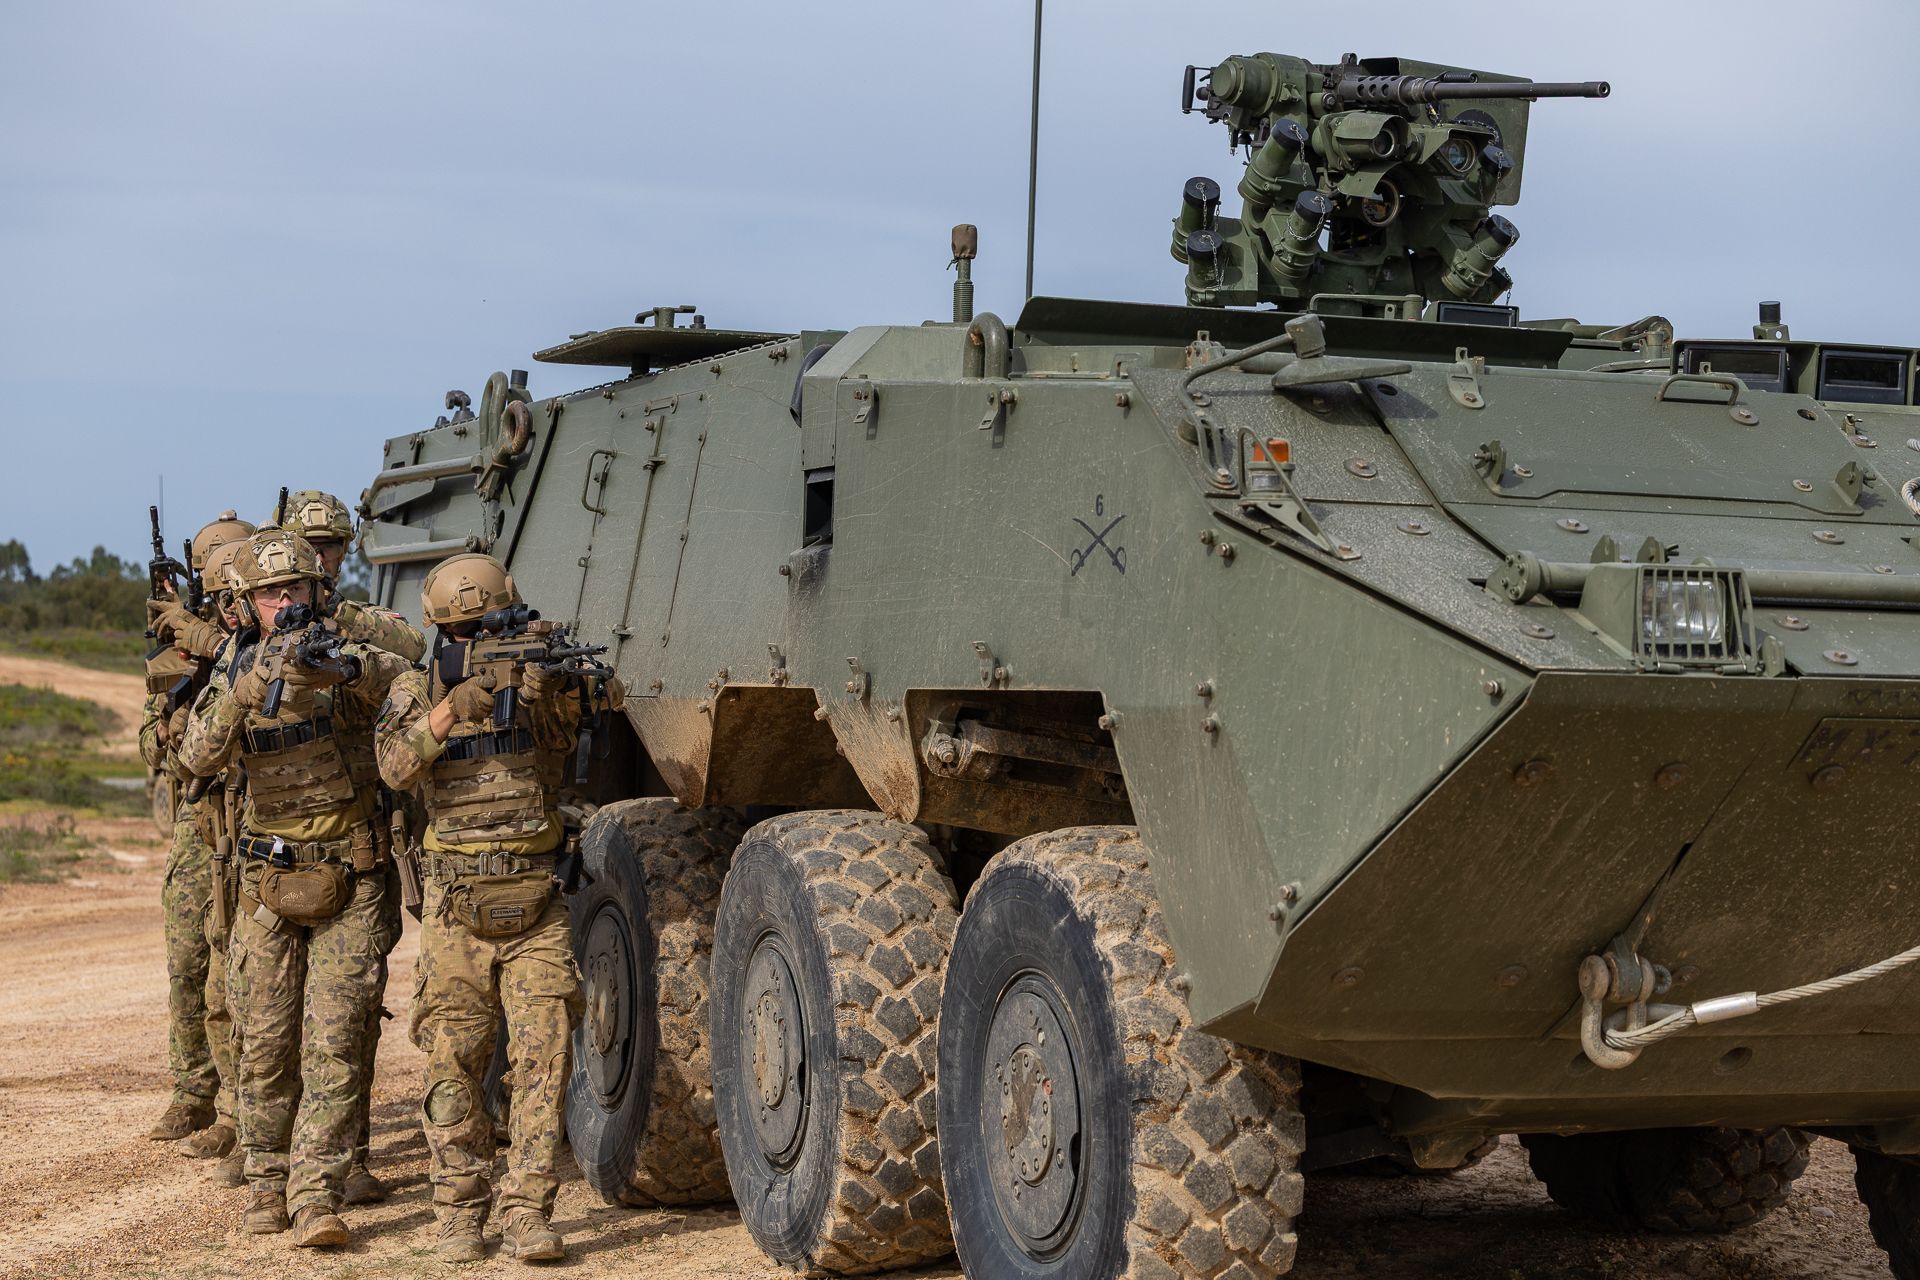
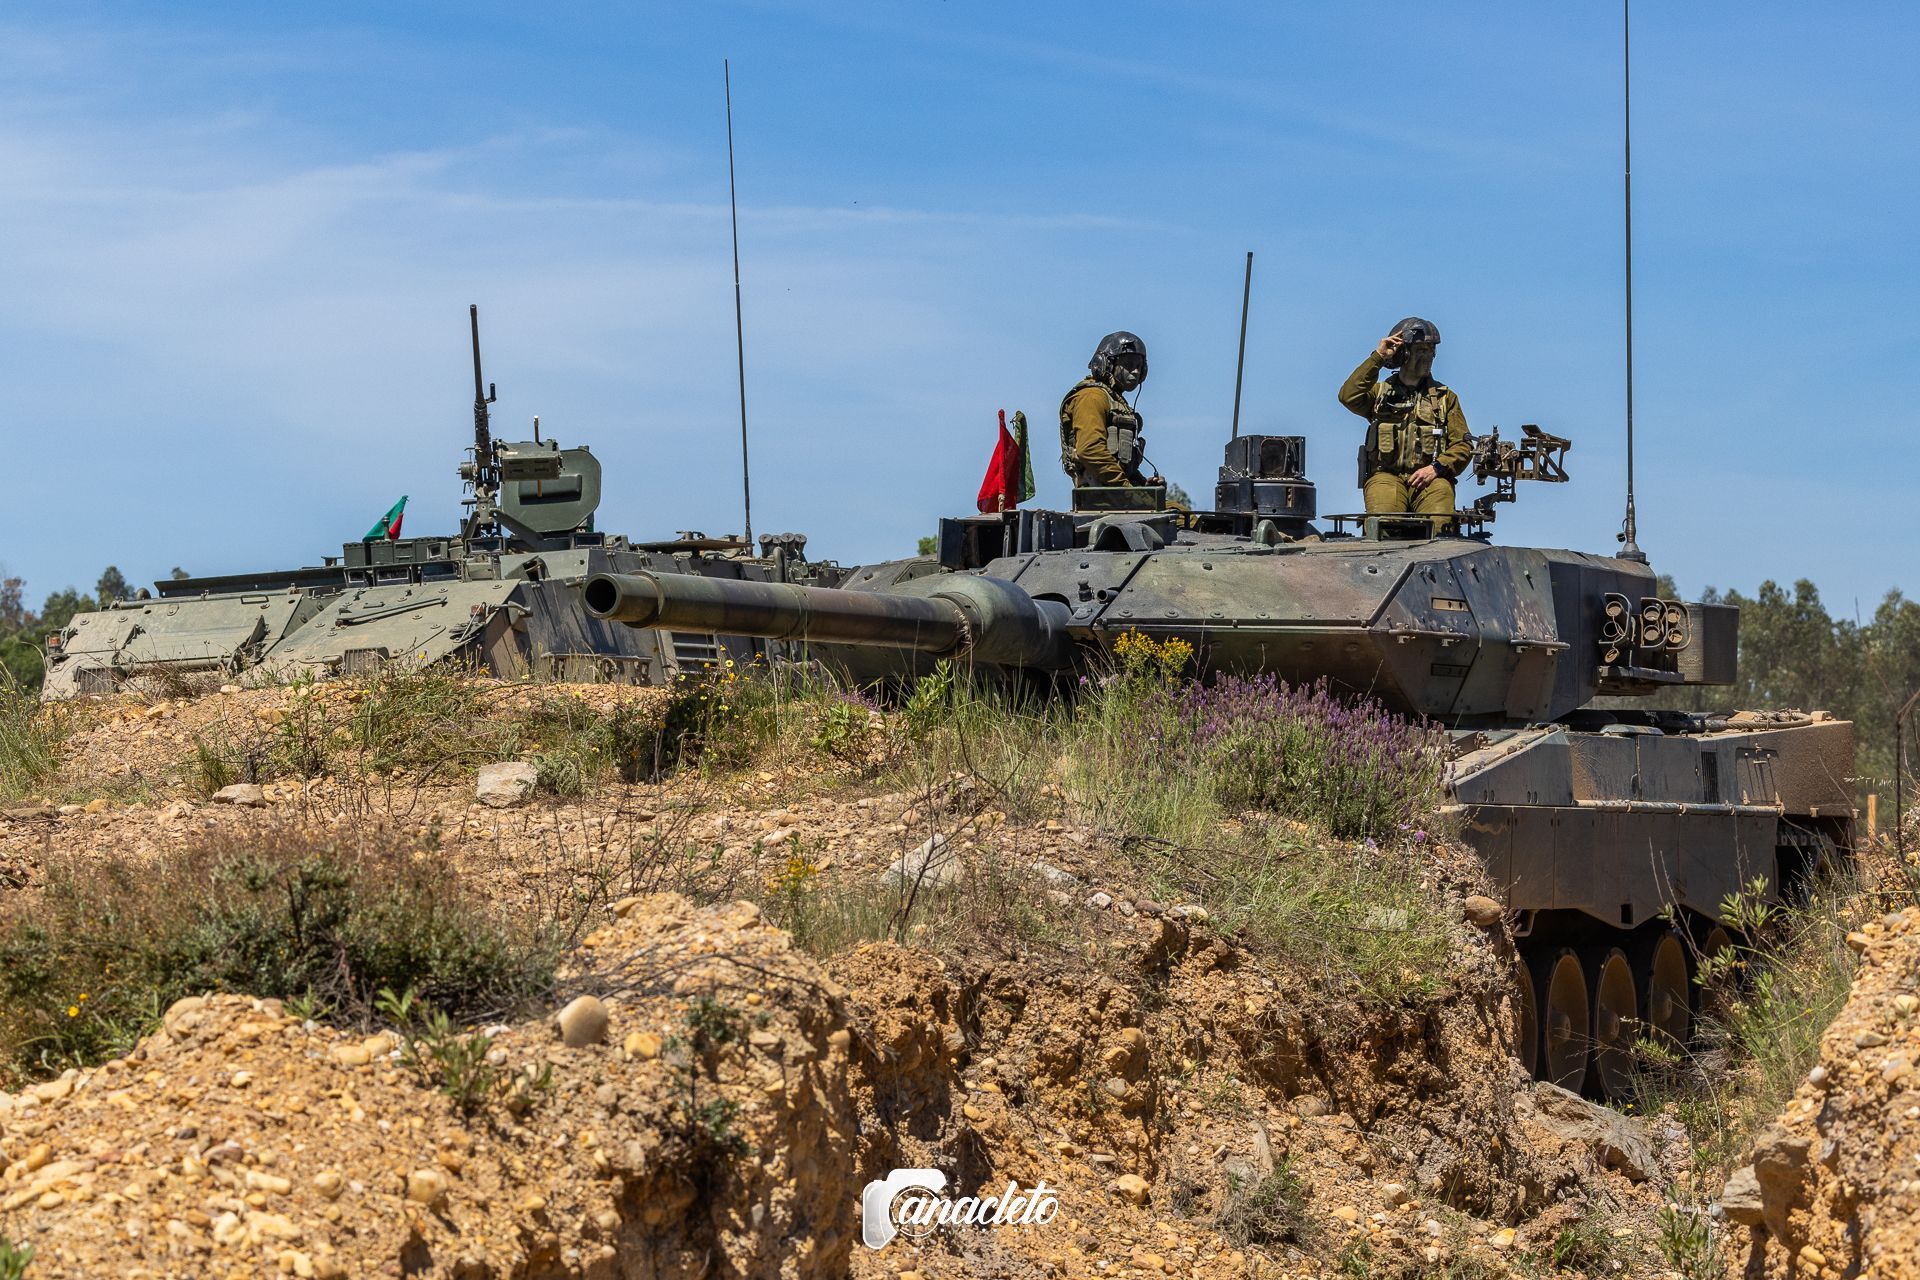
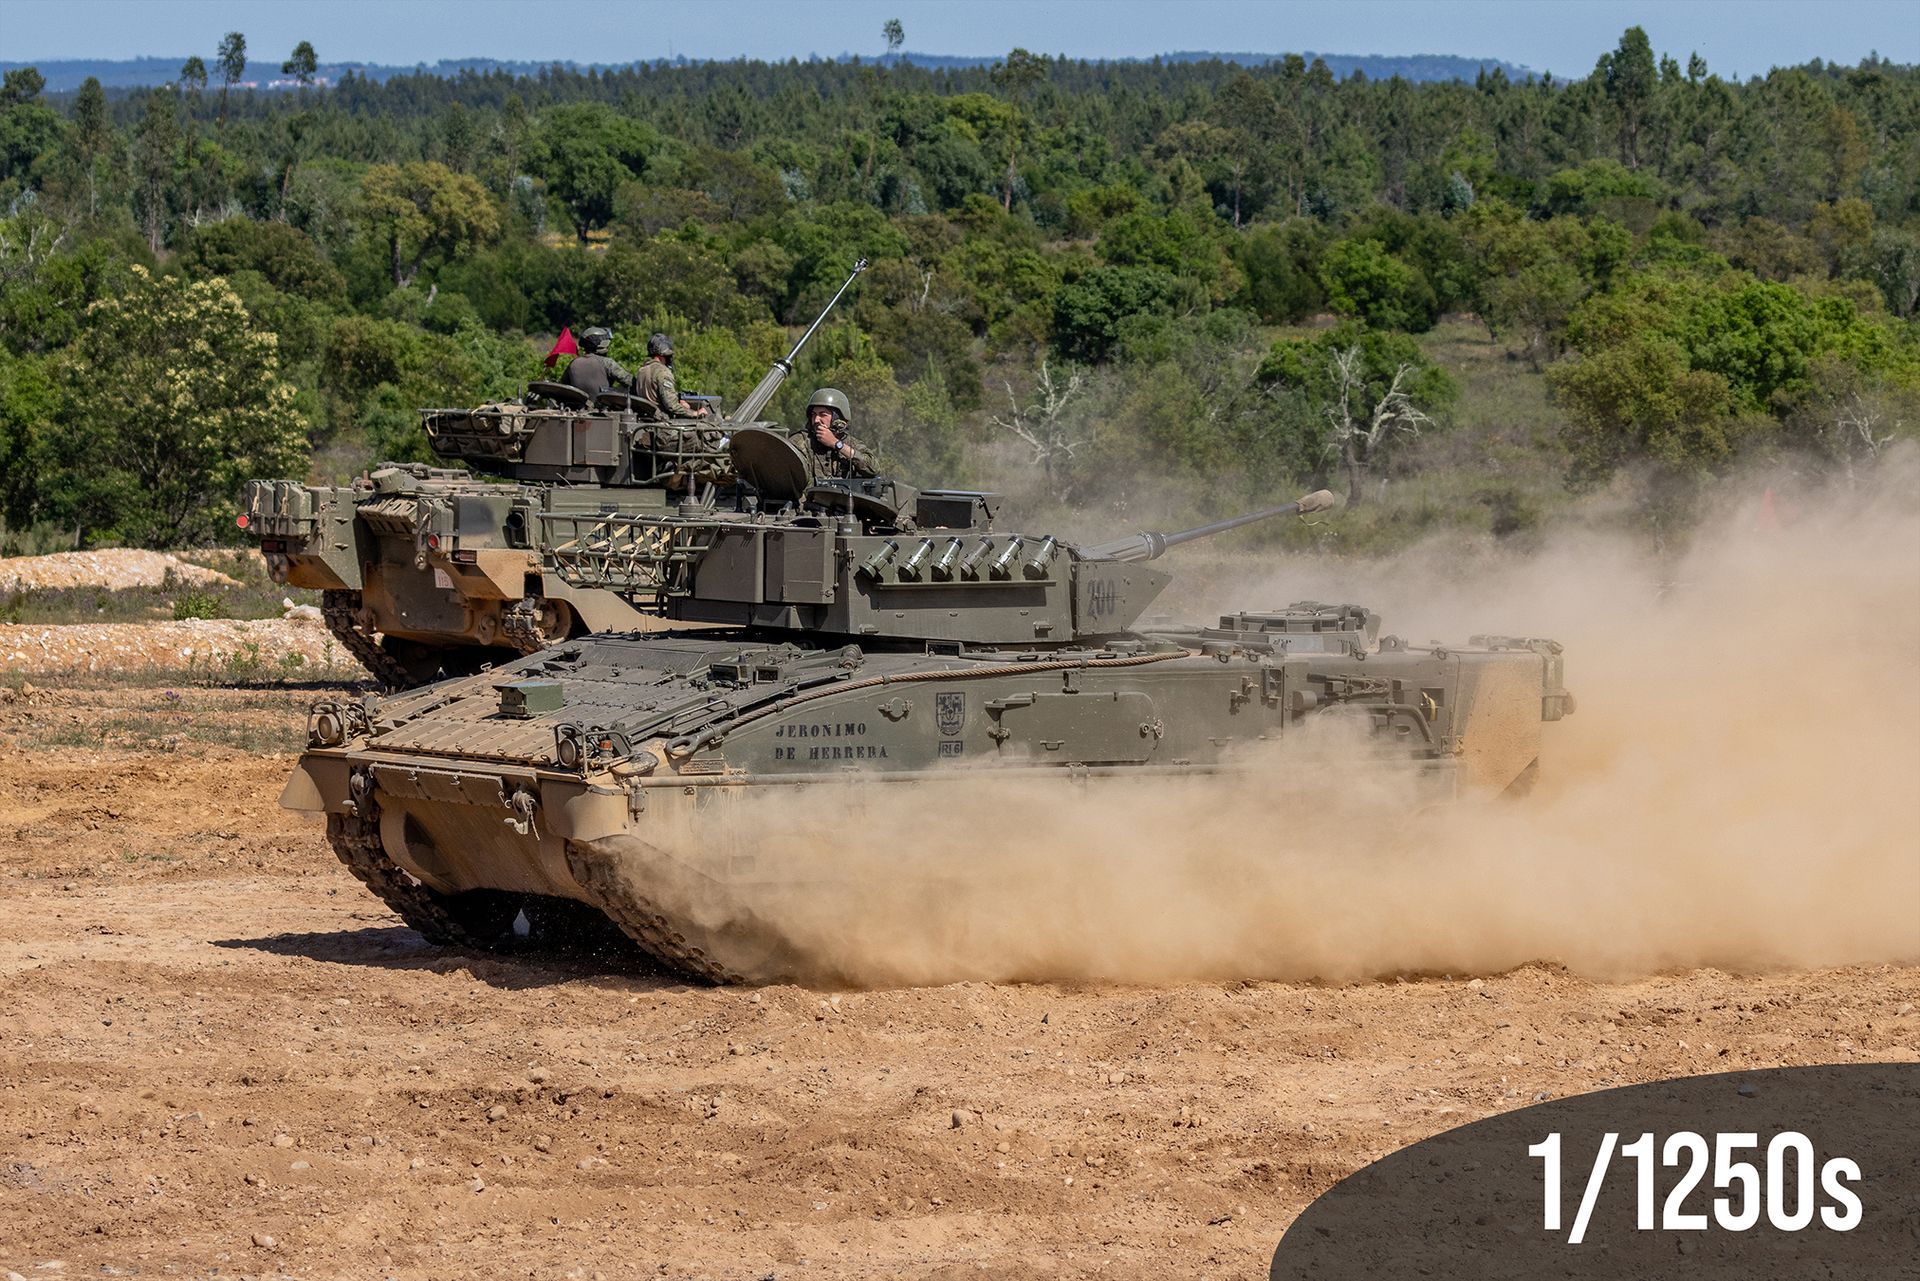
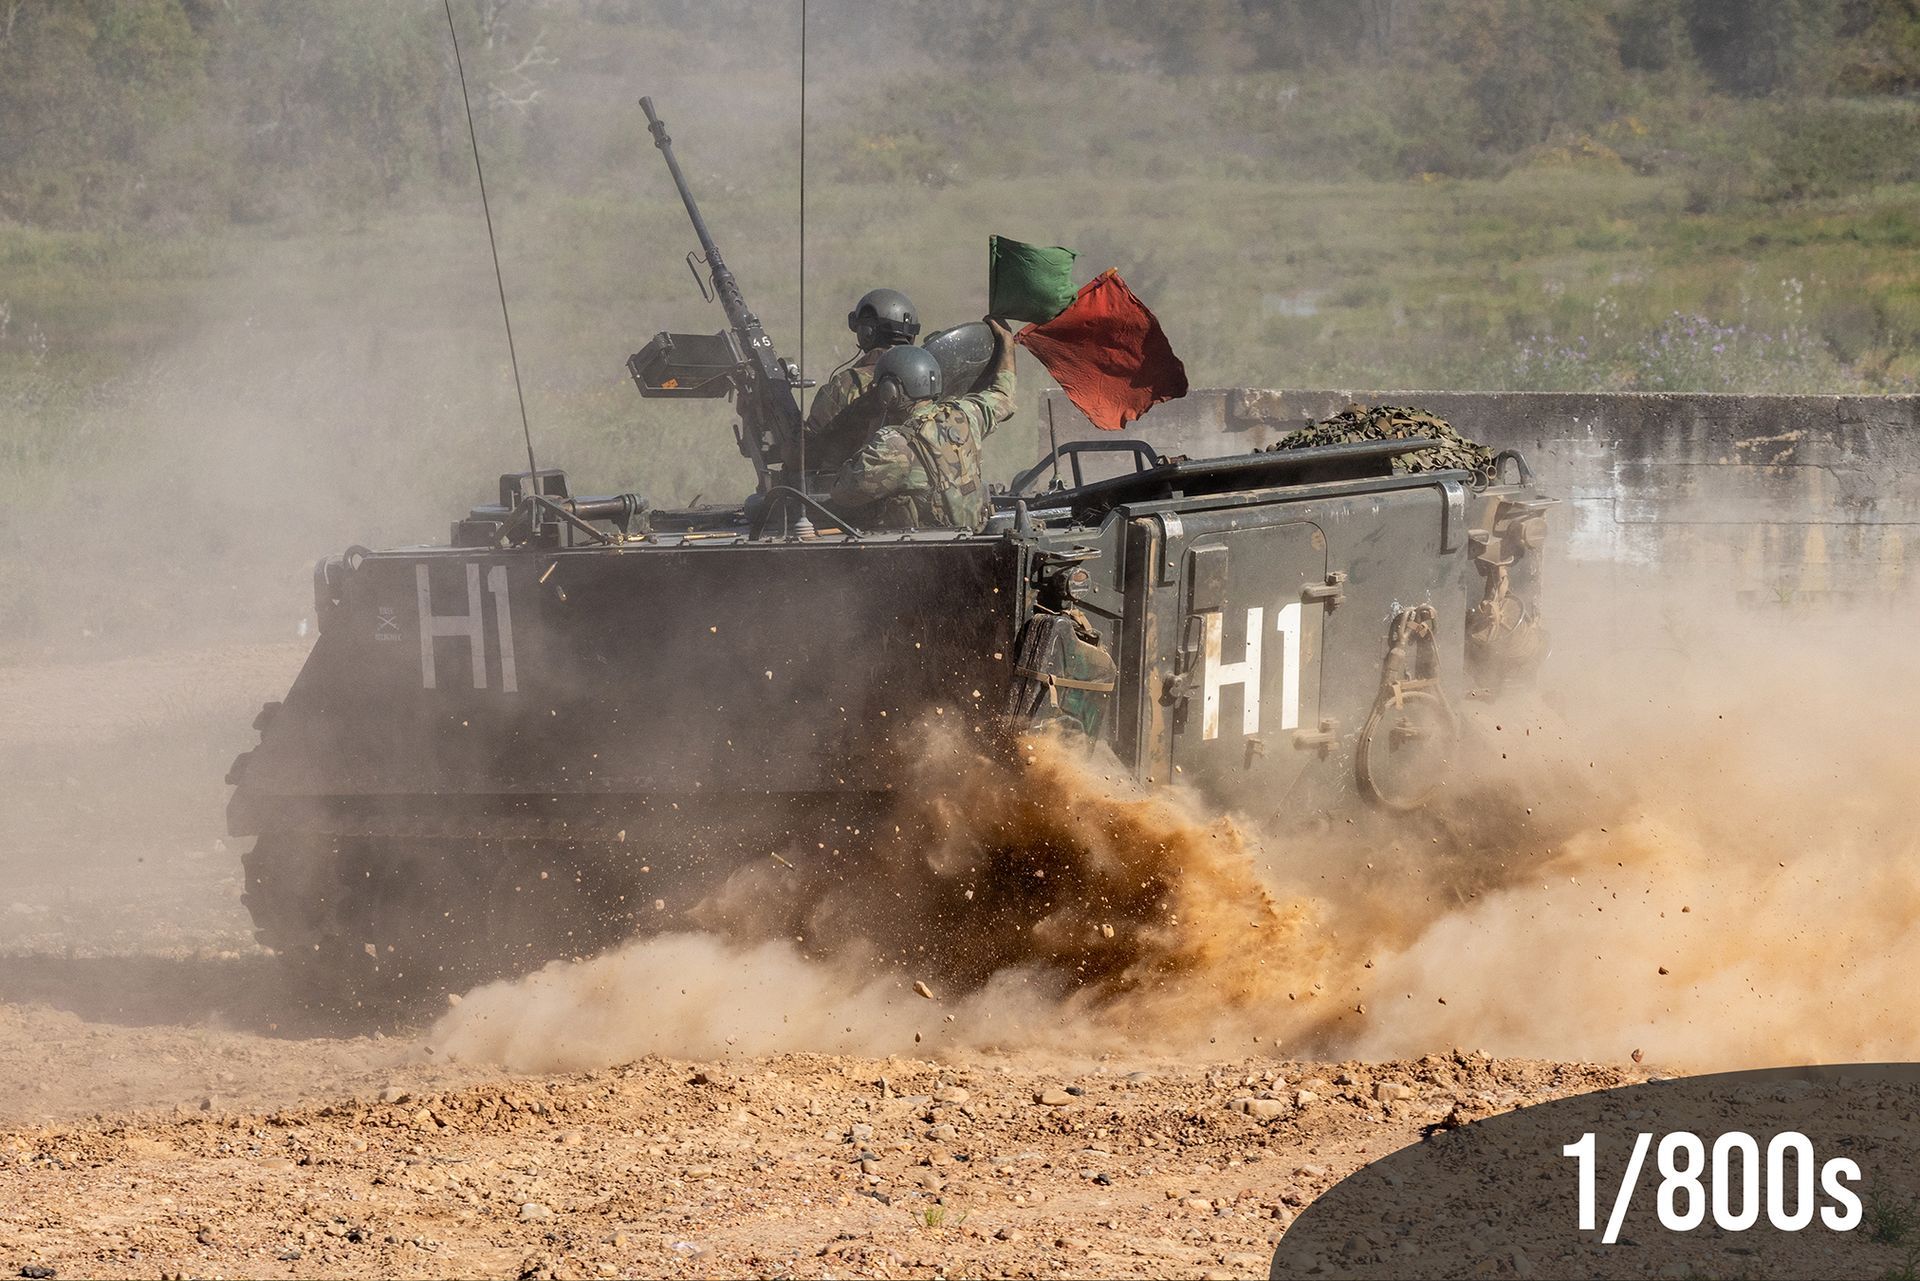
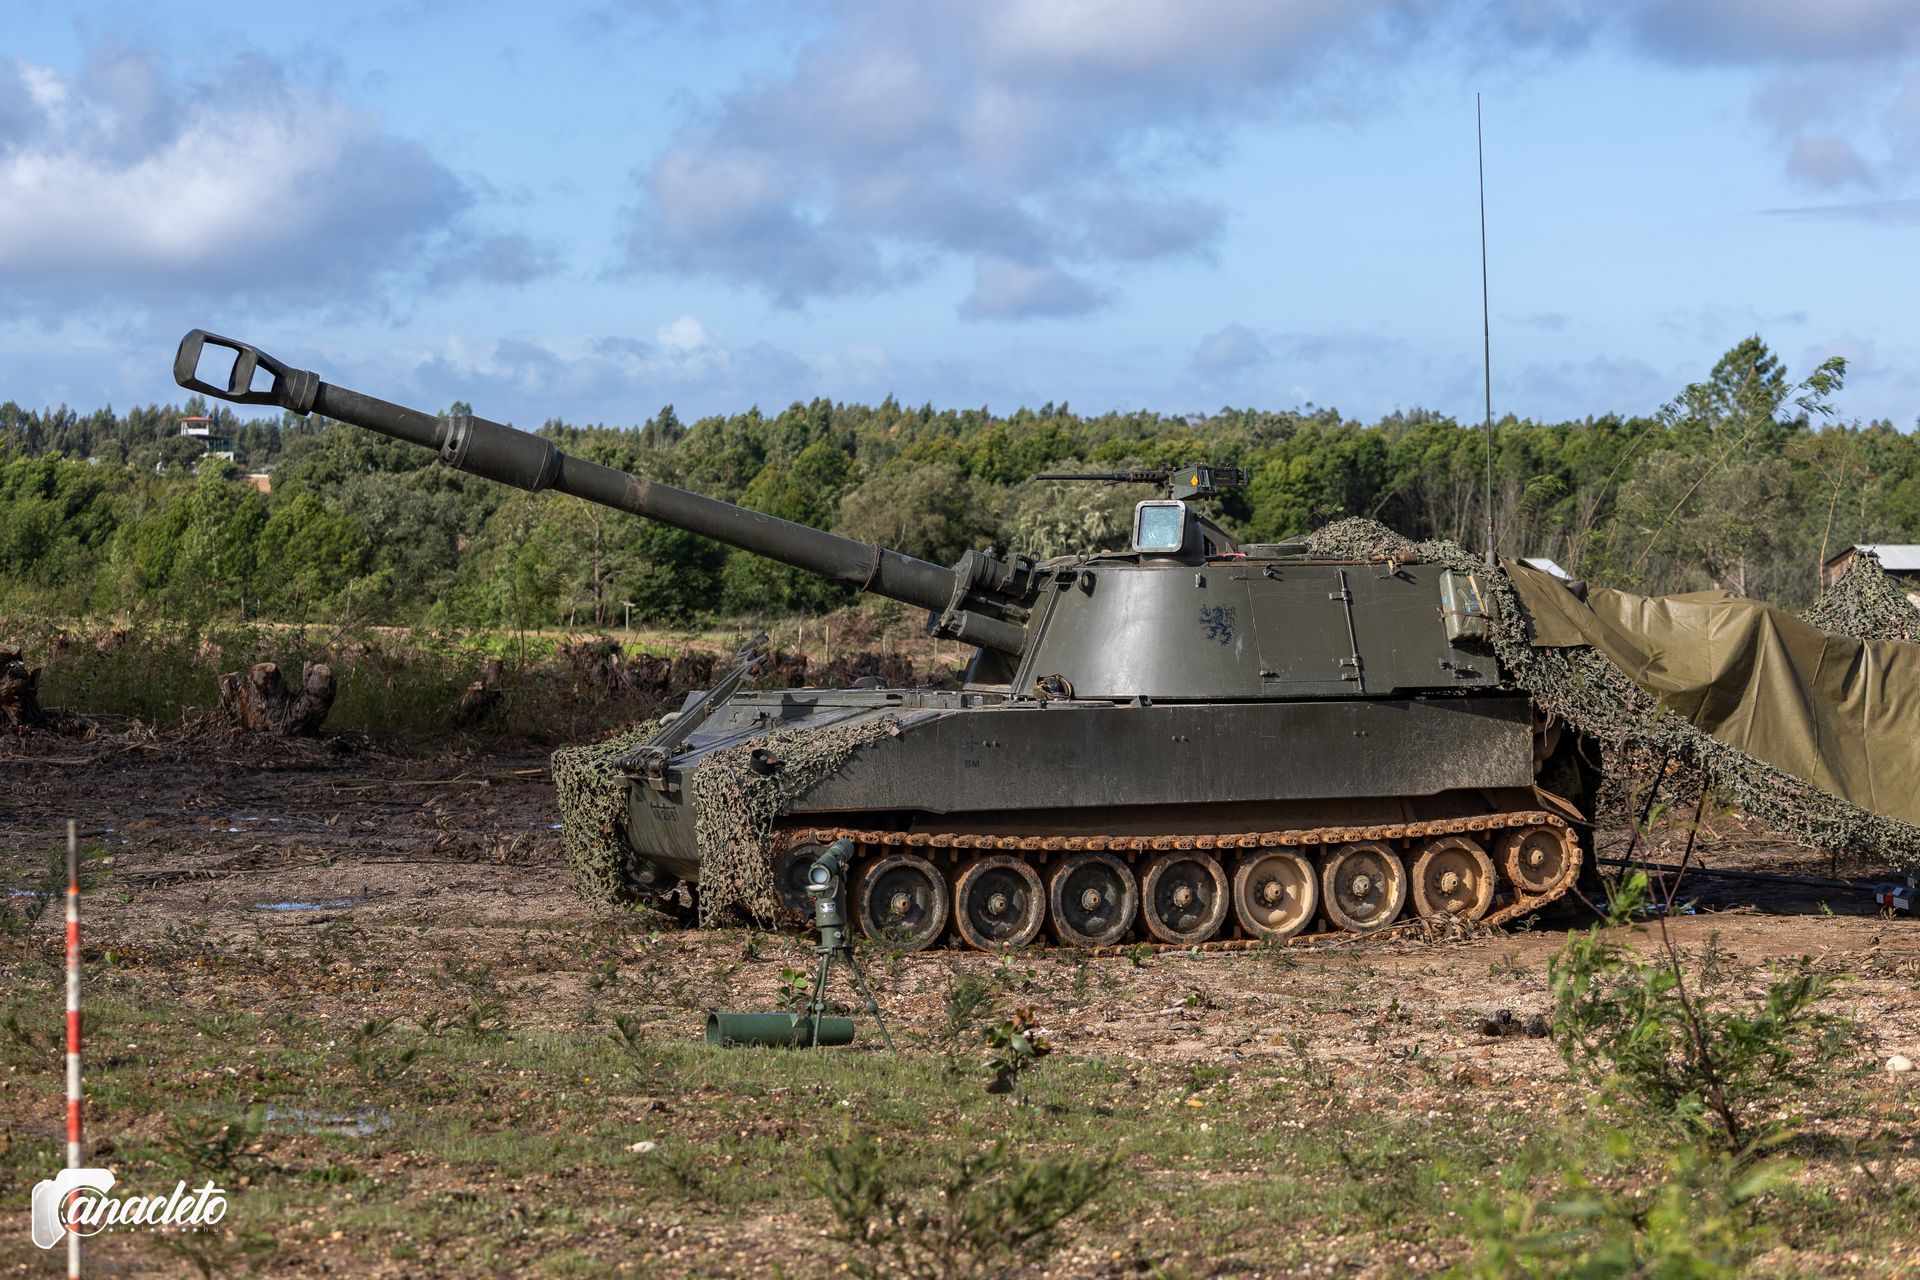
This principle doesn't stop at the flight line; it applies directly to ground operations. If you are photographing a tactical vehicle - like a Pandur or a Leopard tank - moving aggressively across rough terrain, freezing it completely at 1/2000s might make it look like it's simply parked in the mud. By dropping your shutter speed and panning with the vehicle, you blur the background and the wheels/tracks, instantly communicating speed, weight, and momentum.
Conversely, if you need to freeze the explosive peak of a breaching charge, the ejection of a spent brass casing, or the exact moment a paratrooper leaves the door, you must push that shutter speed aggressively high.
It is never about just getting a sharp photo; it is about choosing the shutter speed that tells the true story of the battlefield's pace.
2. Tactical Composition: Commanding the Viewer's Eye
In chaotic environments - whether a bustling flight line, a dusty LZ (Landing Zone), or a live-fire exercise - visual clutter is your worst enemy. Composition is not just about making a photo look "pretty"; it is a tactical tool used to cut through the noise and forcefully dictate where the viewer looks.
Here is the operational breakdown of the 15 compositional techniques every military photojournalist must master:
1. Rule of Thirds
- The Concept: The universal baseline. Mentally dividing your frame into a 3x3 grid and placing your primary subject on the intersecting lines or nodes, rather than dead center. It creates natural tension and gives the subject "room to breathe" or move into the frame.
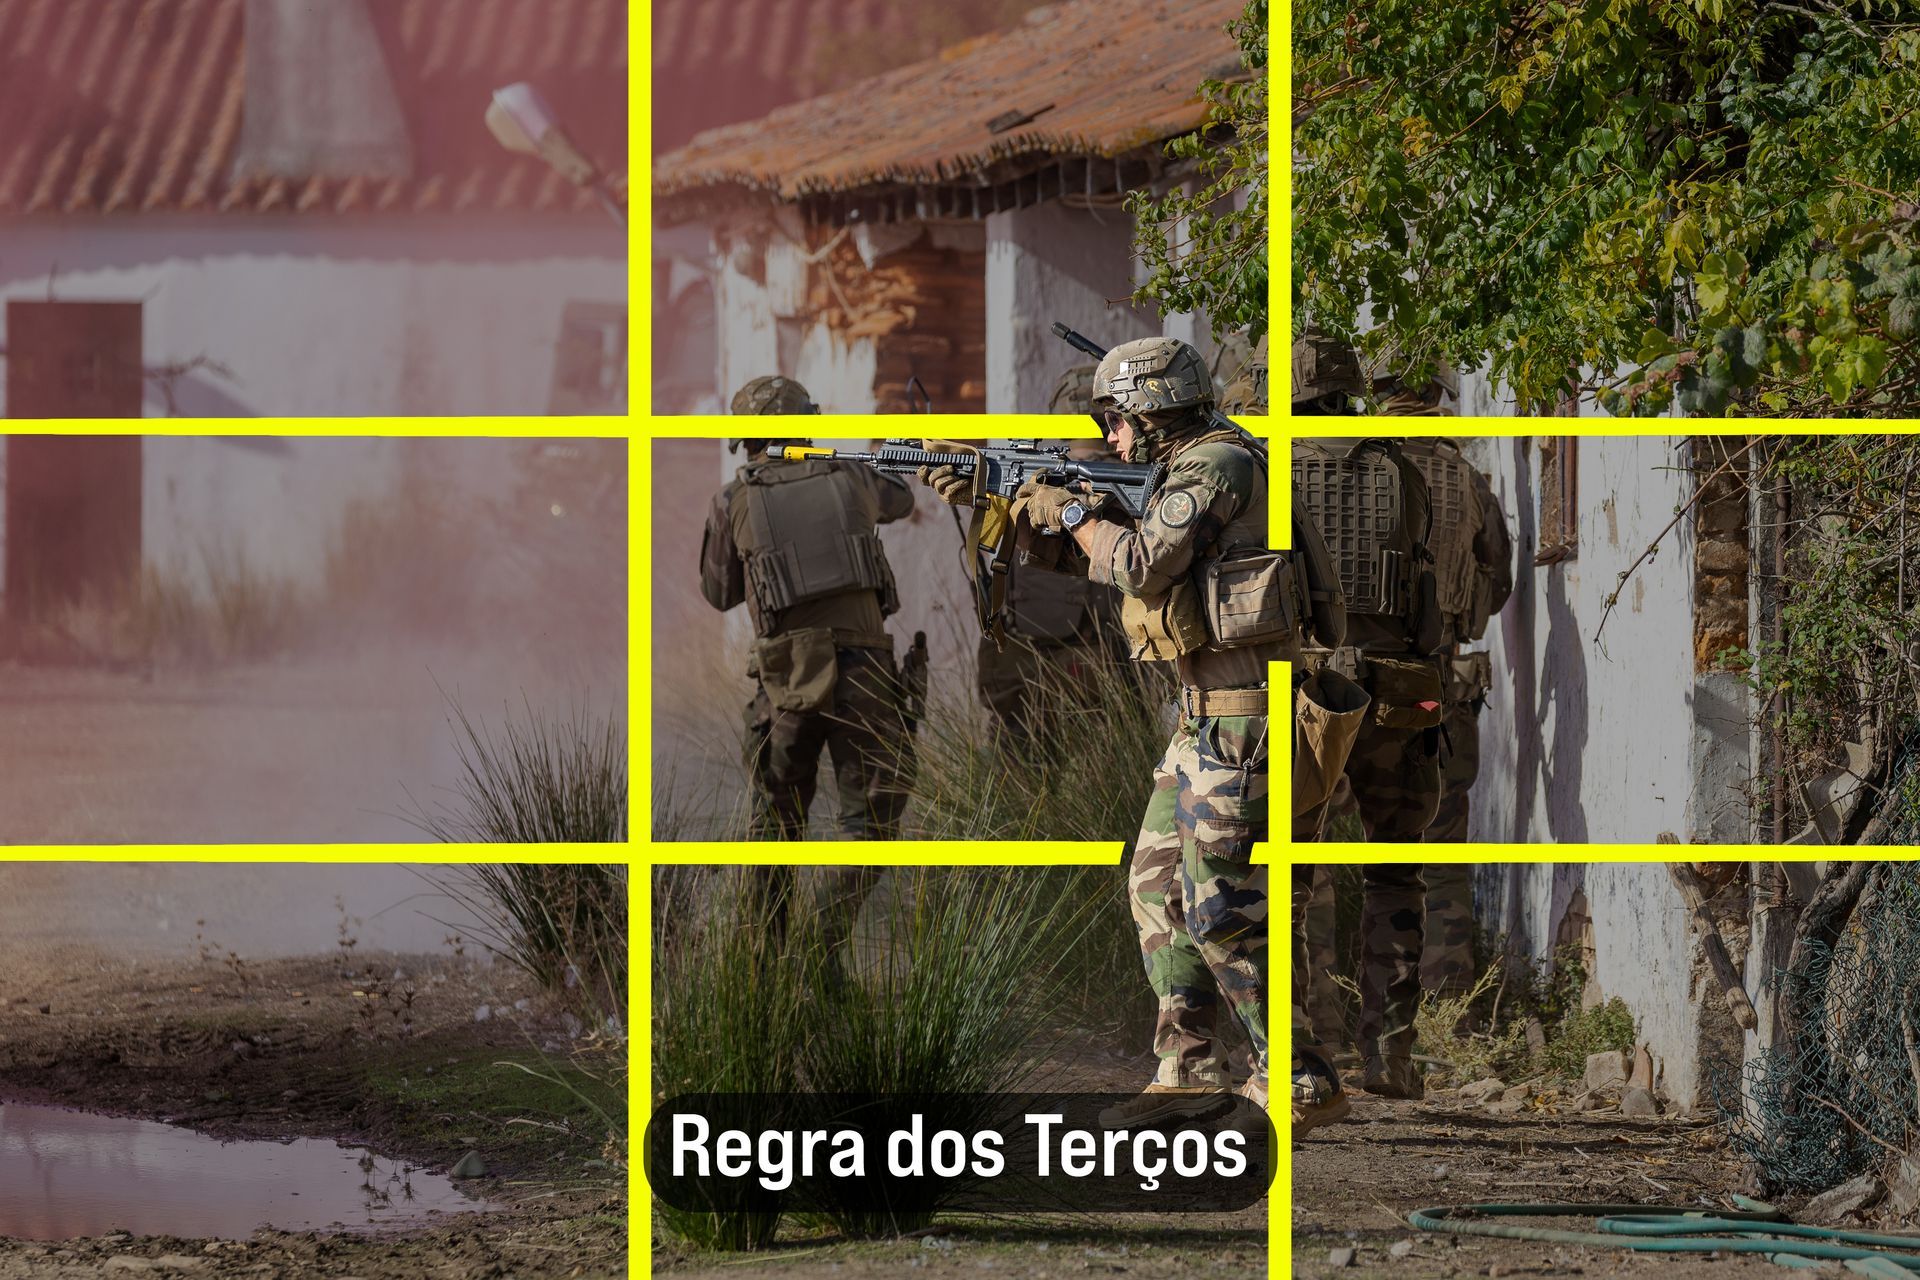
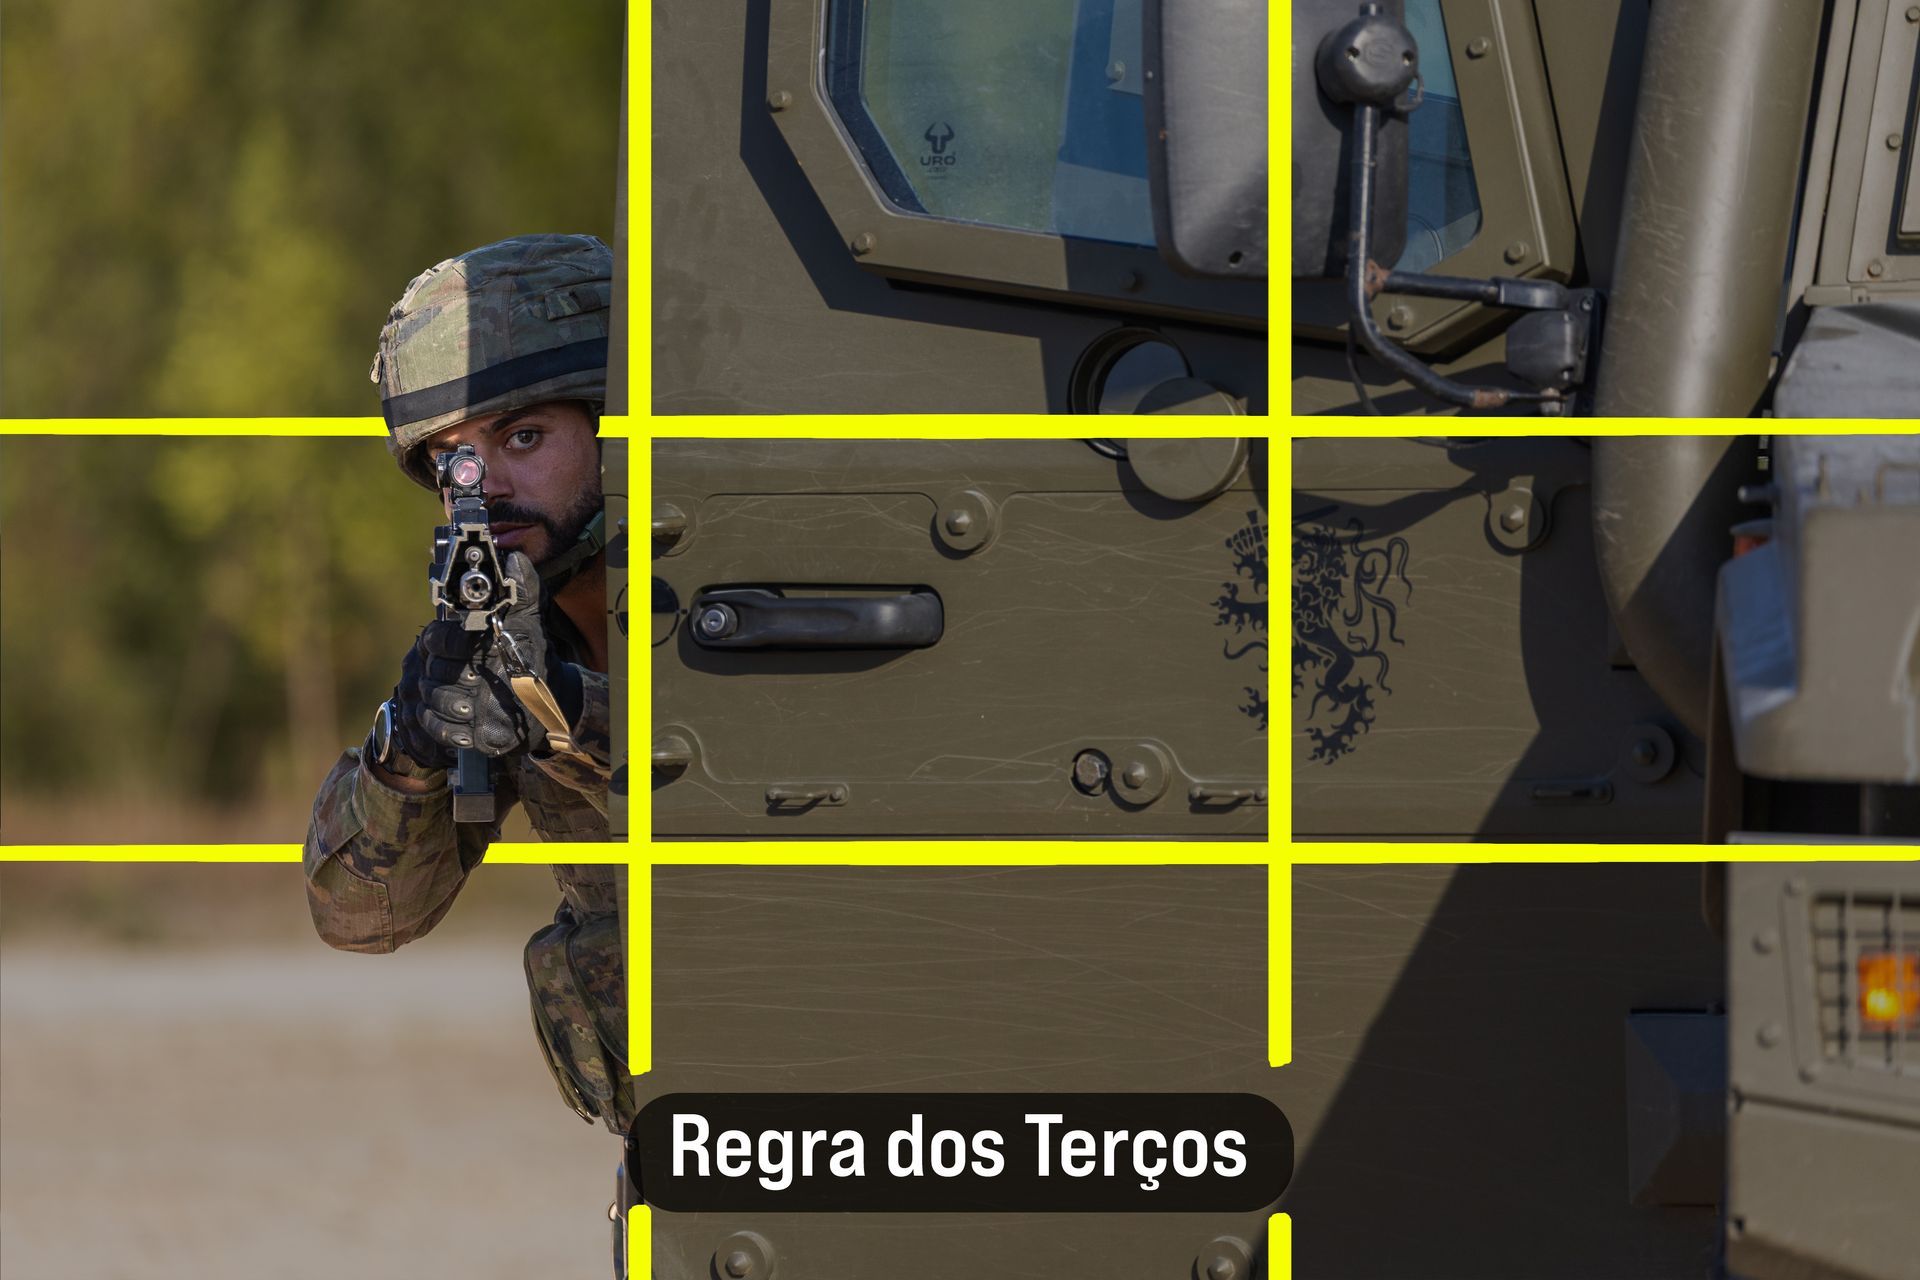
- In the Field (Left): Placing a soldier and his team on the far-right intersecting nodes, allowing the rest of the image to "breathe" and show the broader operational environment where the action is unfolding.
- In the Field (Right): Capturing an operator taking a defensive position behind the armored door of a vehicle immediately after dismounting. By placing him exactly on the far-left vertical line, you draw immediate tension and leave the right side open to show his line of sight.
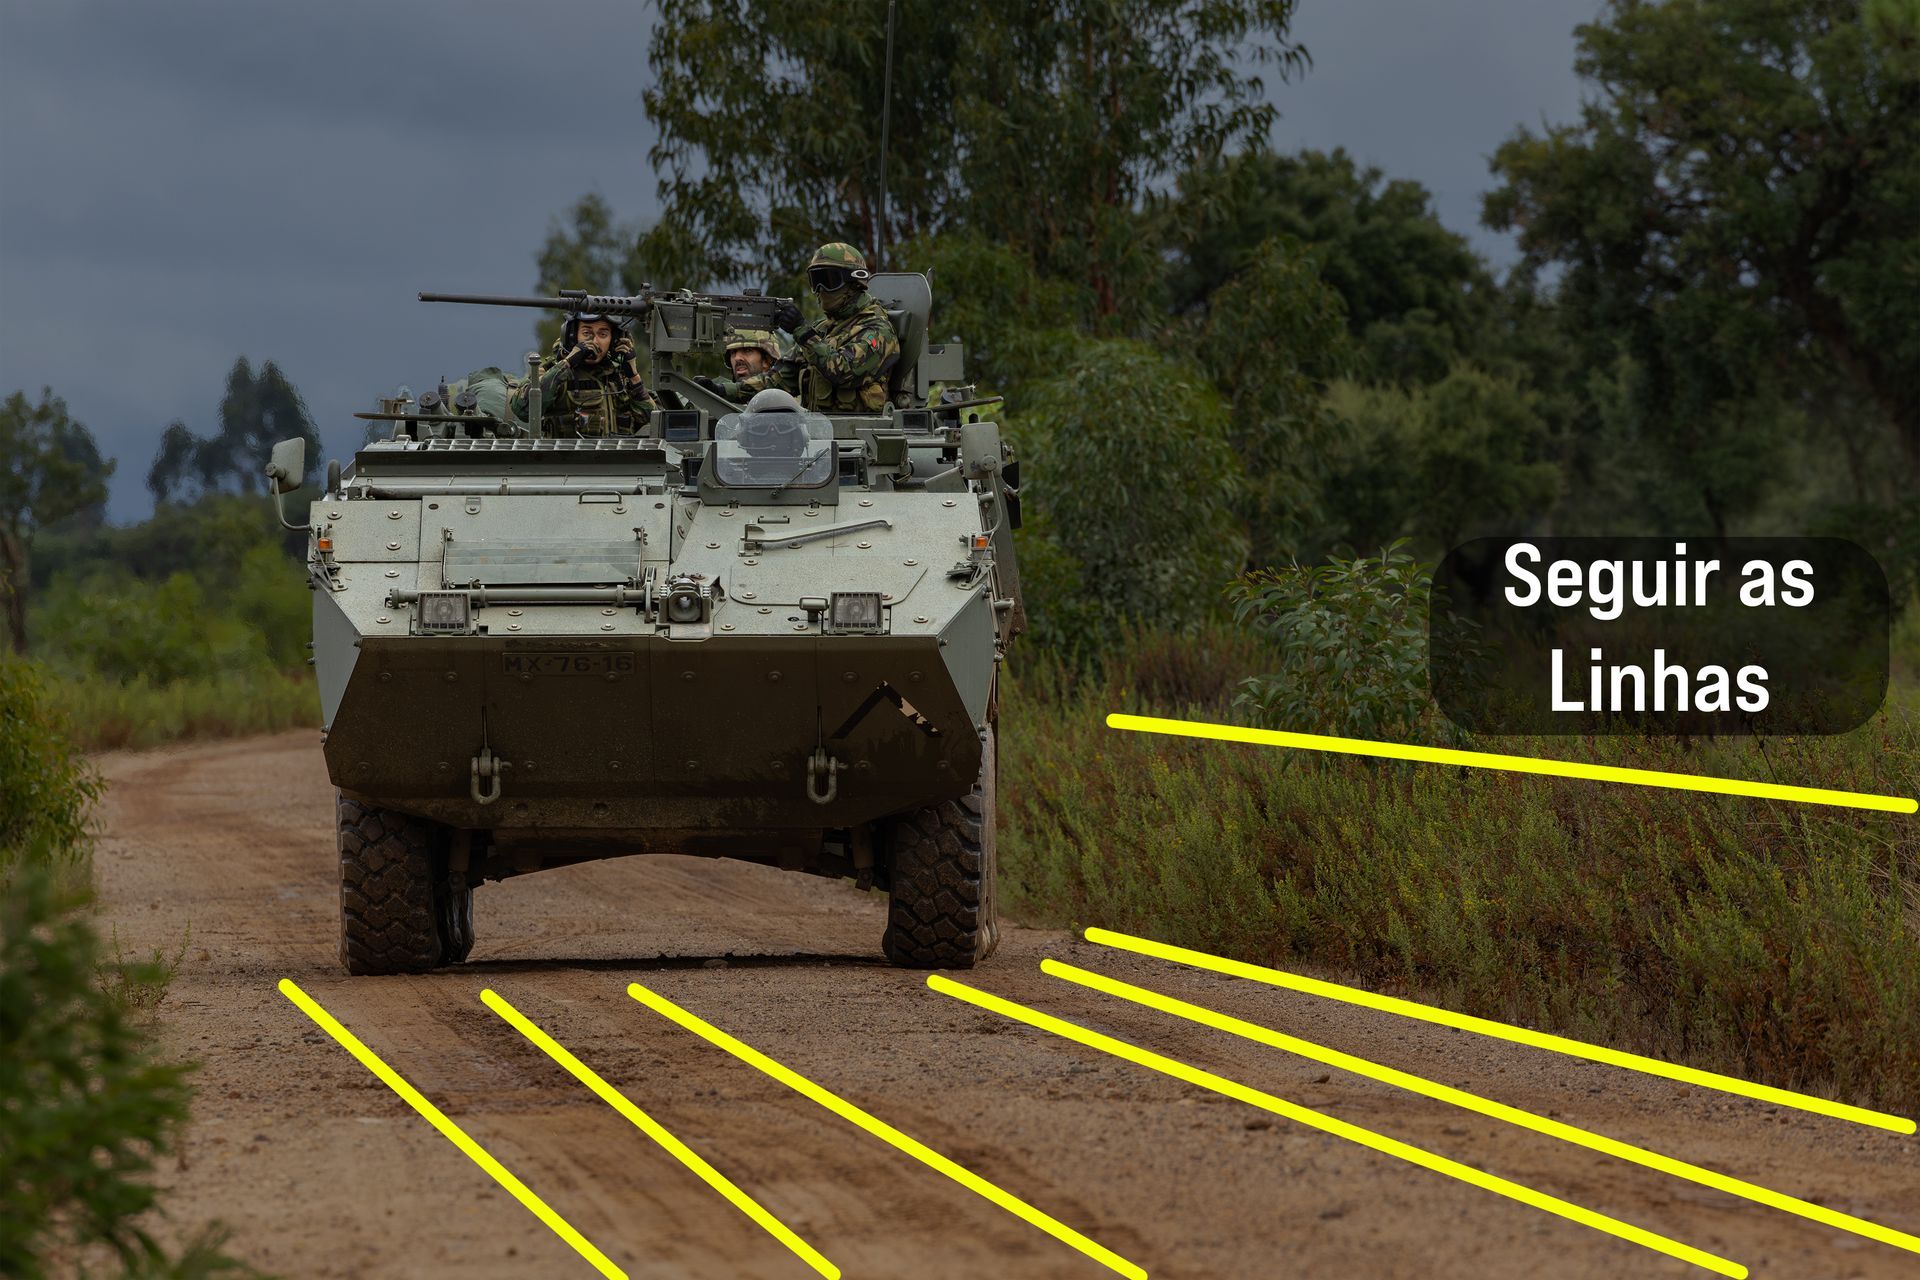
2. Leading Lines
- The Concept: Using the geometry of the battlefield or the environment to create literal visual arrows that vector the viewer's eye straight to the target.

- In the Field (Left): Using an out-of-focus formation of troops - wearing identical gear and berets - as a visual corridor. This repetition of blurred shapes naturally leads the eye directly to a sharply focused officer conducting an inspection in the exact same gear.
- In the Field (Right): Utilizing the natural geometry of a dirt road, fresh tire tracks, and the surrounding vegetation to act as converging lines that vector the viewer's eye straight toward an approaching Pandur armored vehicle.
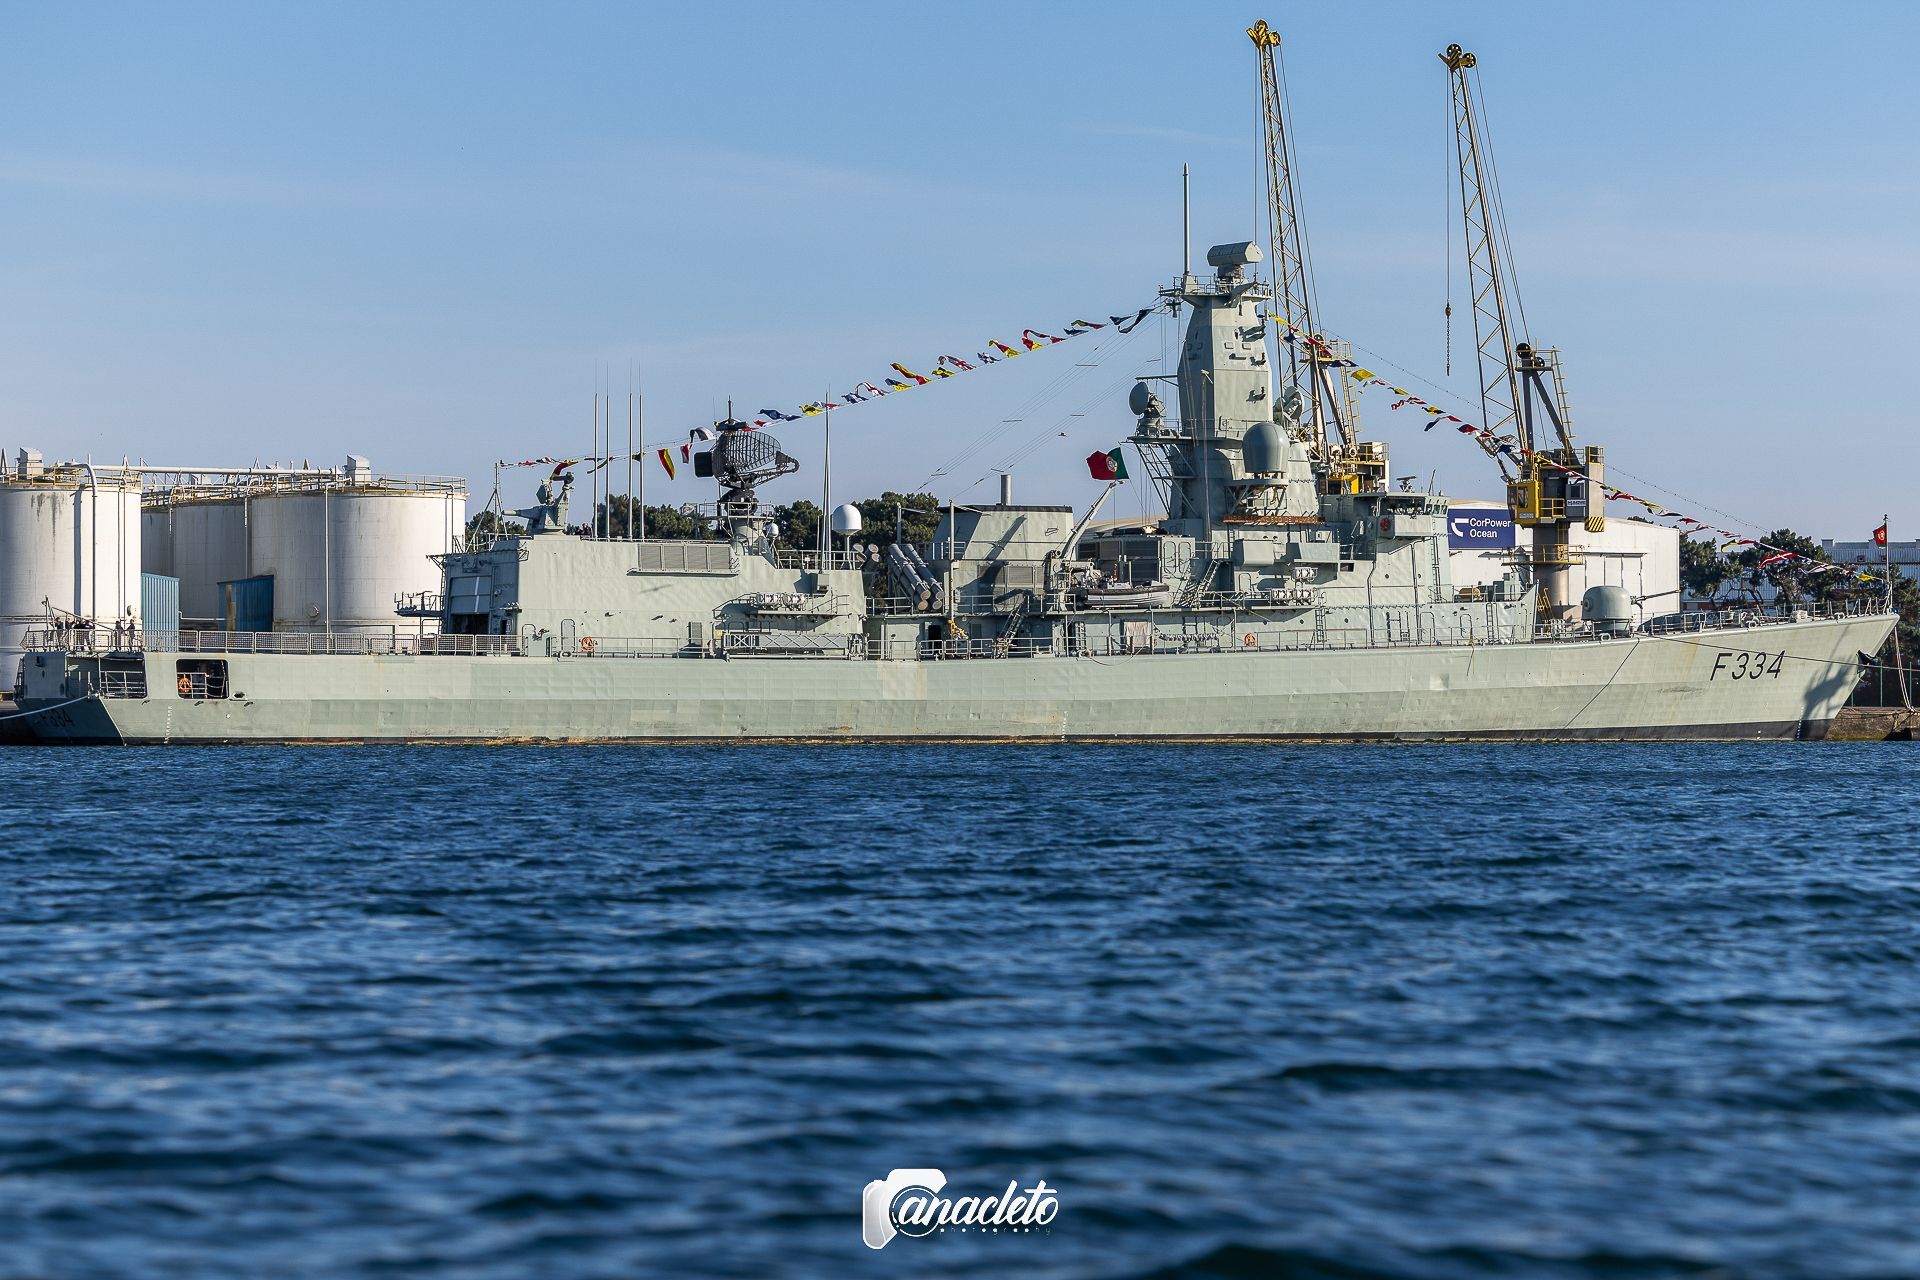
3. Symmetry
- The Concept: A technique used to project absolute order, power, and precision. It commands attention through perfect visual equilibrium.
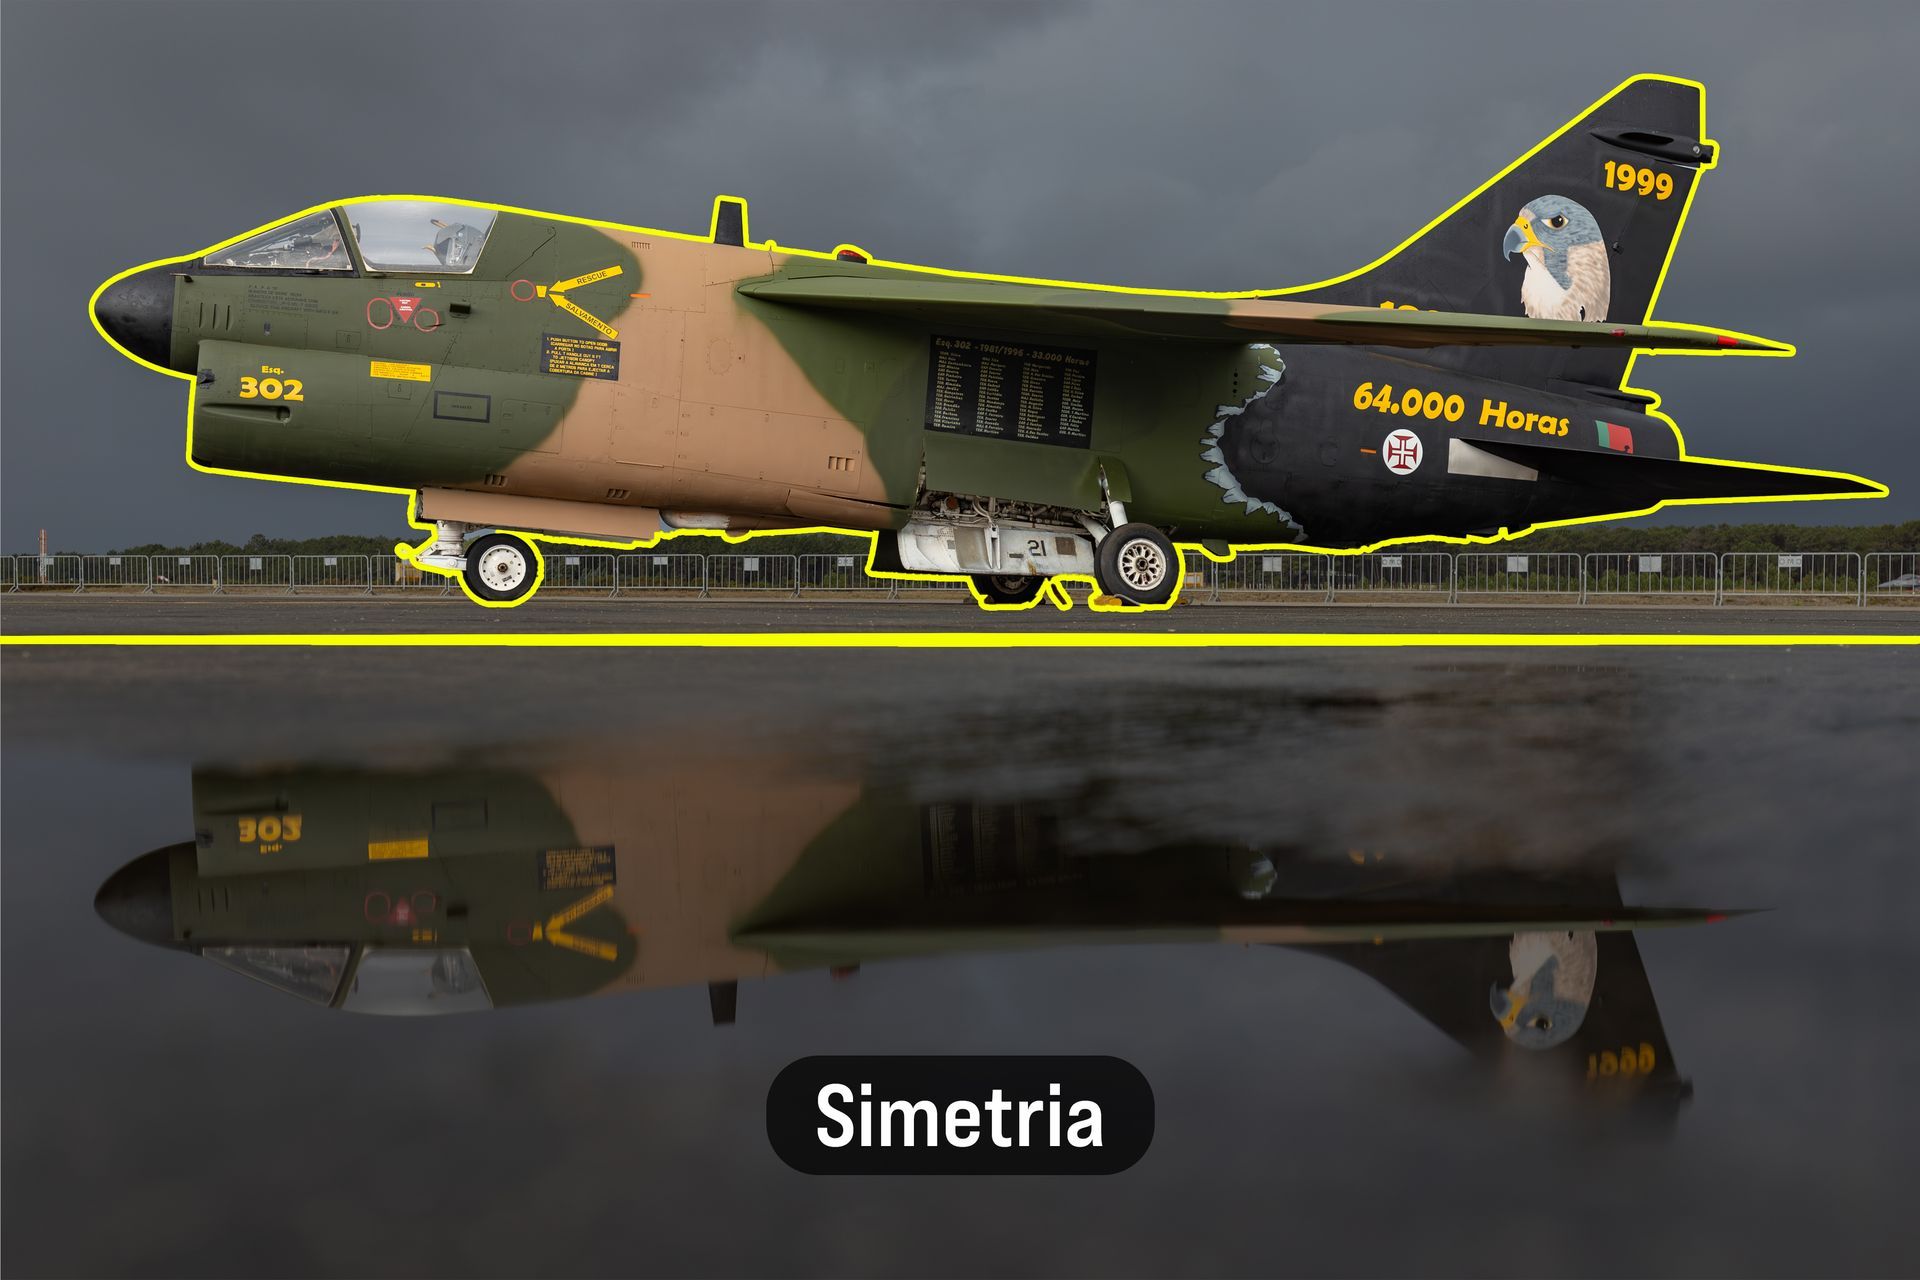
- In the Field: Capturing an A-7 Corsair II parked on the flight line, framed in perfect horizontal symmetry with its crisp reflection in a tarmac puddle, projecting absolute visual balance.
4. Balance
- The Concept: When you place a heavy subject on one side of your frame, the opposite side cannot feel empty or "tipping over." You must balance the visual weight with a secondary element.
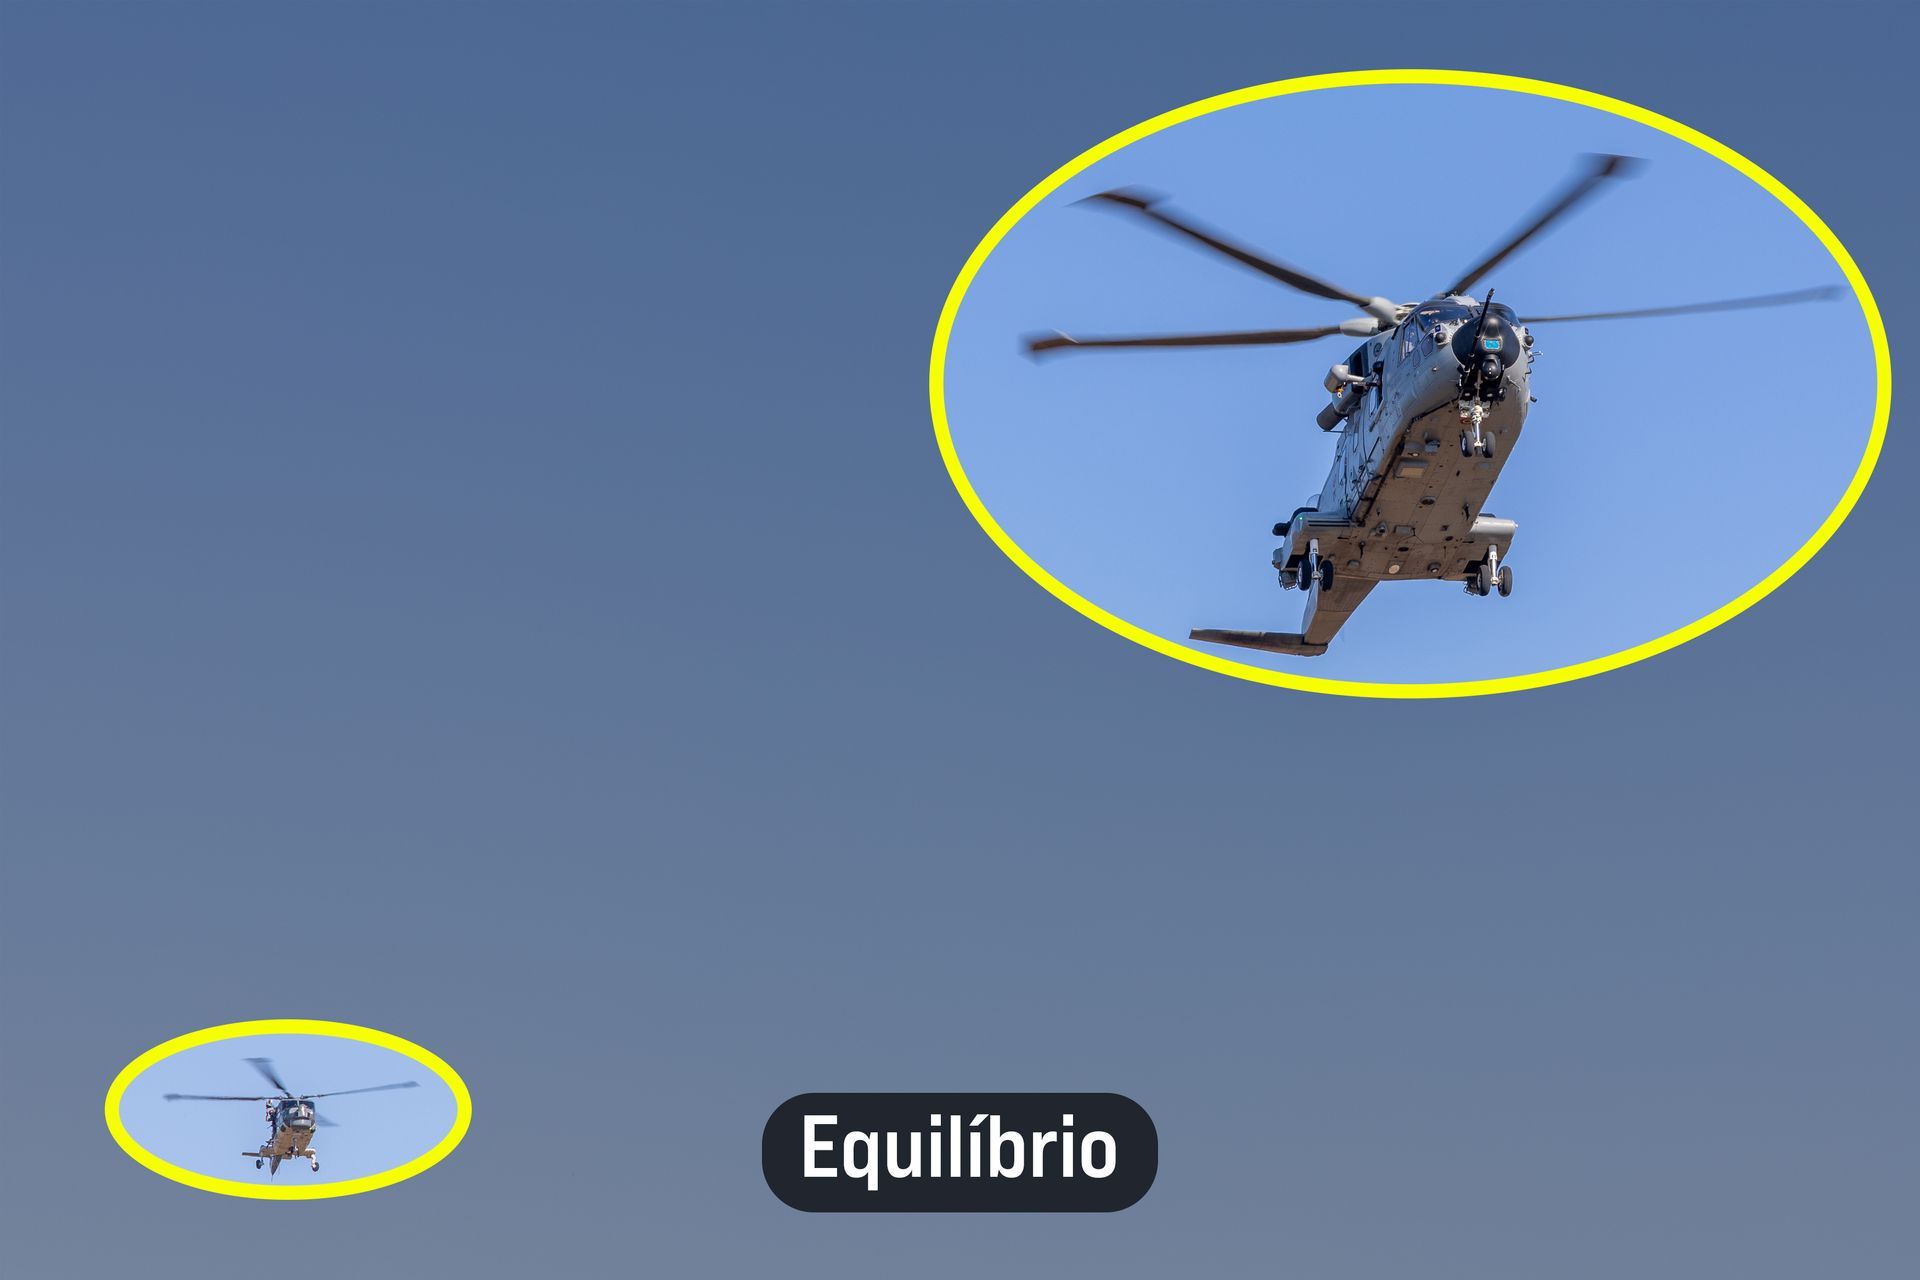
- In the Field: Framing an HH-101 helicopter in the immediate foreground, locking it onto the top-right intersection. To prevent the image from feeling lopsided, a smaller Lynx helicopter is positioned in the distant background on the bottom-left intersection, perfectly counterweighting the scene against a clean, blue sky.
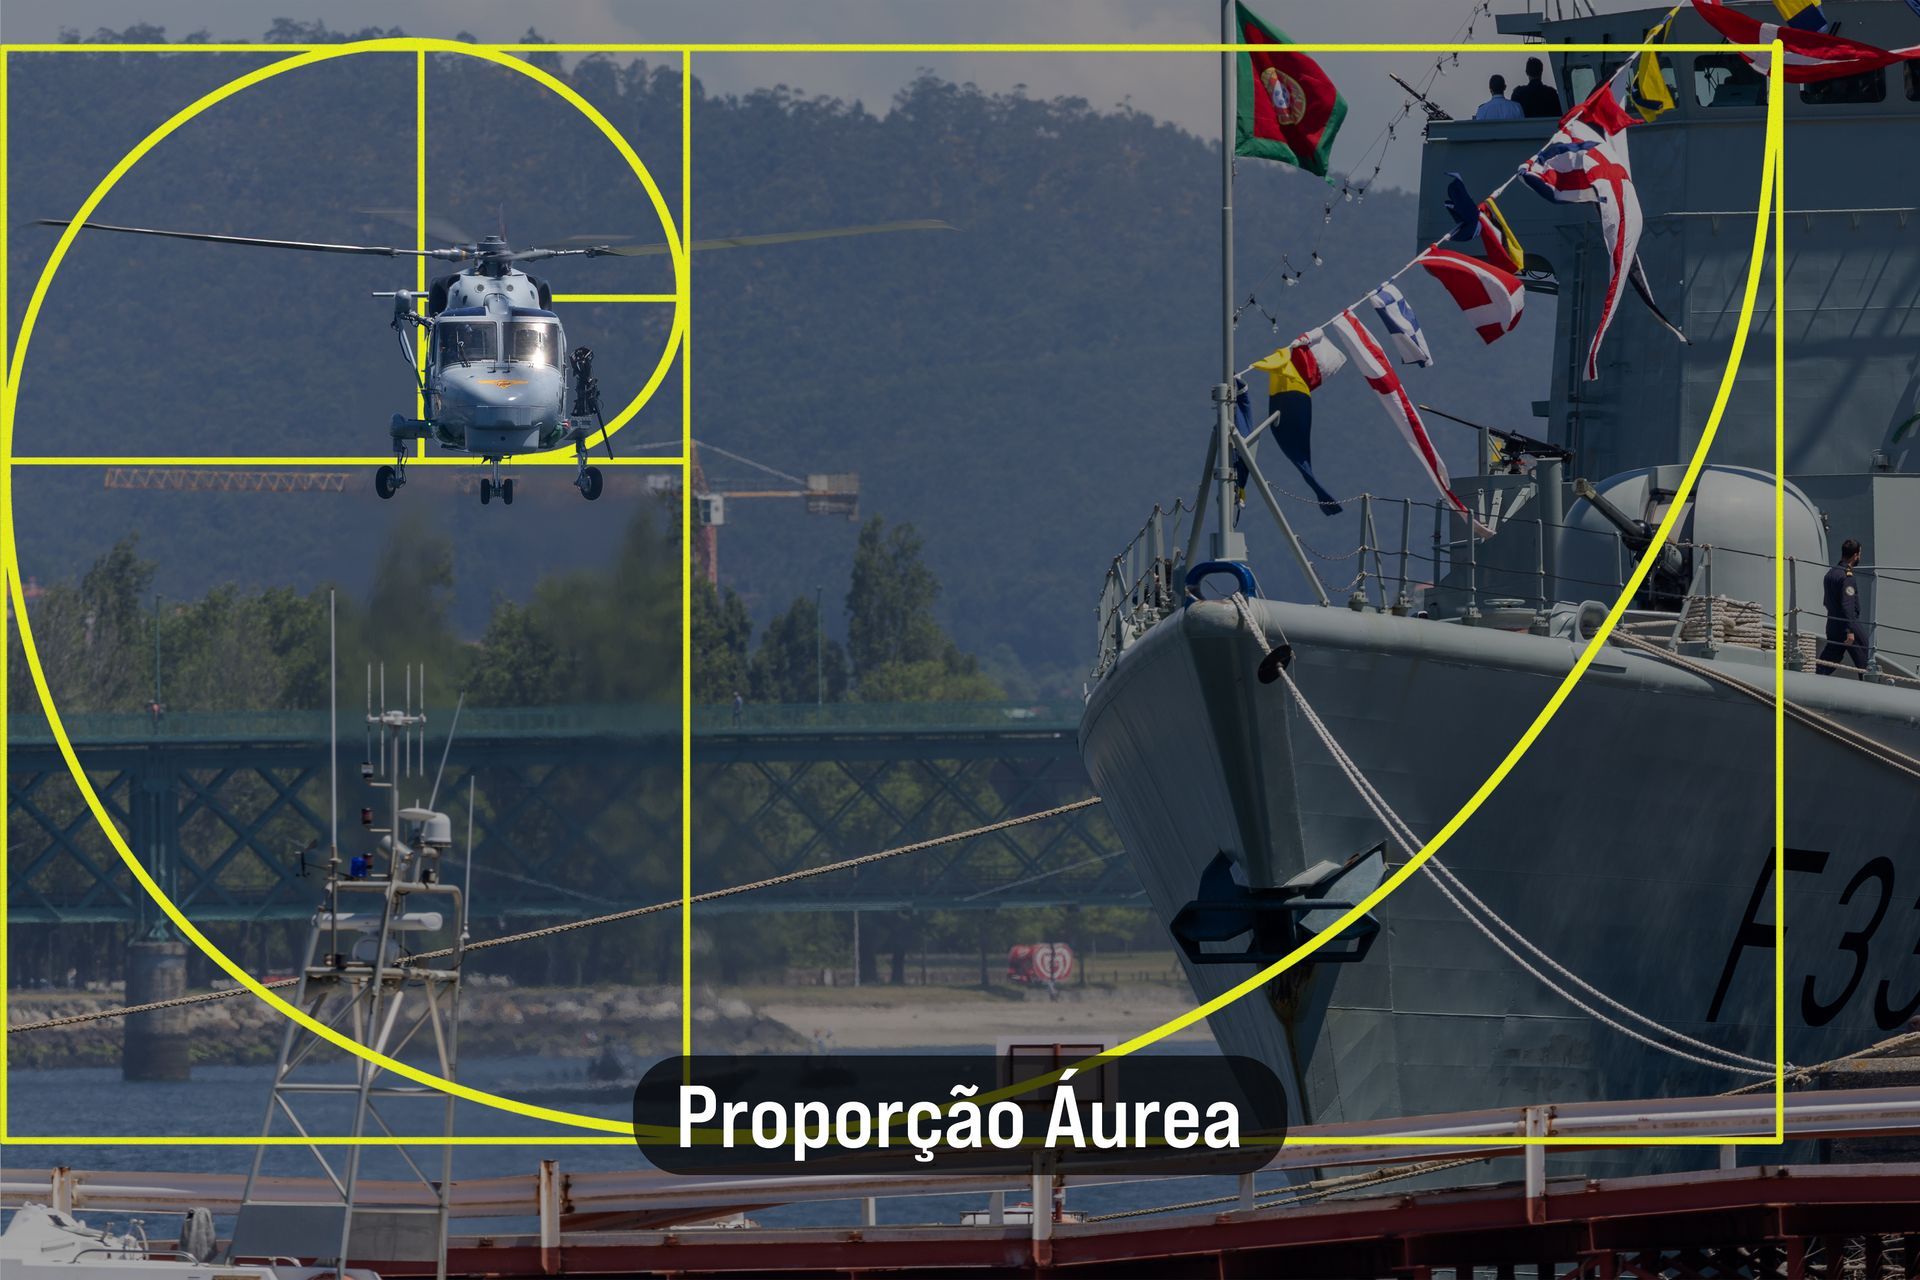
5. Golden Ratio
- The Concept: A mathematical ratio that guides the human eye in a fluid, sweeping spiral motion through the image, landing perfectly on the primary subject.
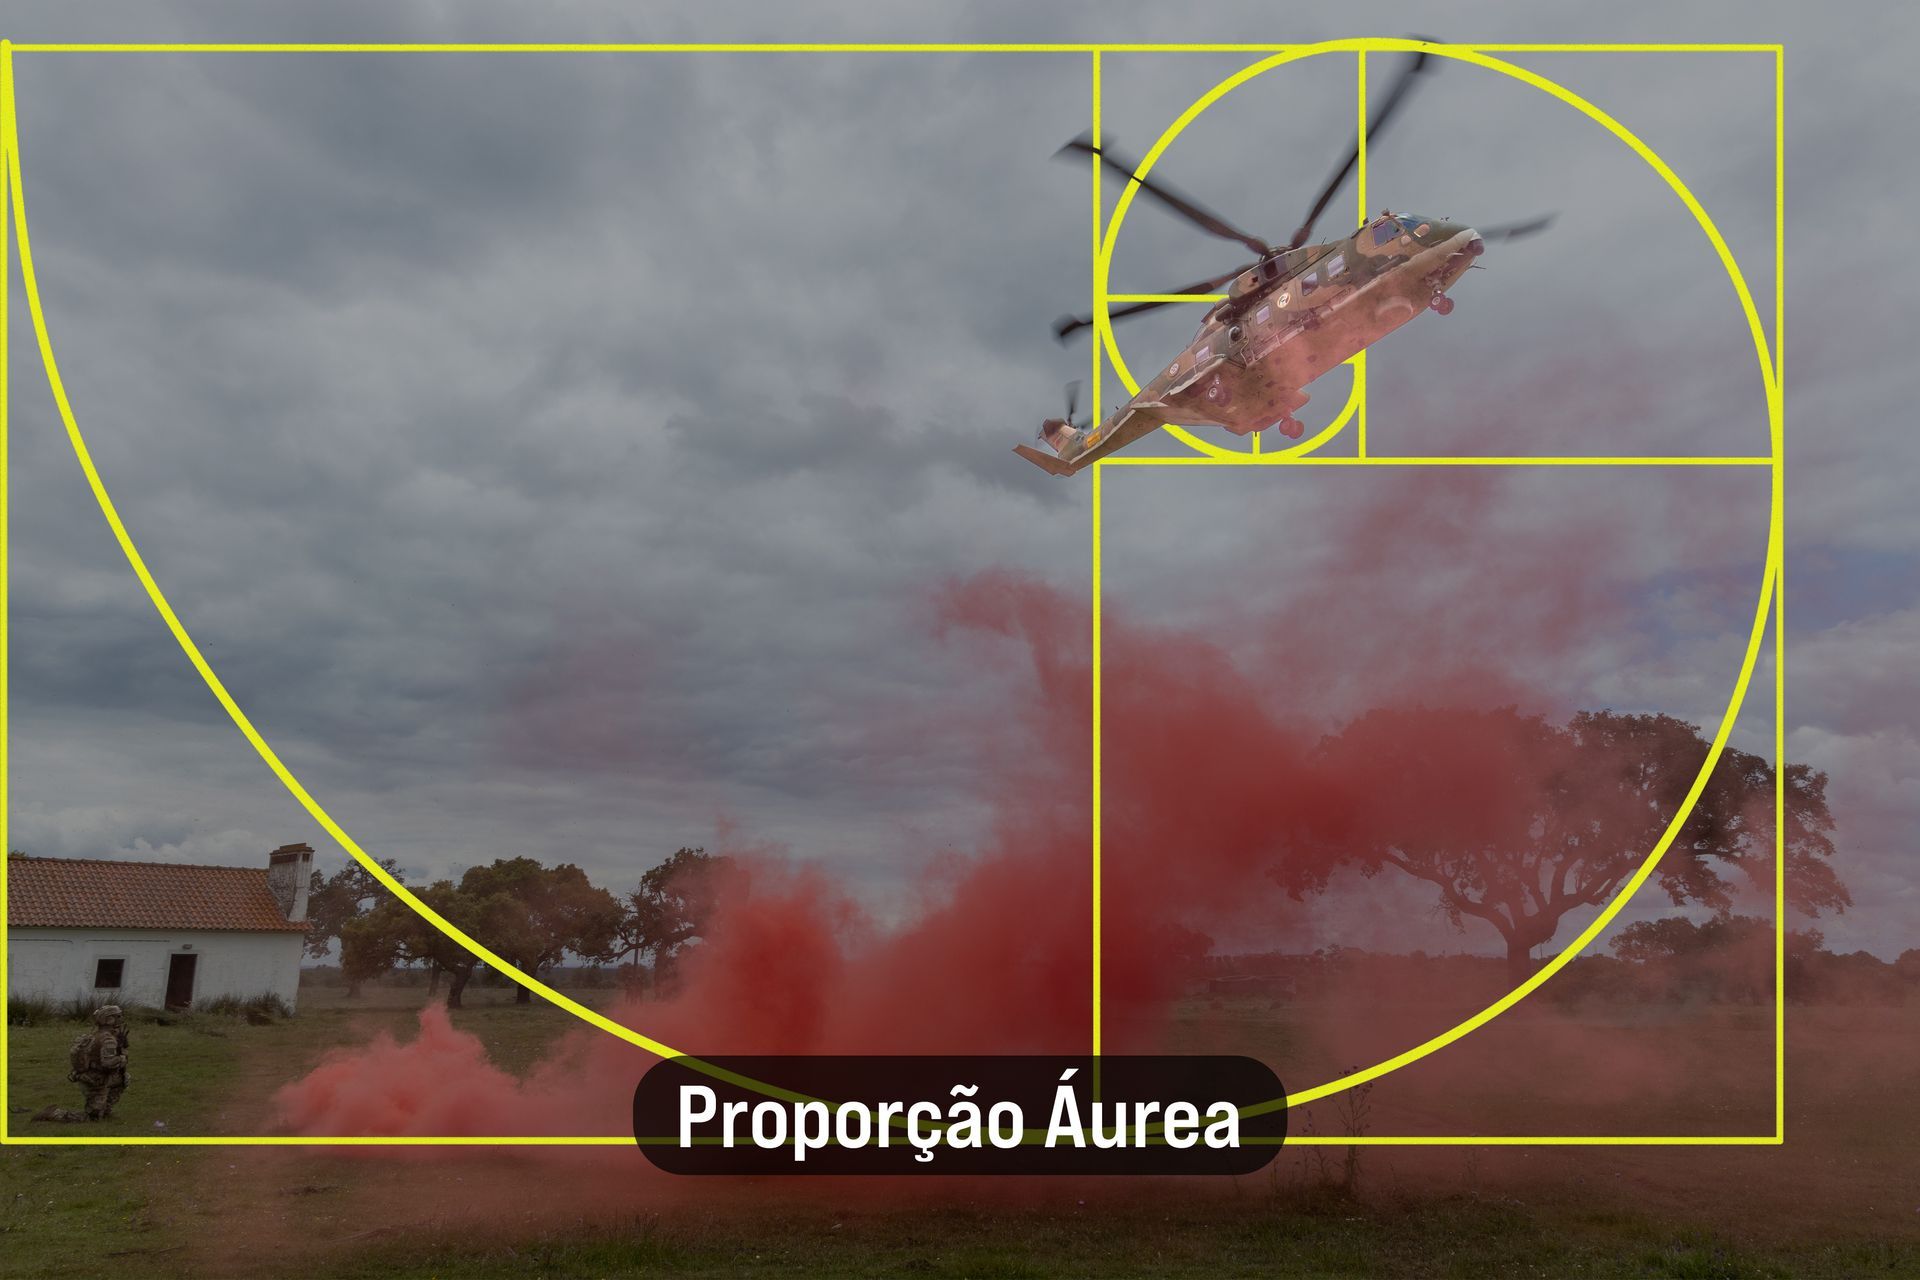
- In the Field (Left): A visual spiral initiating at a small structure on the Landing Zone (LZ), following the ground line and the curving trajectory of red smoke from a signal grenade, terminating perfectly on the center of the spiral: an EH-101 Merlin on final approach.
- In the Field (Right): Using the bow of a frigate as the origin of the spiral, sweeping through a pier and some civilian boats, before tightening and resting on the main subject in the center: a hovering Super Lynx helicopter.
6. Golden Rectangle
- The Concept: Similar to the Golden Ratio, this involves dividing your frame into progressively smaller rectangles to organize complex scenes so the eye flows logically to the focal point.
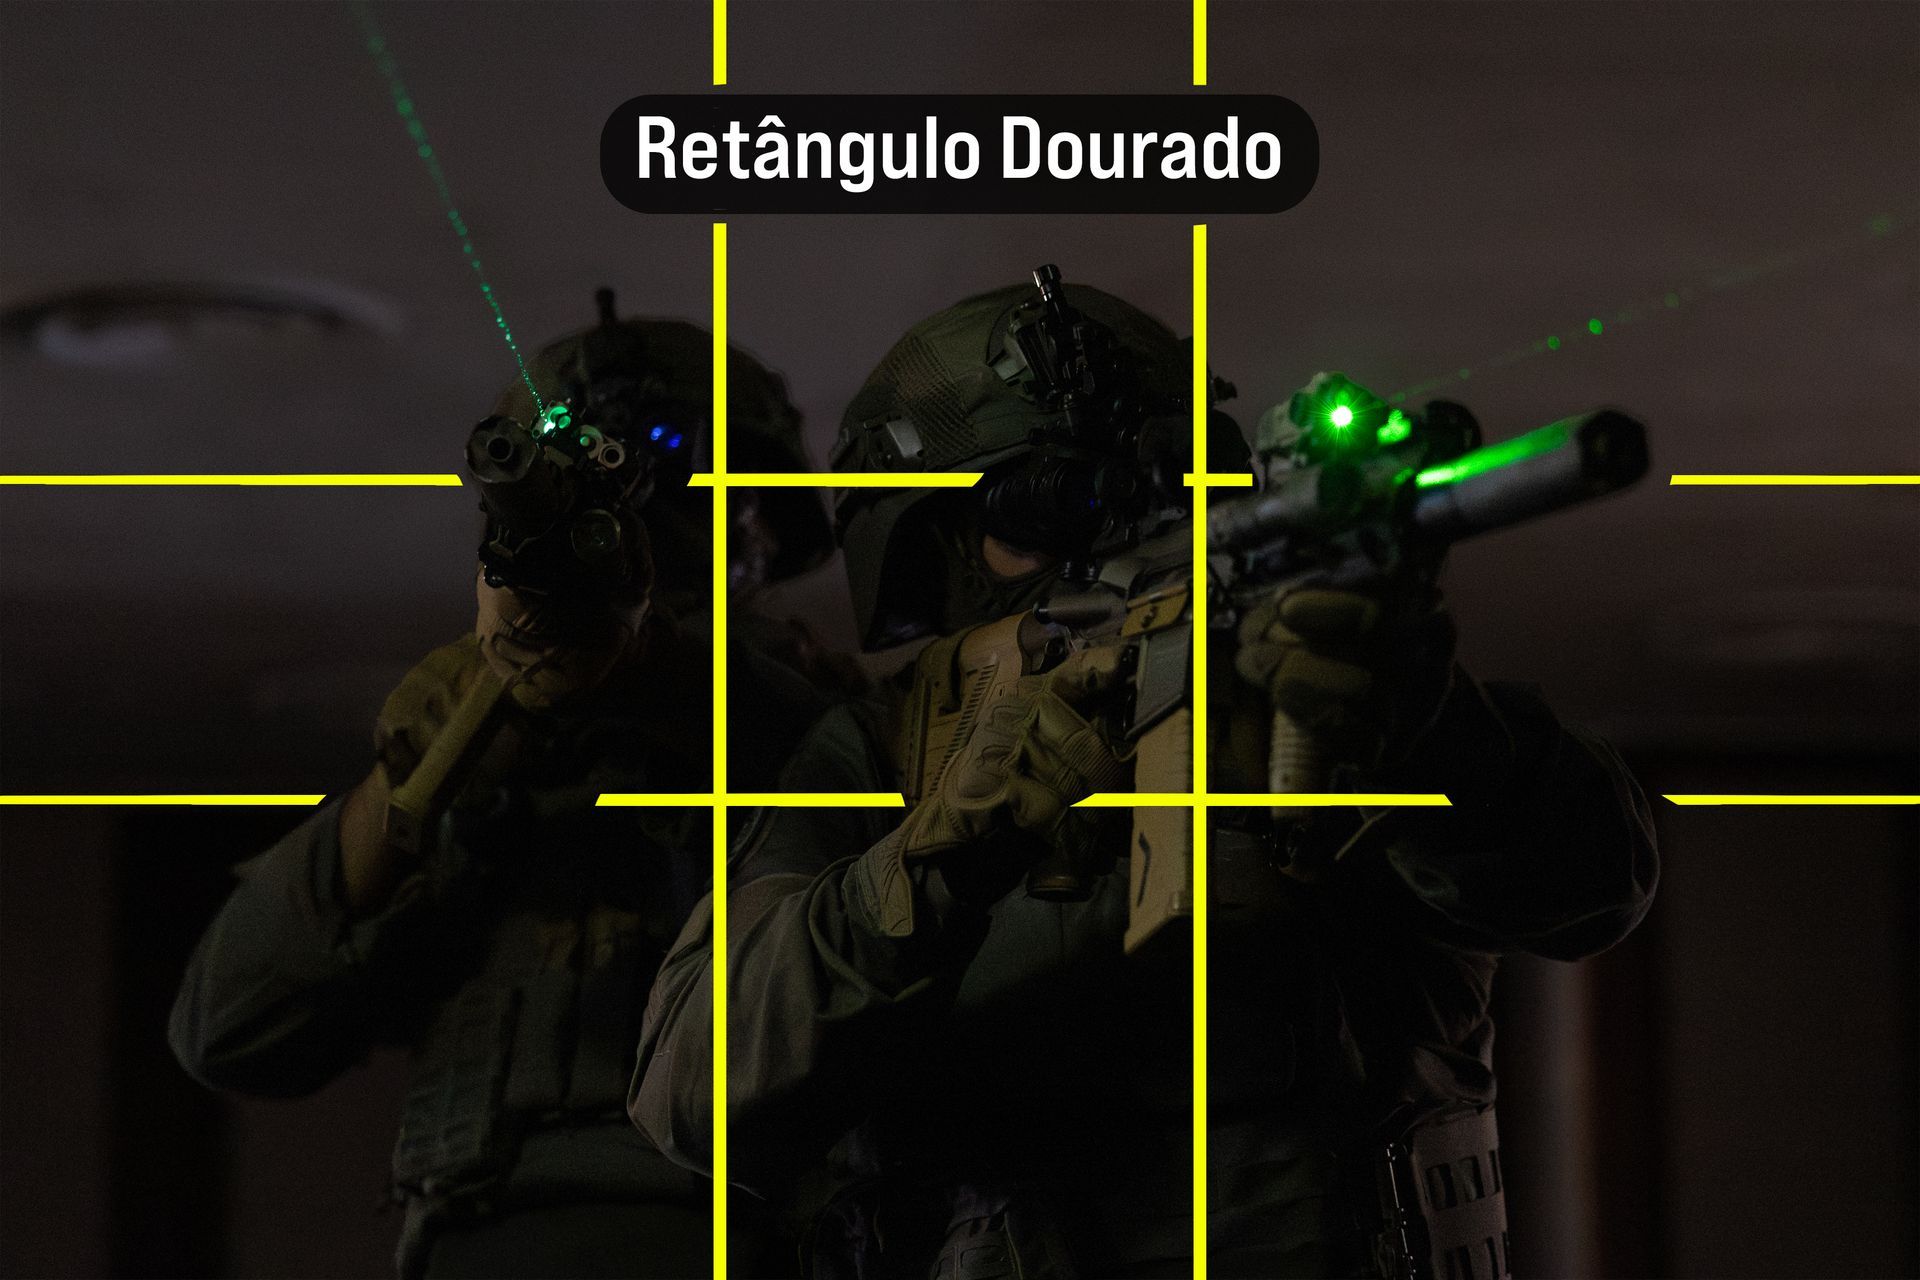
- In the Field: Using the intersecting lines of these progressively smaller rectangles to lock onto the lead GIOE (Special Operations) operator in a two-man formation closest to the lens, perfectly structuring the chaotic darkness of a low-light operation.
7. Golden Triangle
- The Concept: Highly effective in dynamic or structural scenes. You draw a diagonal line from corner to corner, and intersecting lines from the other corners to create triangular sectors that amplify kinetic energy.

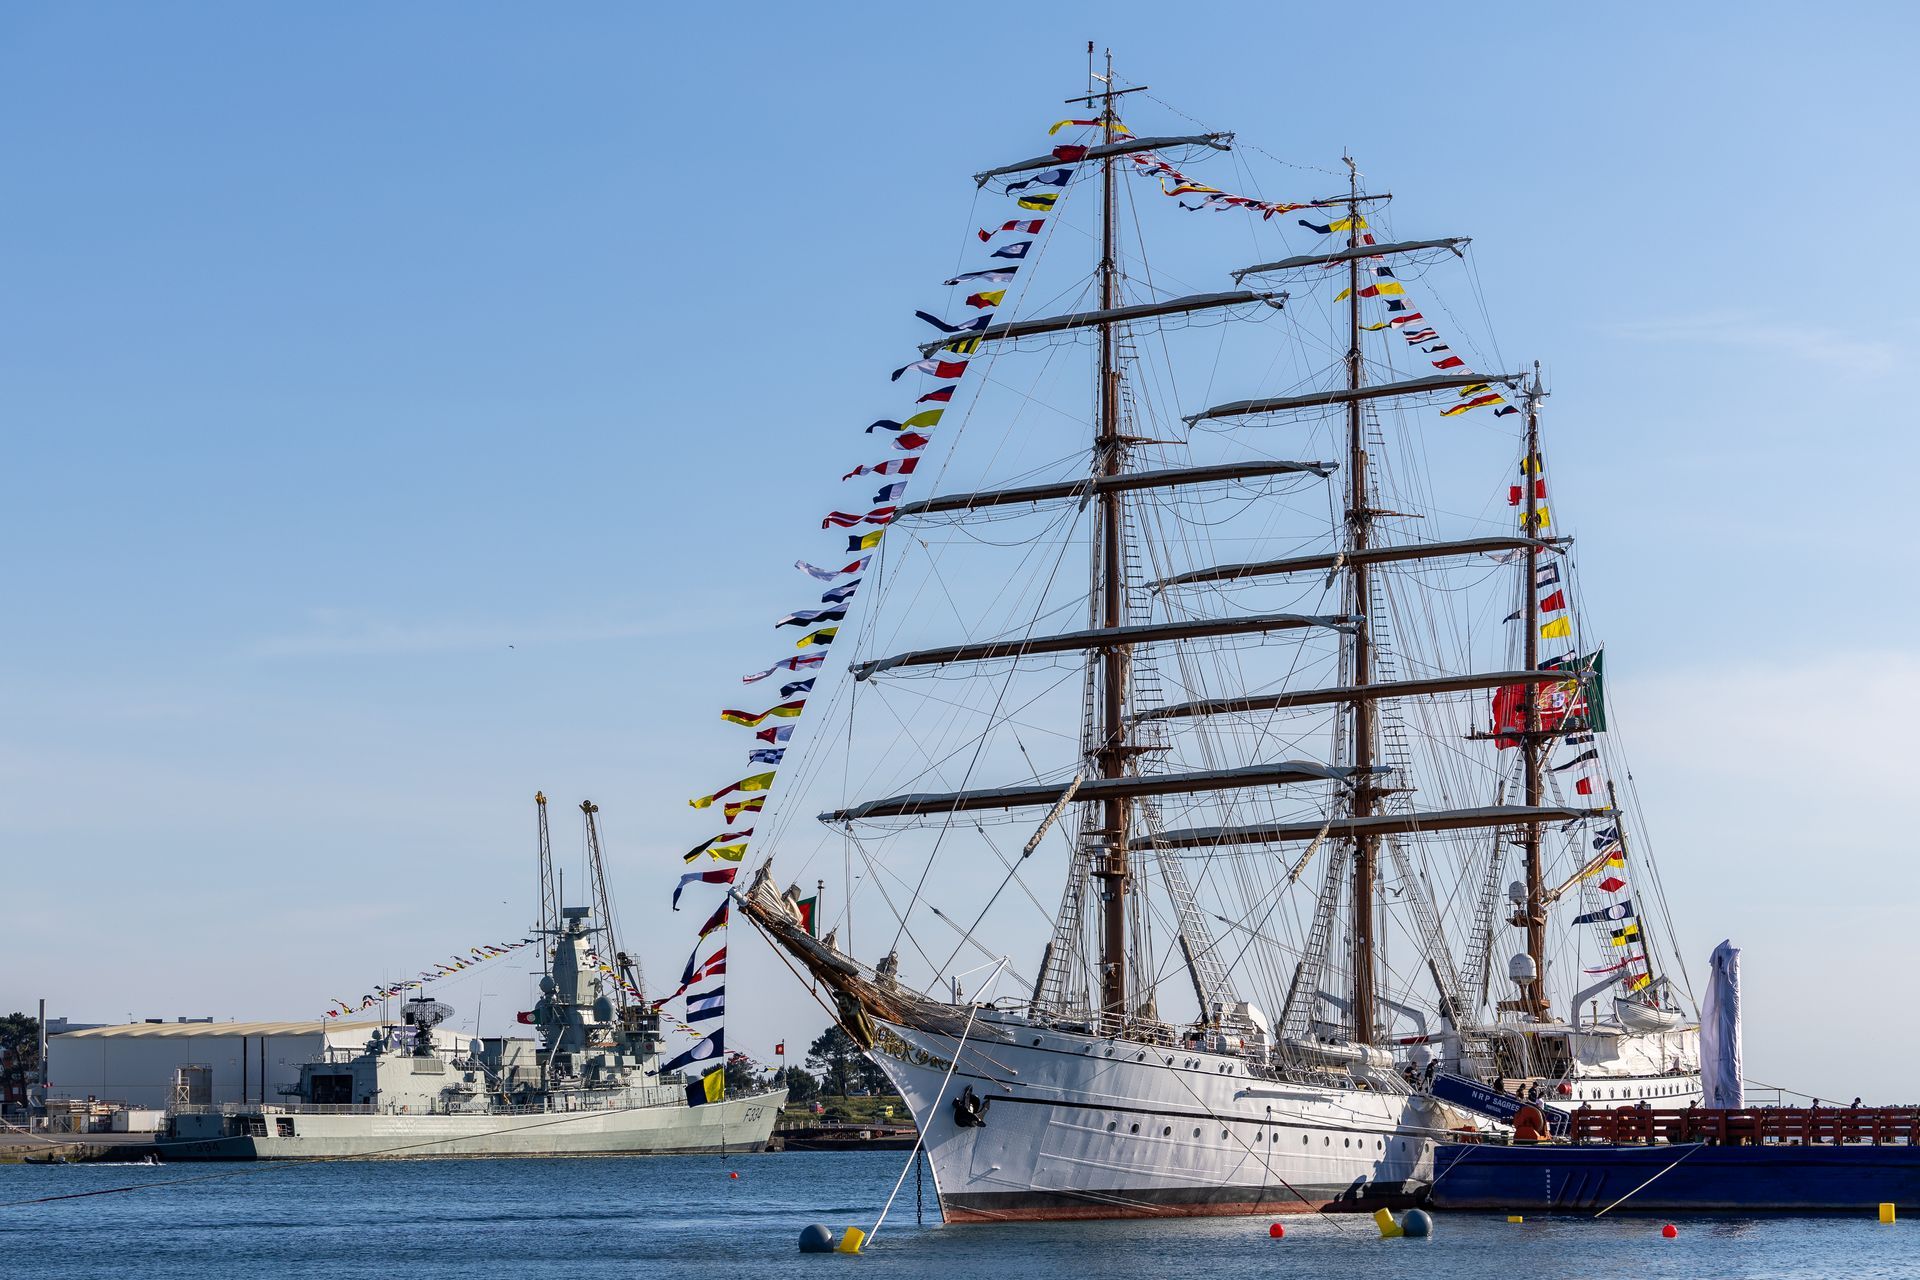
In the Field: Utilizing the iconic structure of the Dom Luís I Bridge in Porto as the primary diagonal axis. The majestic NRP Sagres tall ship and its reflection sit powerfully within one of the resulting triangular sectors, not perfectly on the intersections, but commanding the designated space.
8. Fill the Frame
- The Concept: Total immersion. Stripping away all environmental context and forcing the viewer to confront the sheer scale or emotion of the subject.
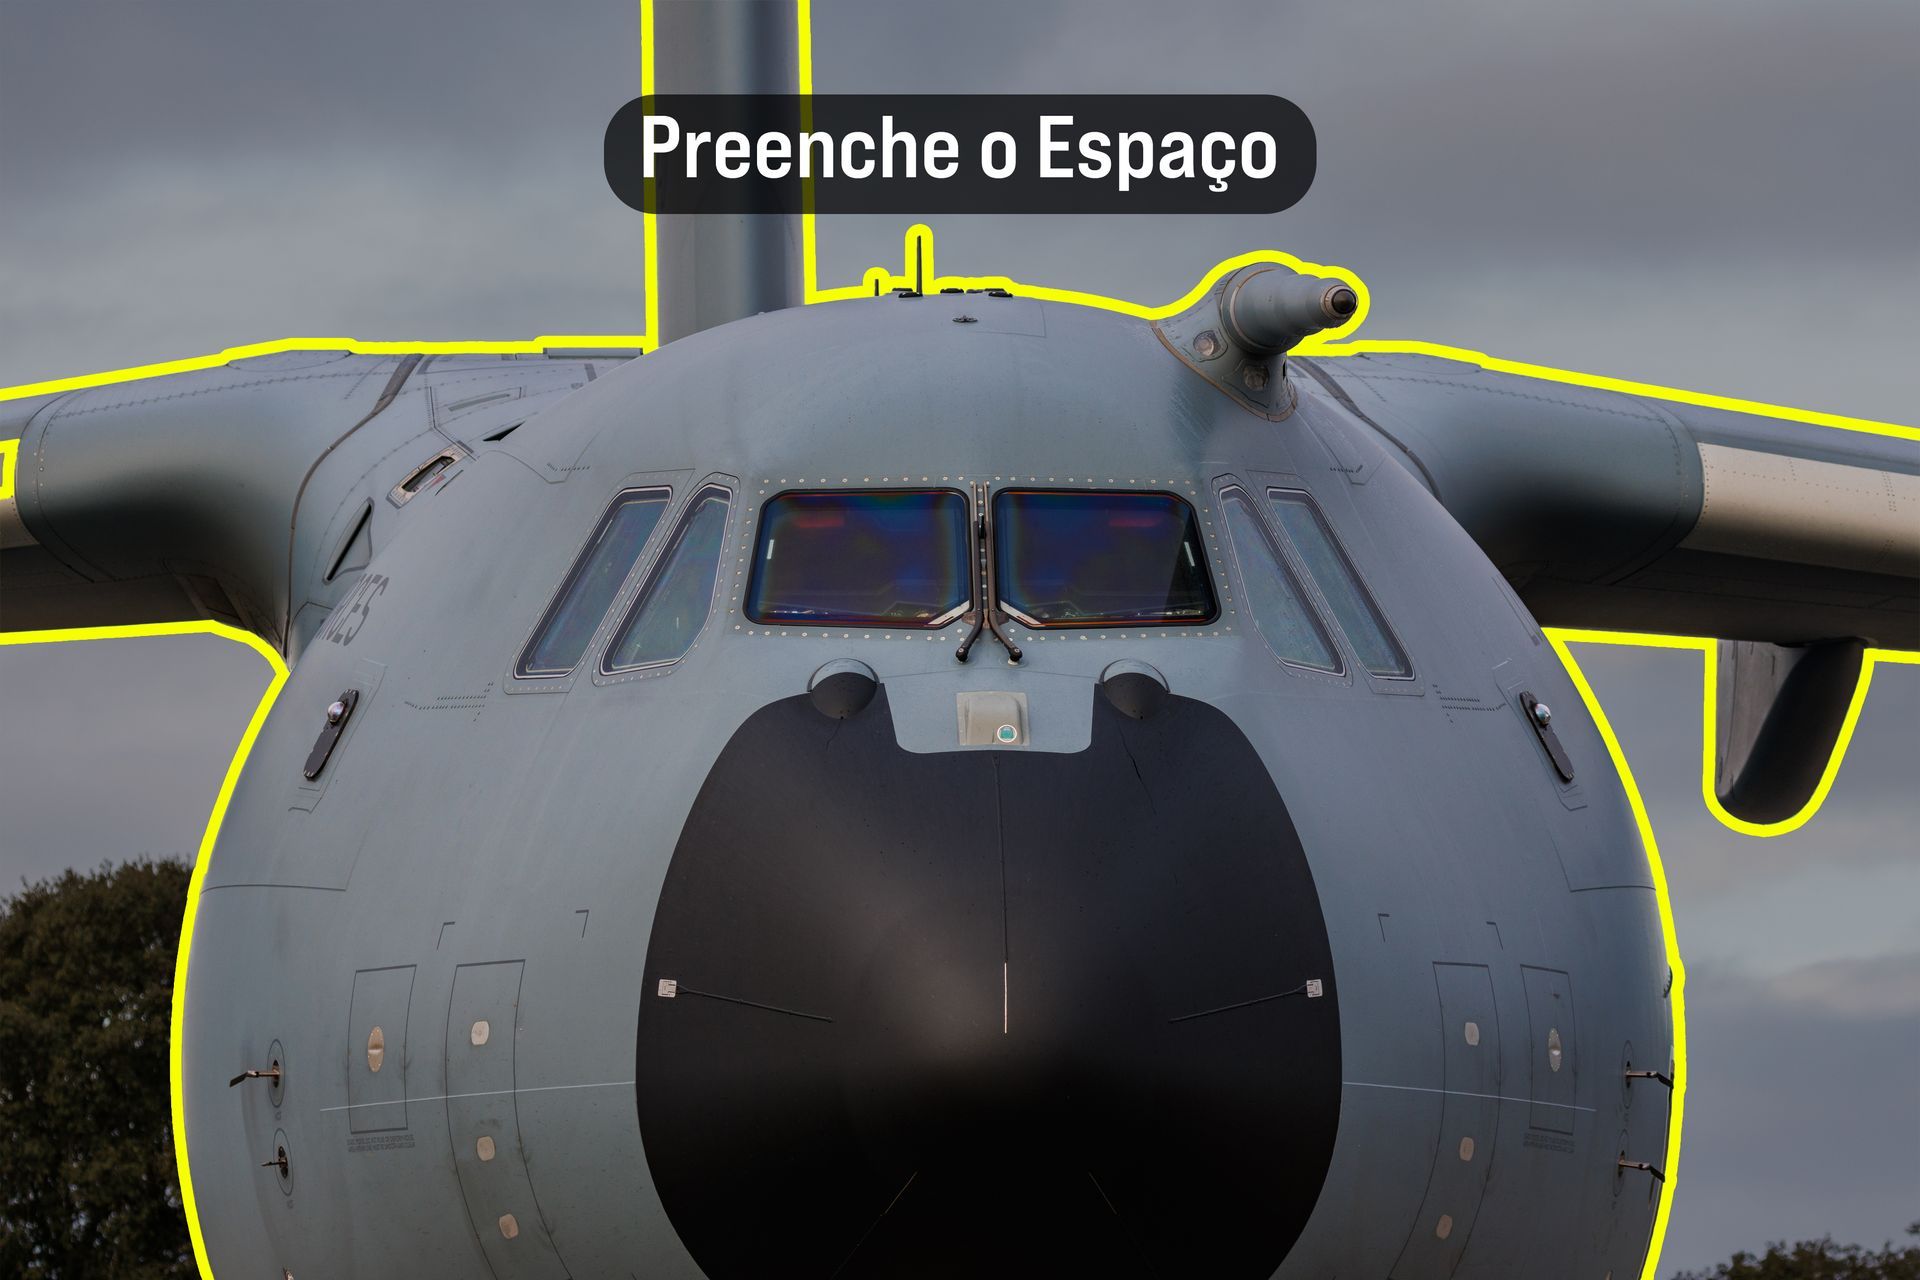
- In the Field: Getting up close and filling the entire composition with just the massive, imposing nose of an A400M. No background, no sky, just the engineering of the machine.
9. Negative Space
- The Concept: The exact opposite of filling the frame. Deliberately leaving vast amounts of empty space around your subject to emphasize scale, isolation, or vulnerability.
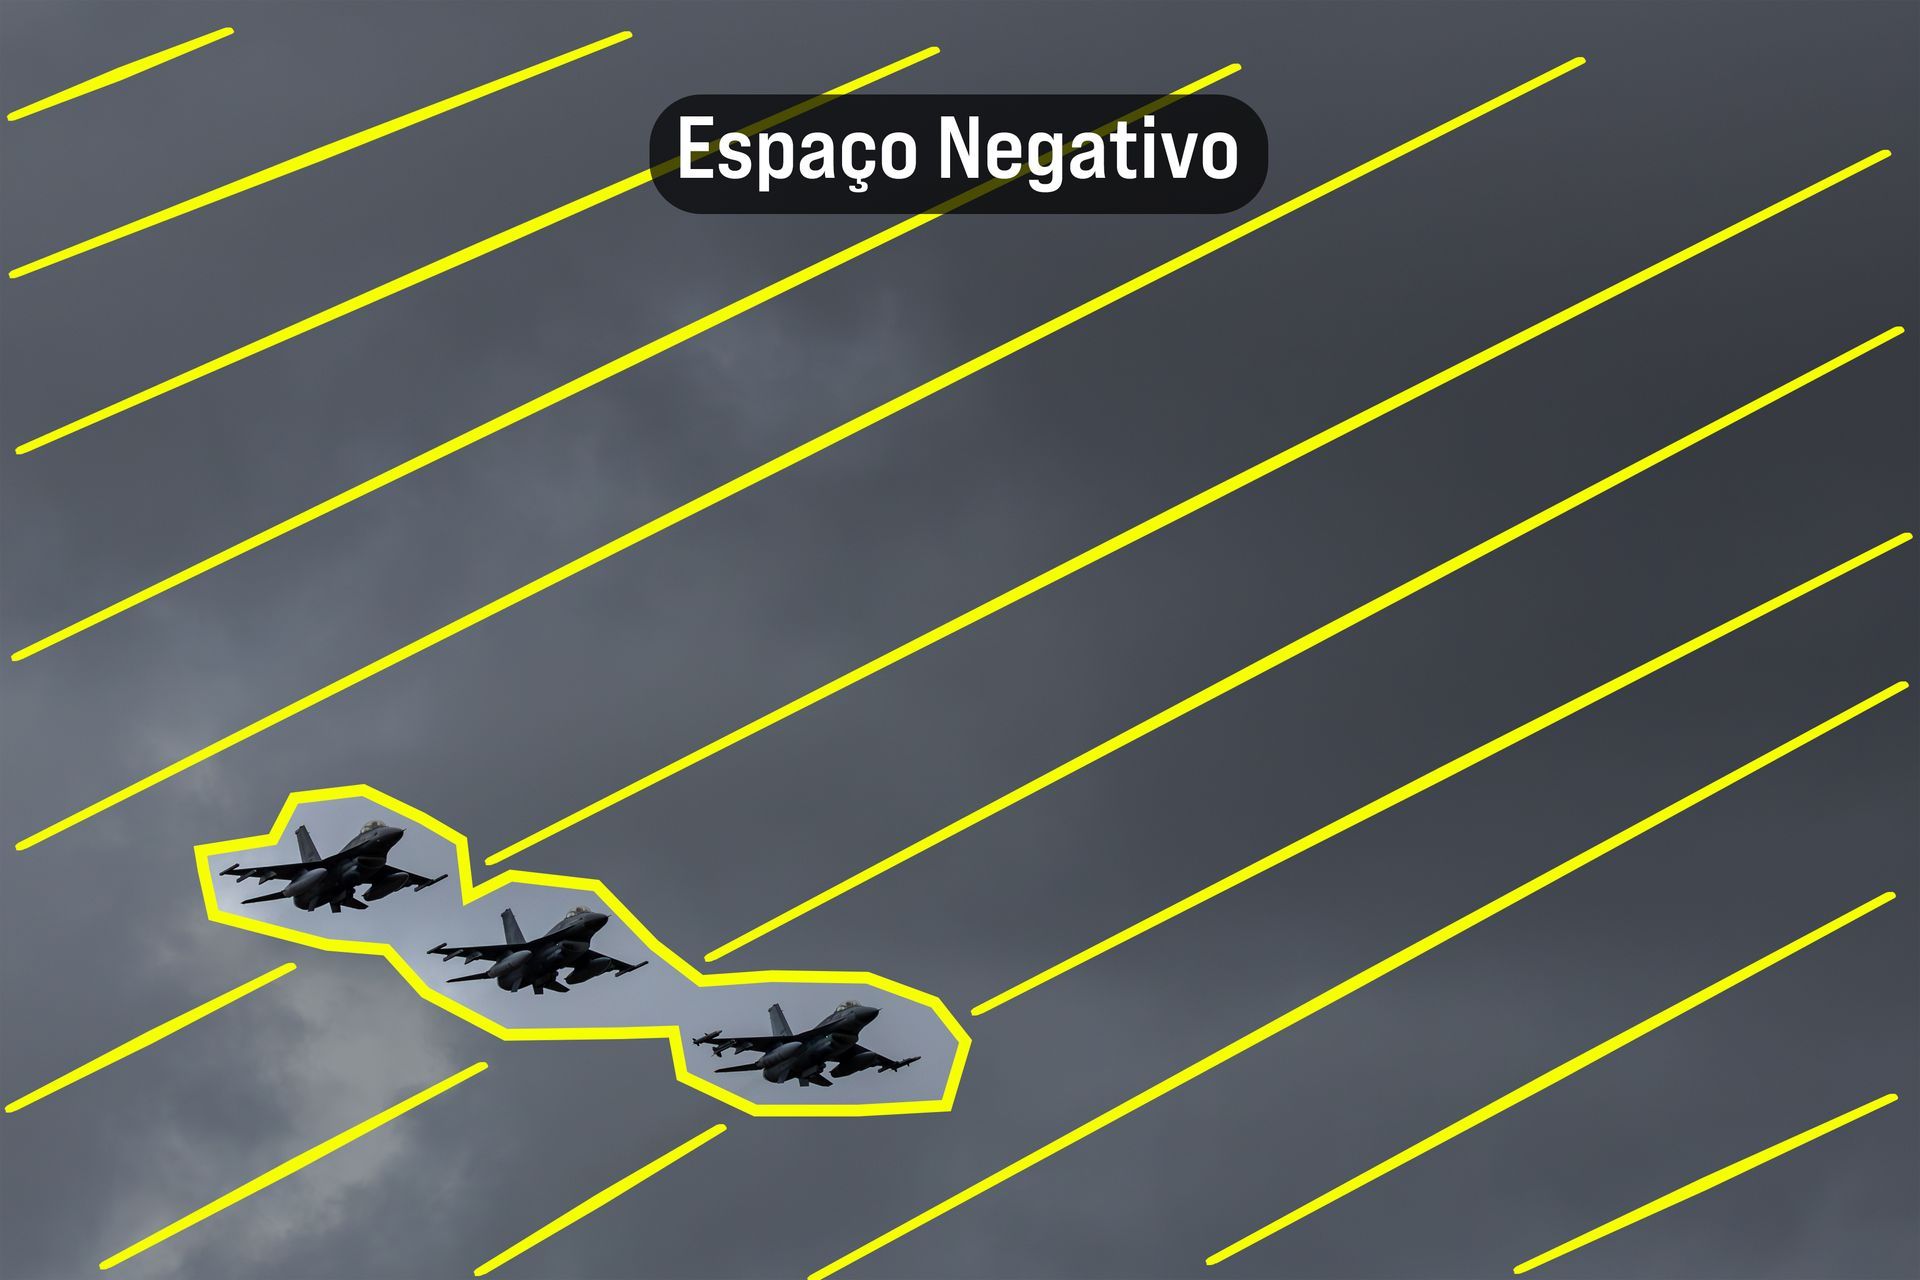
- In the Field: Placing a tight formation of three F-16s against a vast, empty, overcast gray sky. The aircraft become small, emphasizing the sheer immensity of the airspace.
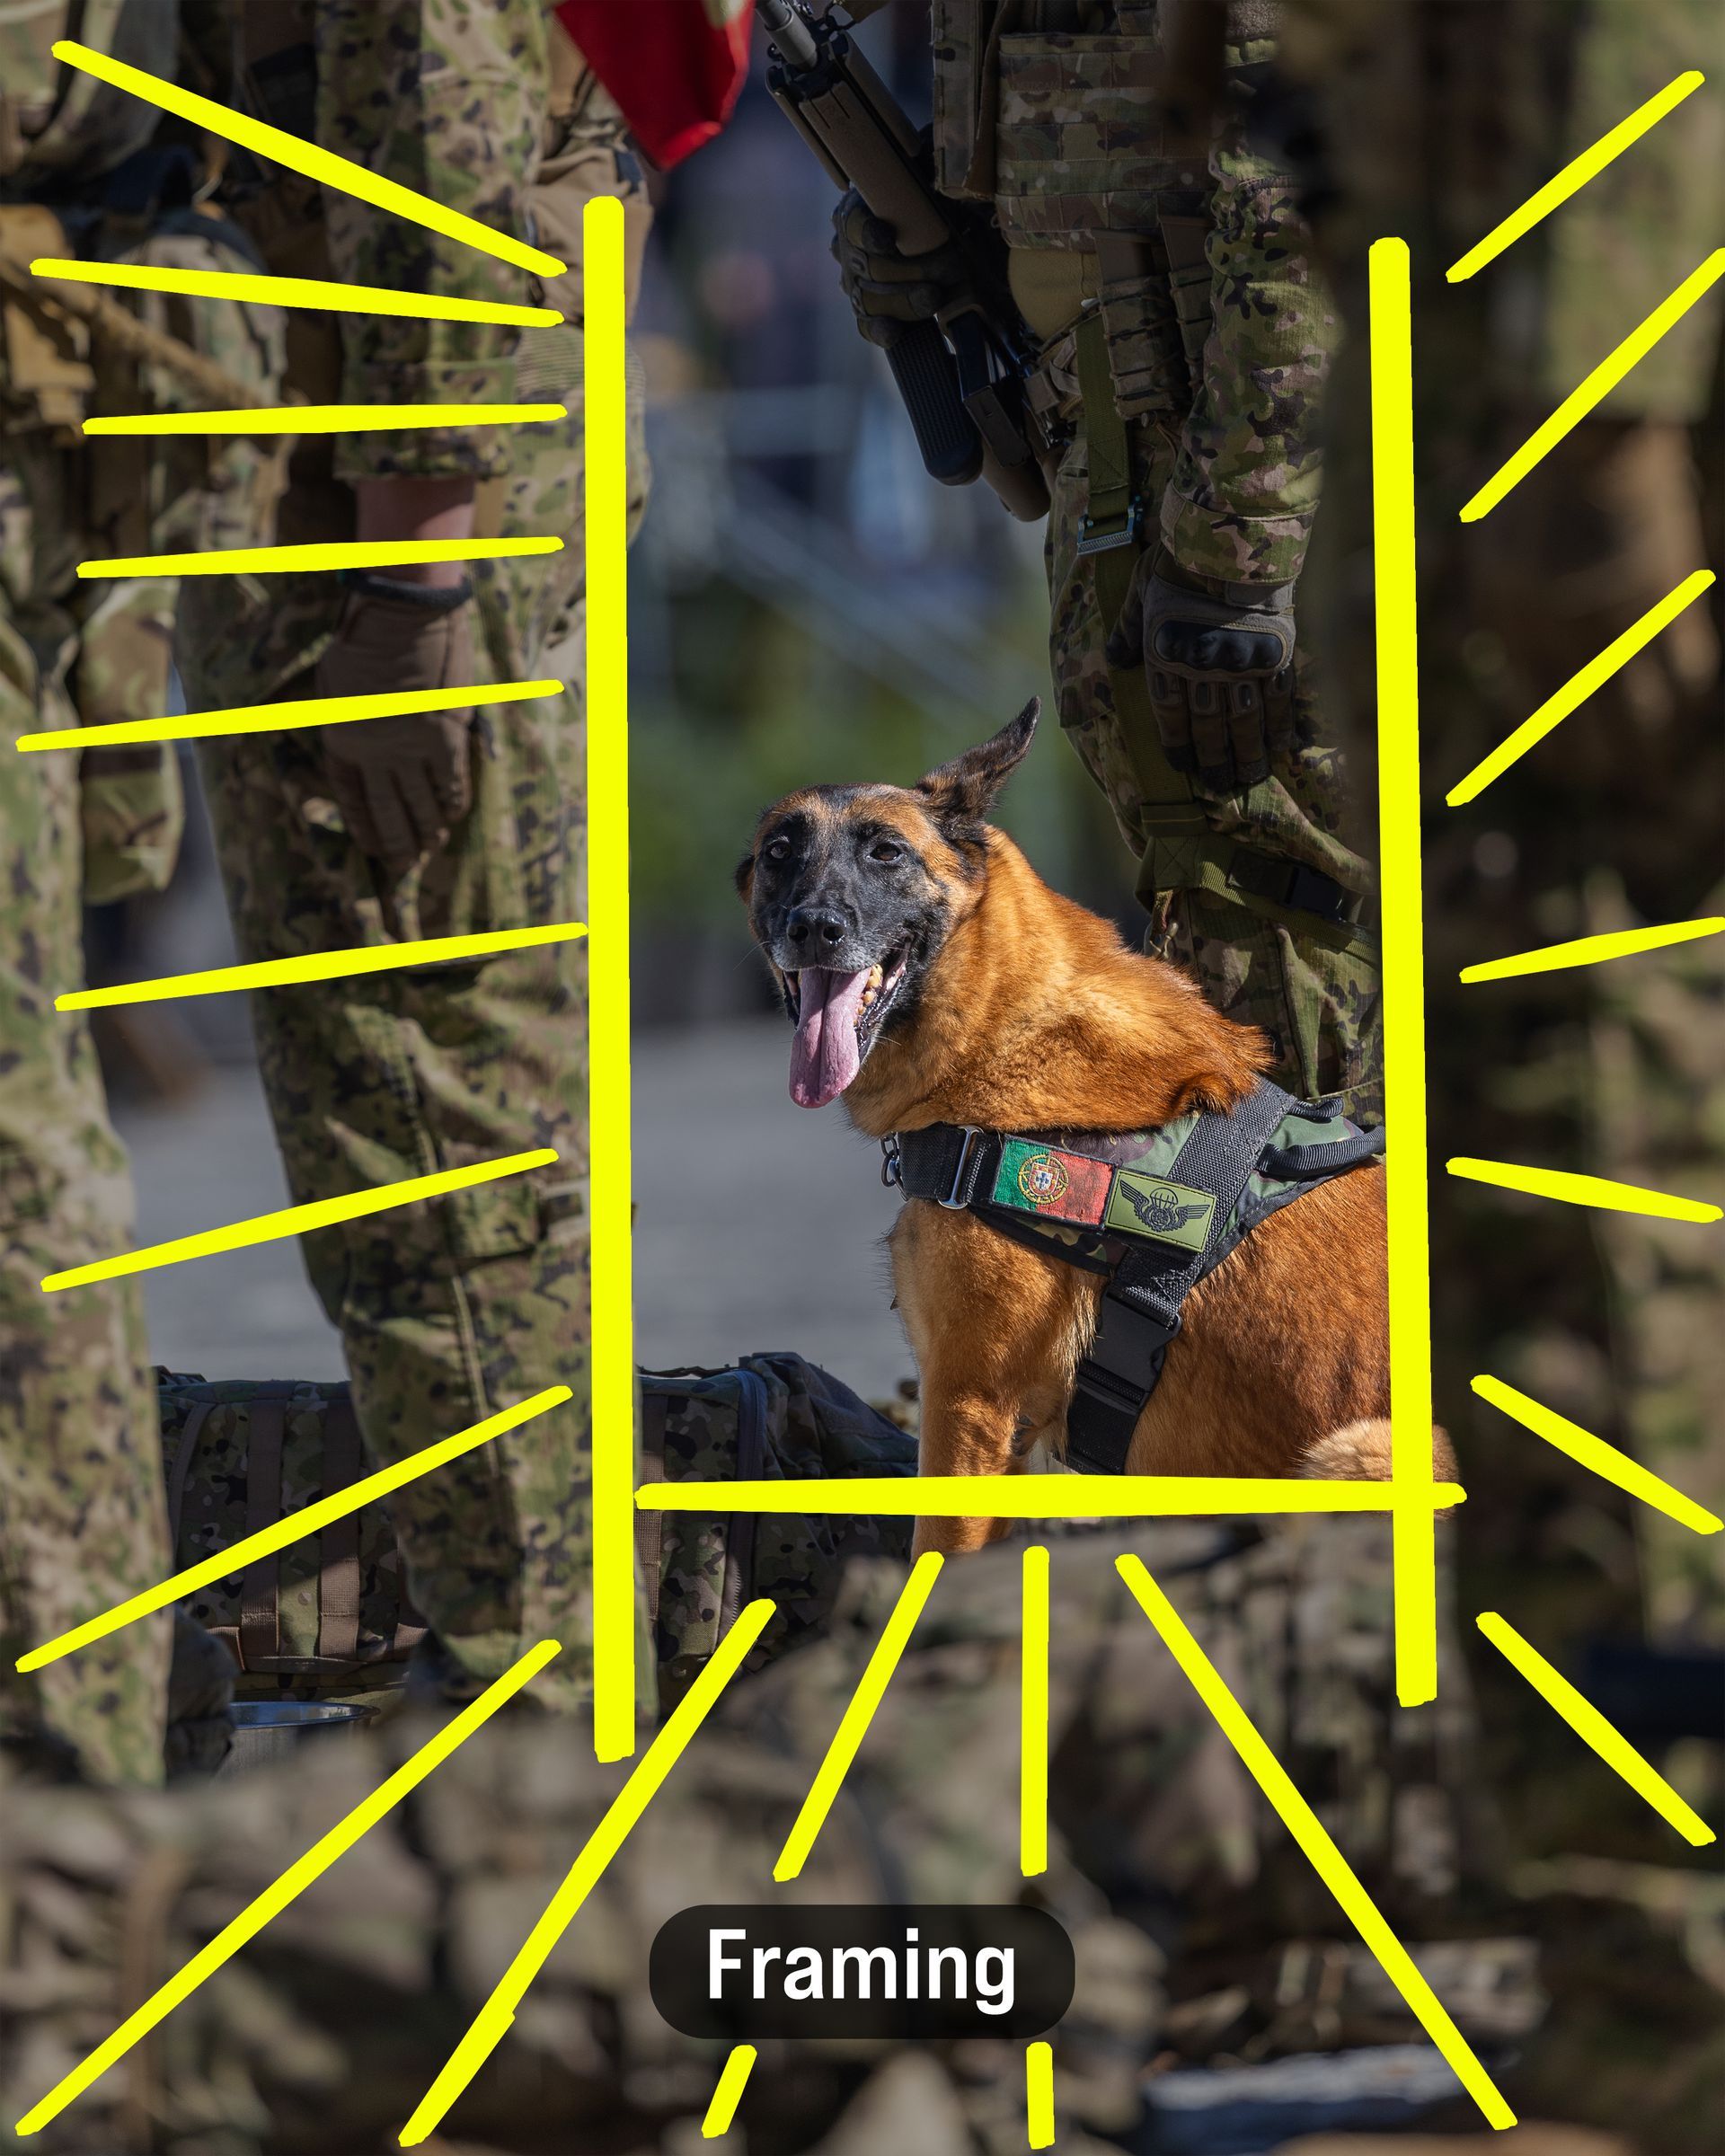
10. Framing
- The Concept: Using elements of the environment to create a "frame within a frame." This places the viewer inside the action and adds crucial context.
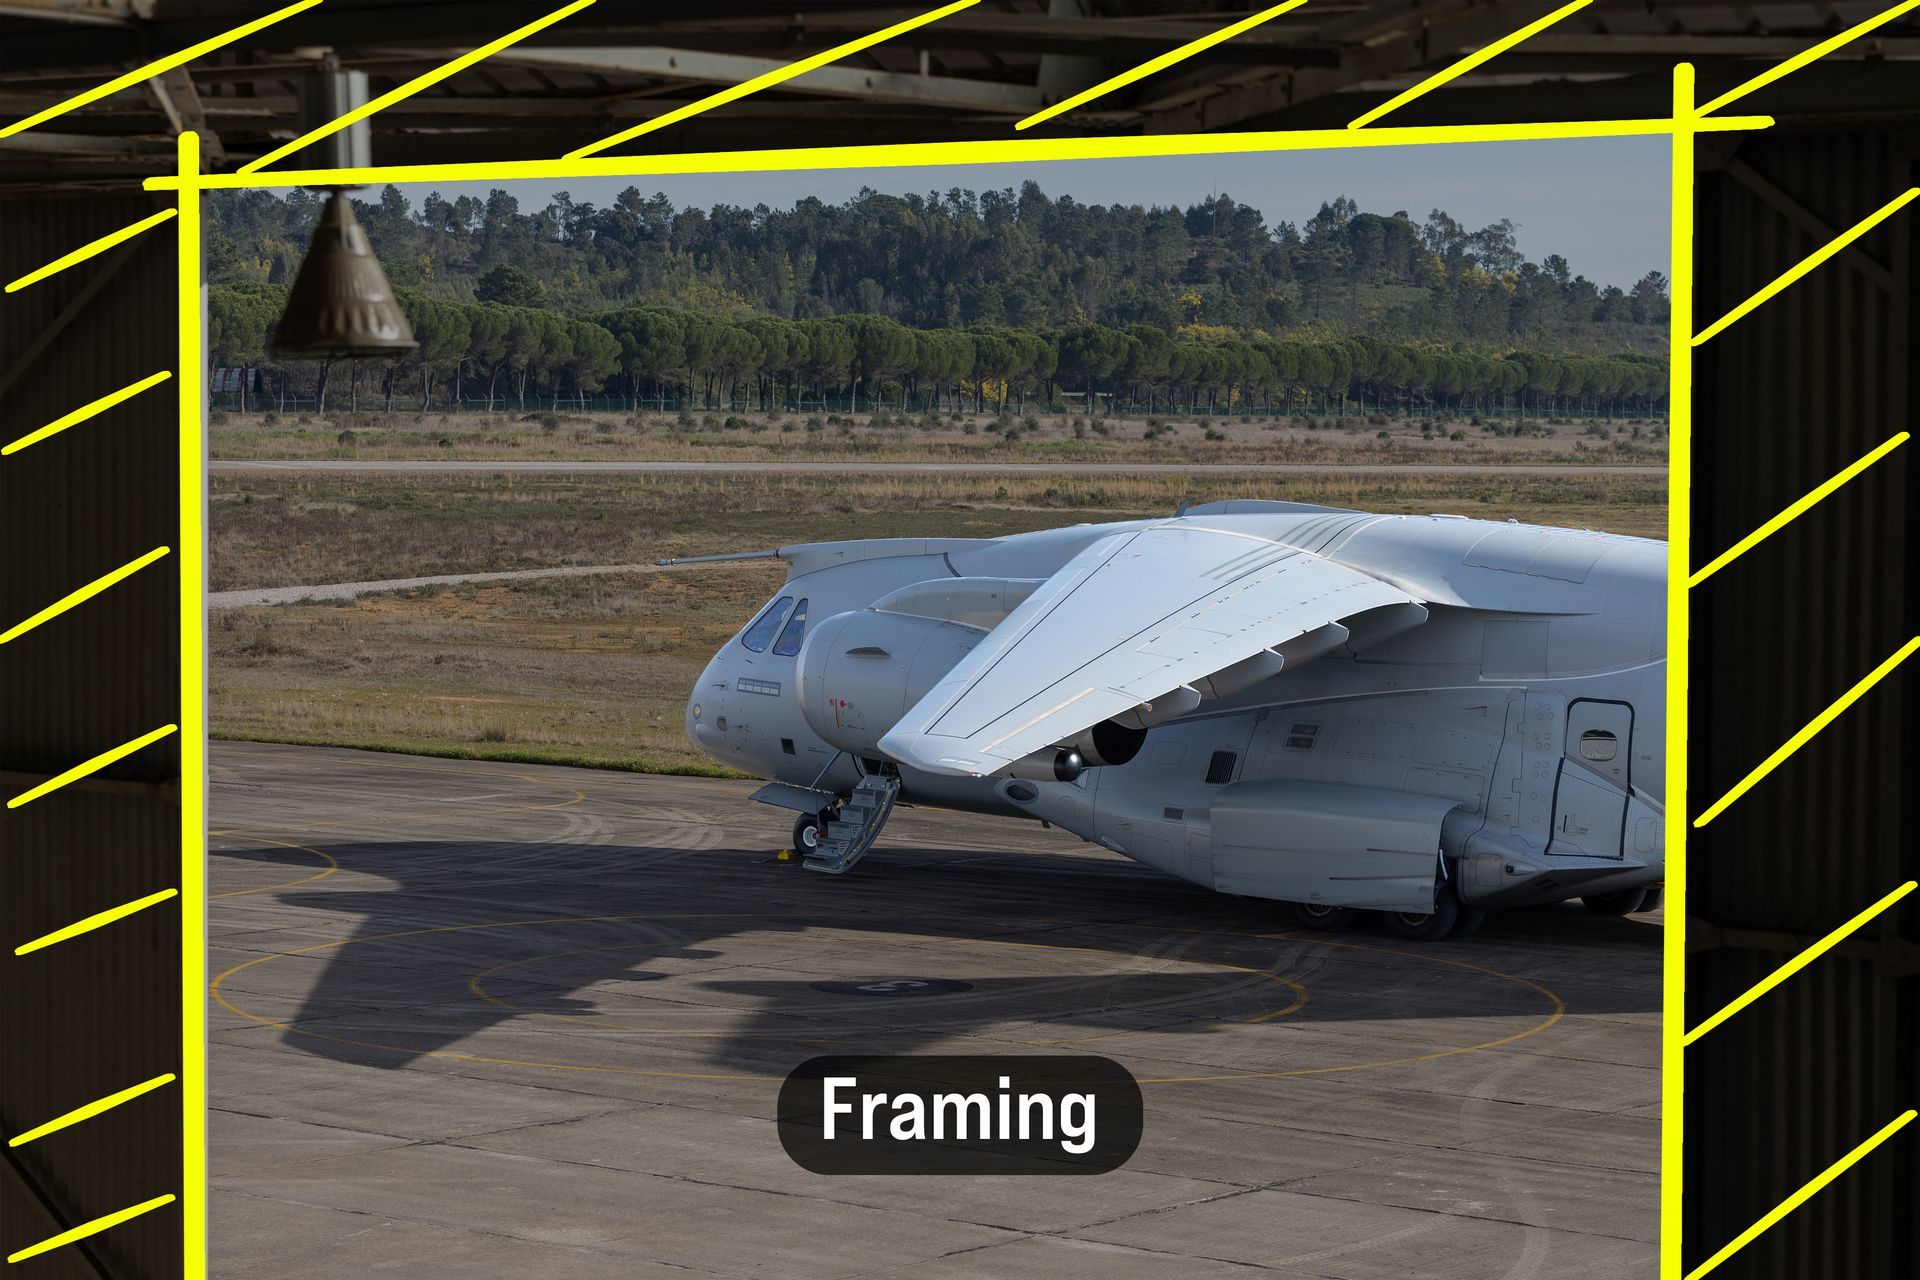
- In the Field (Left): Using massive, dark hangar doors to naturally frame a KC-390 parked outside on the ramp.
- In the Field (Right): Capturing a K9 (paratrooper dog) perfectly framed between the legs of the troops standing at attention in formation.
11. Foreground Element
- The Concept: Adding a layer of depth to an image. Putting something in the immediate foreground grounds the photograph and tells a multi-layered tactical story.
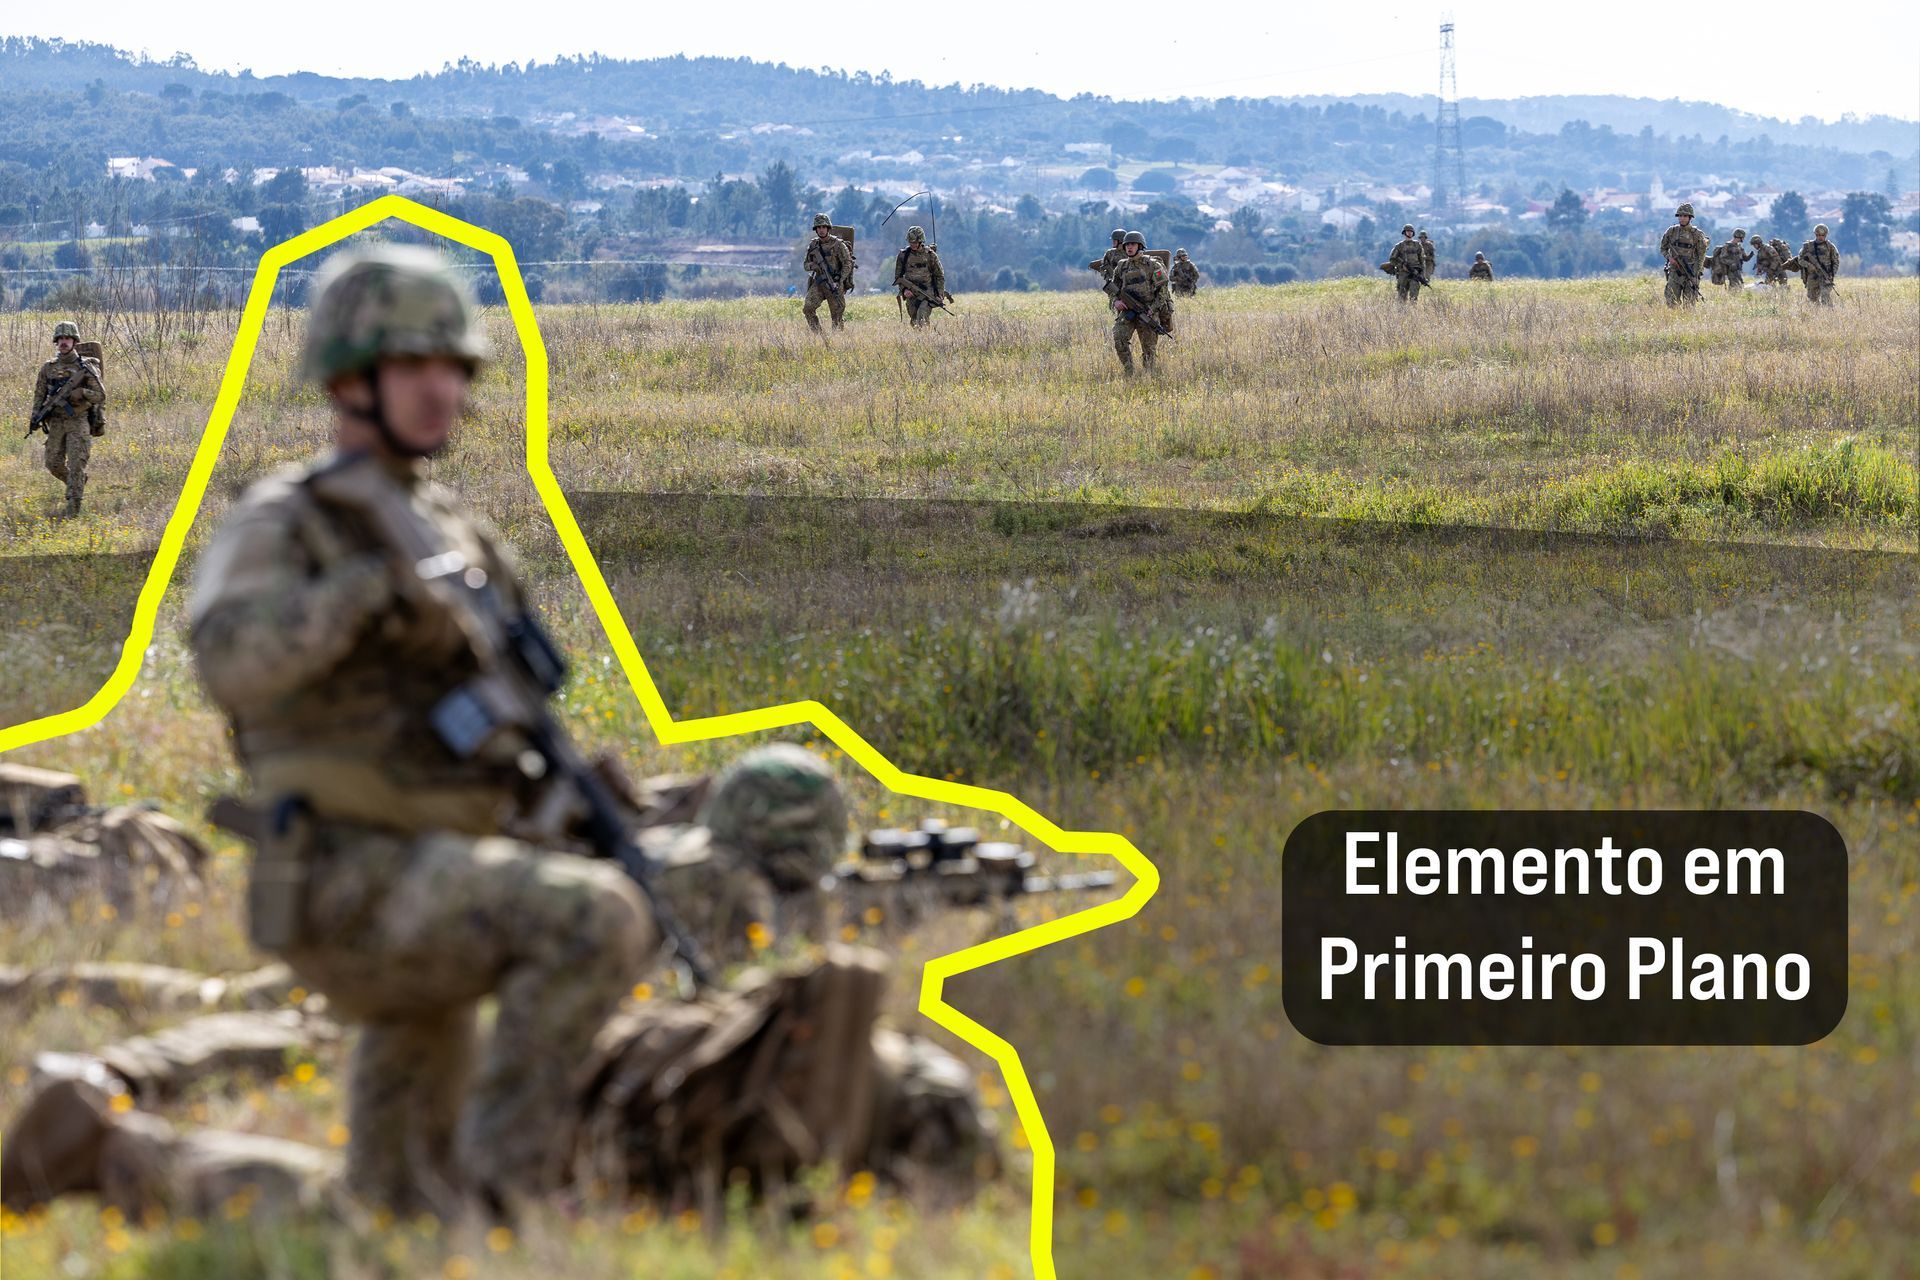
- In the Field: Paratroopers moving on foot to a rendezvous point after landing in the LZ. In the immediate, blurred foreground, other paratroopers hold an overwatch/security position, adding immense narrative depth.
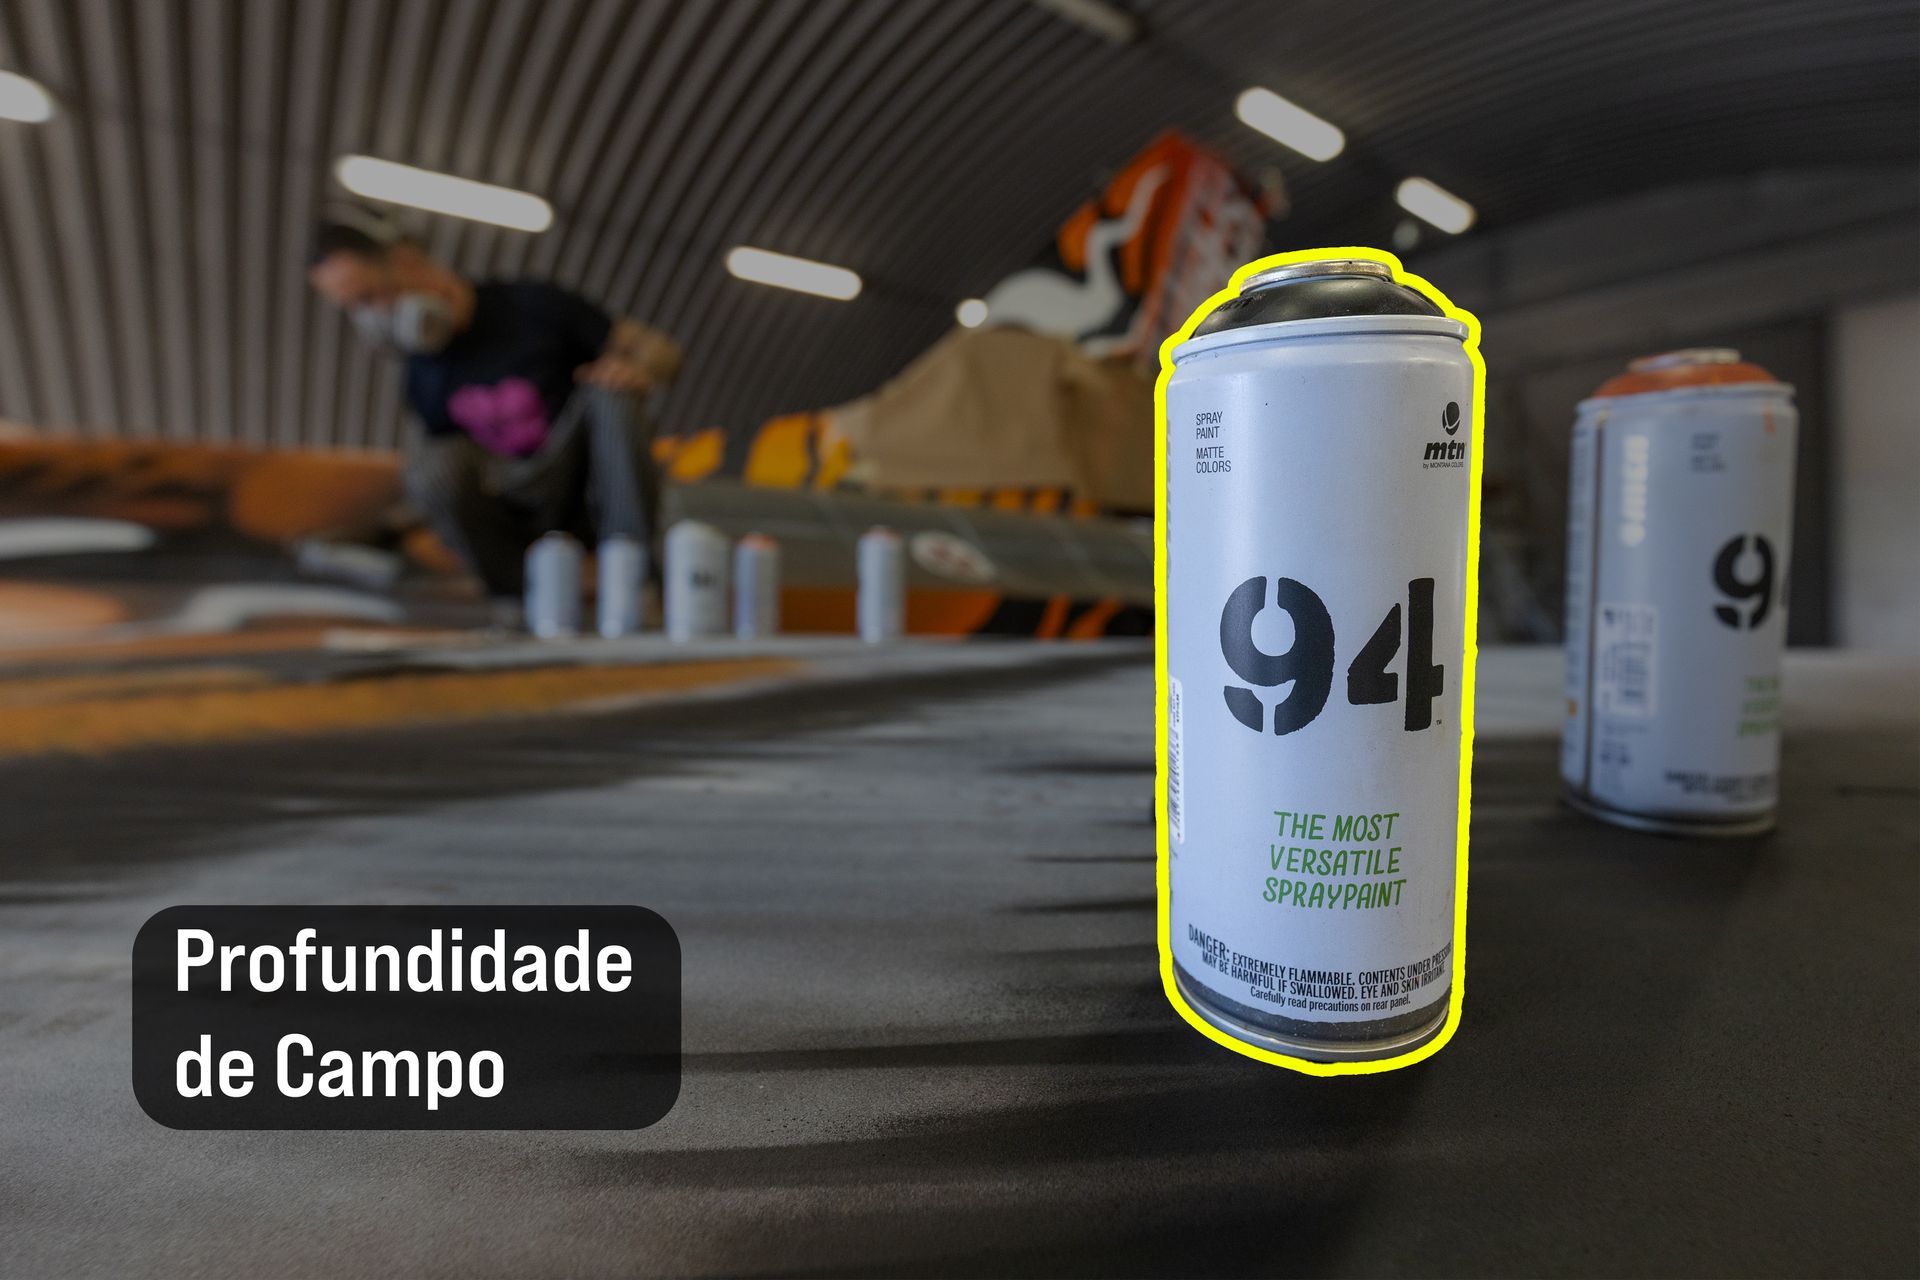
12. Depth of Field
- The Concept: Using your aperture as a weapon of isolation. By shooting wide open, you dictate exactly what is relevant and what is redacted by blurring the background or foreground.
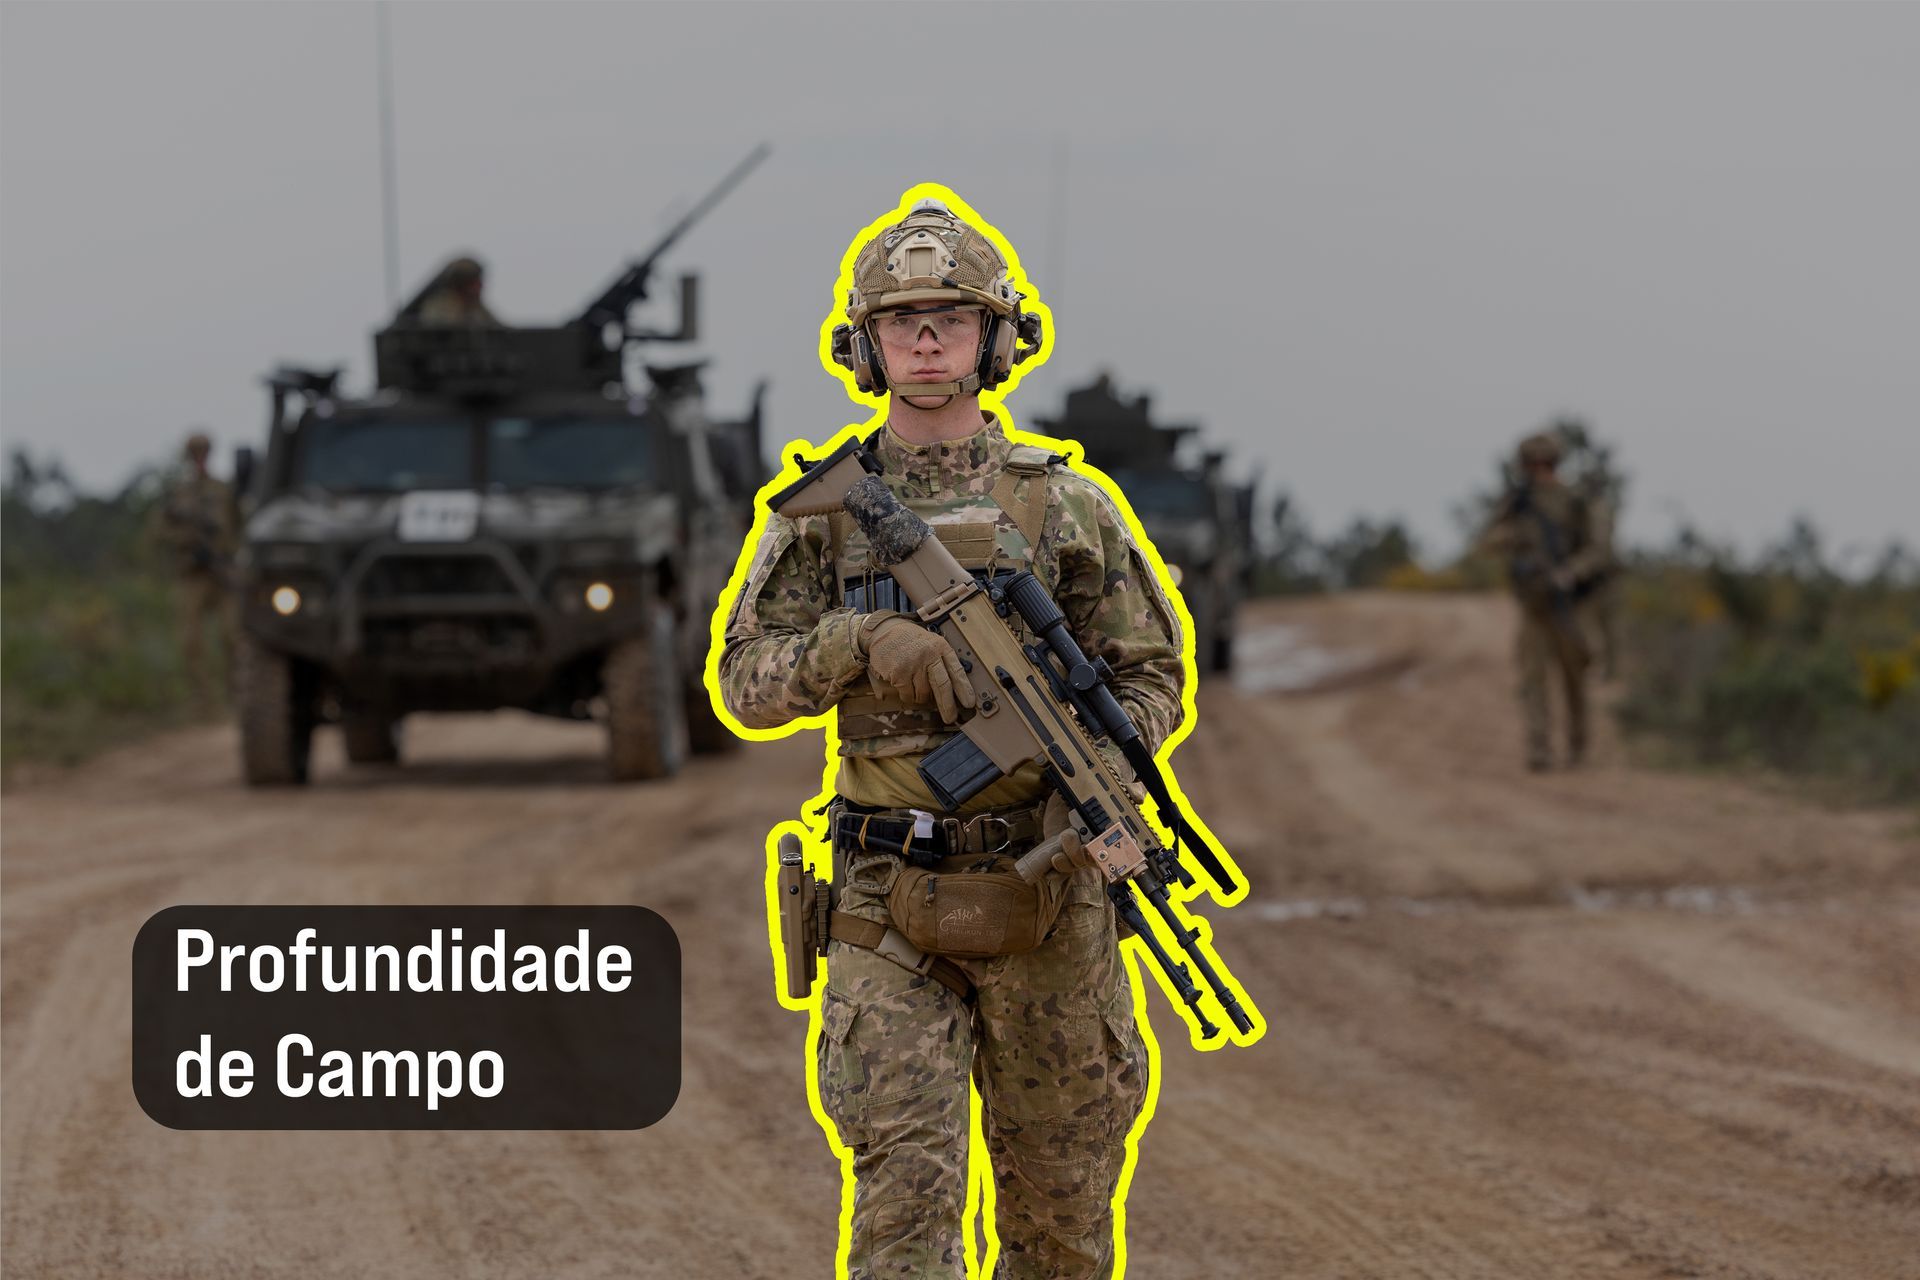
- In the Field (Left): In a mixed patrol of vehicles and infantry, shooting wide open keeps a single dismounted soldier in the center of the frame tack-sharp, while blurring the chaotic surrounding environment.
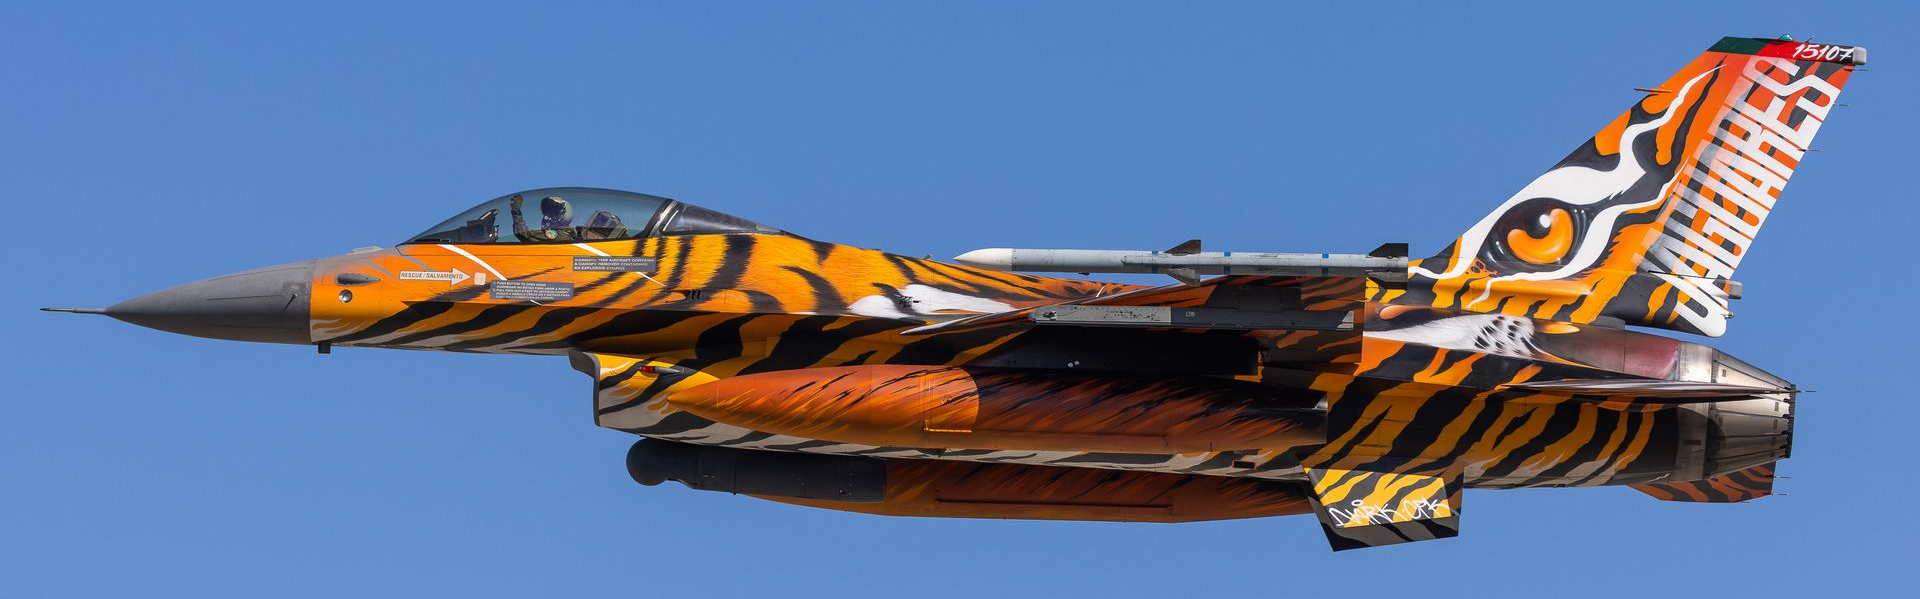
- In the Field (Right): Focusing sharply on a spray paint can in the immediate foreground, while the artist (NARK) and the vibrant colors of the NTM 2025 F-16 "Jaguar" remain softly blurred in the background.
13. Color Contrast
- The Concept: Utilizing aggressively contrasting colors to make a subject violently separate from its environment, immediately grabbing the viewer's attention.
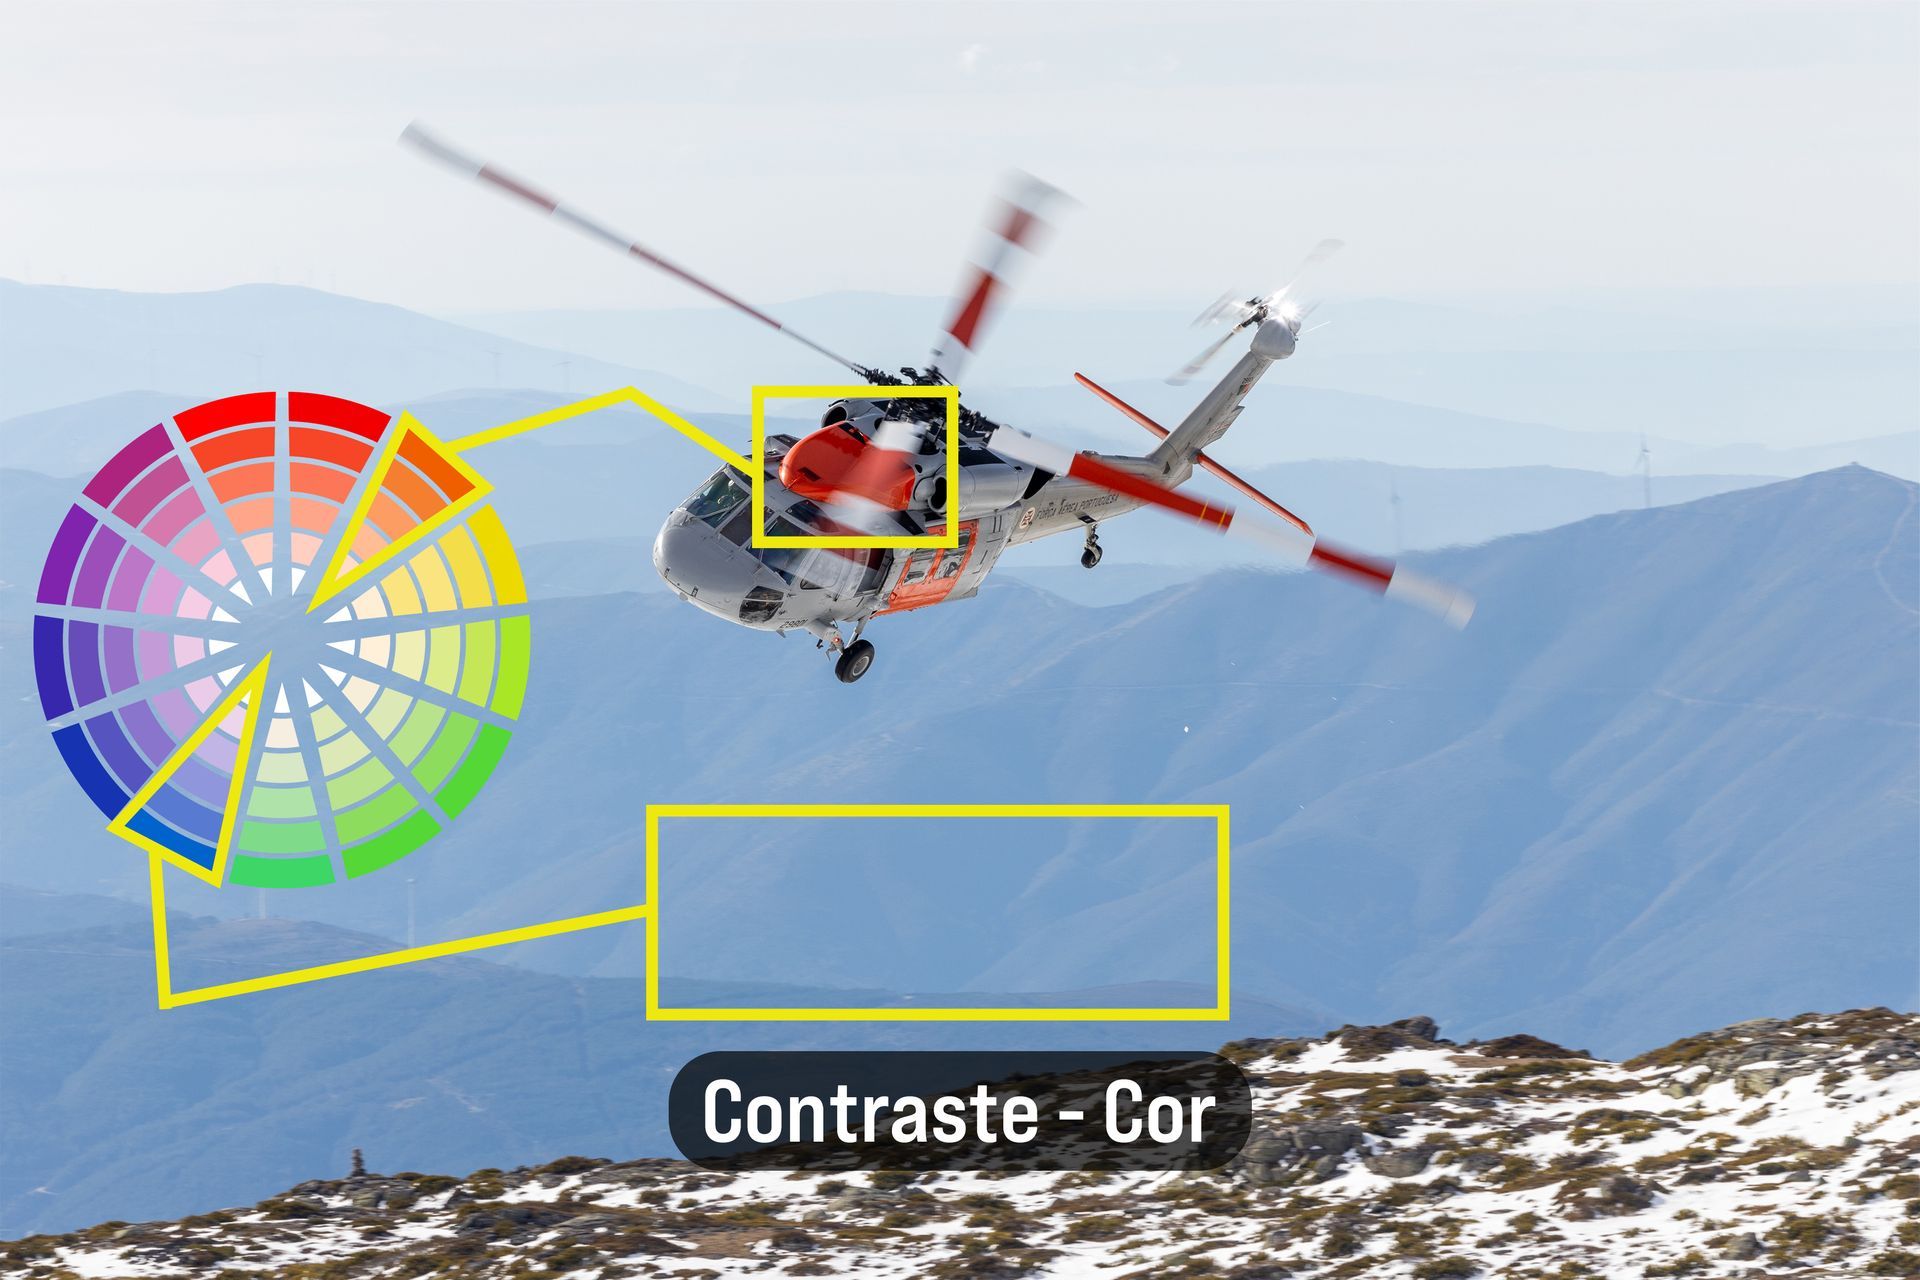
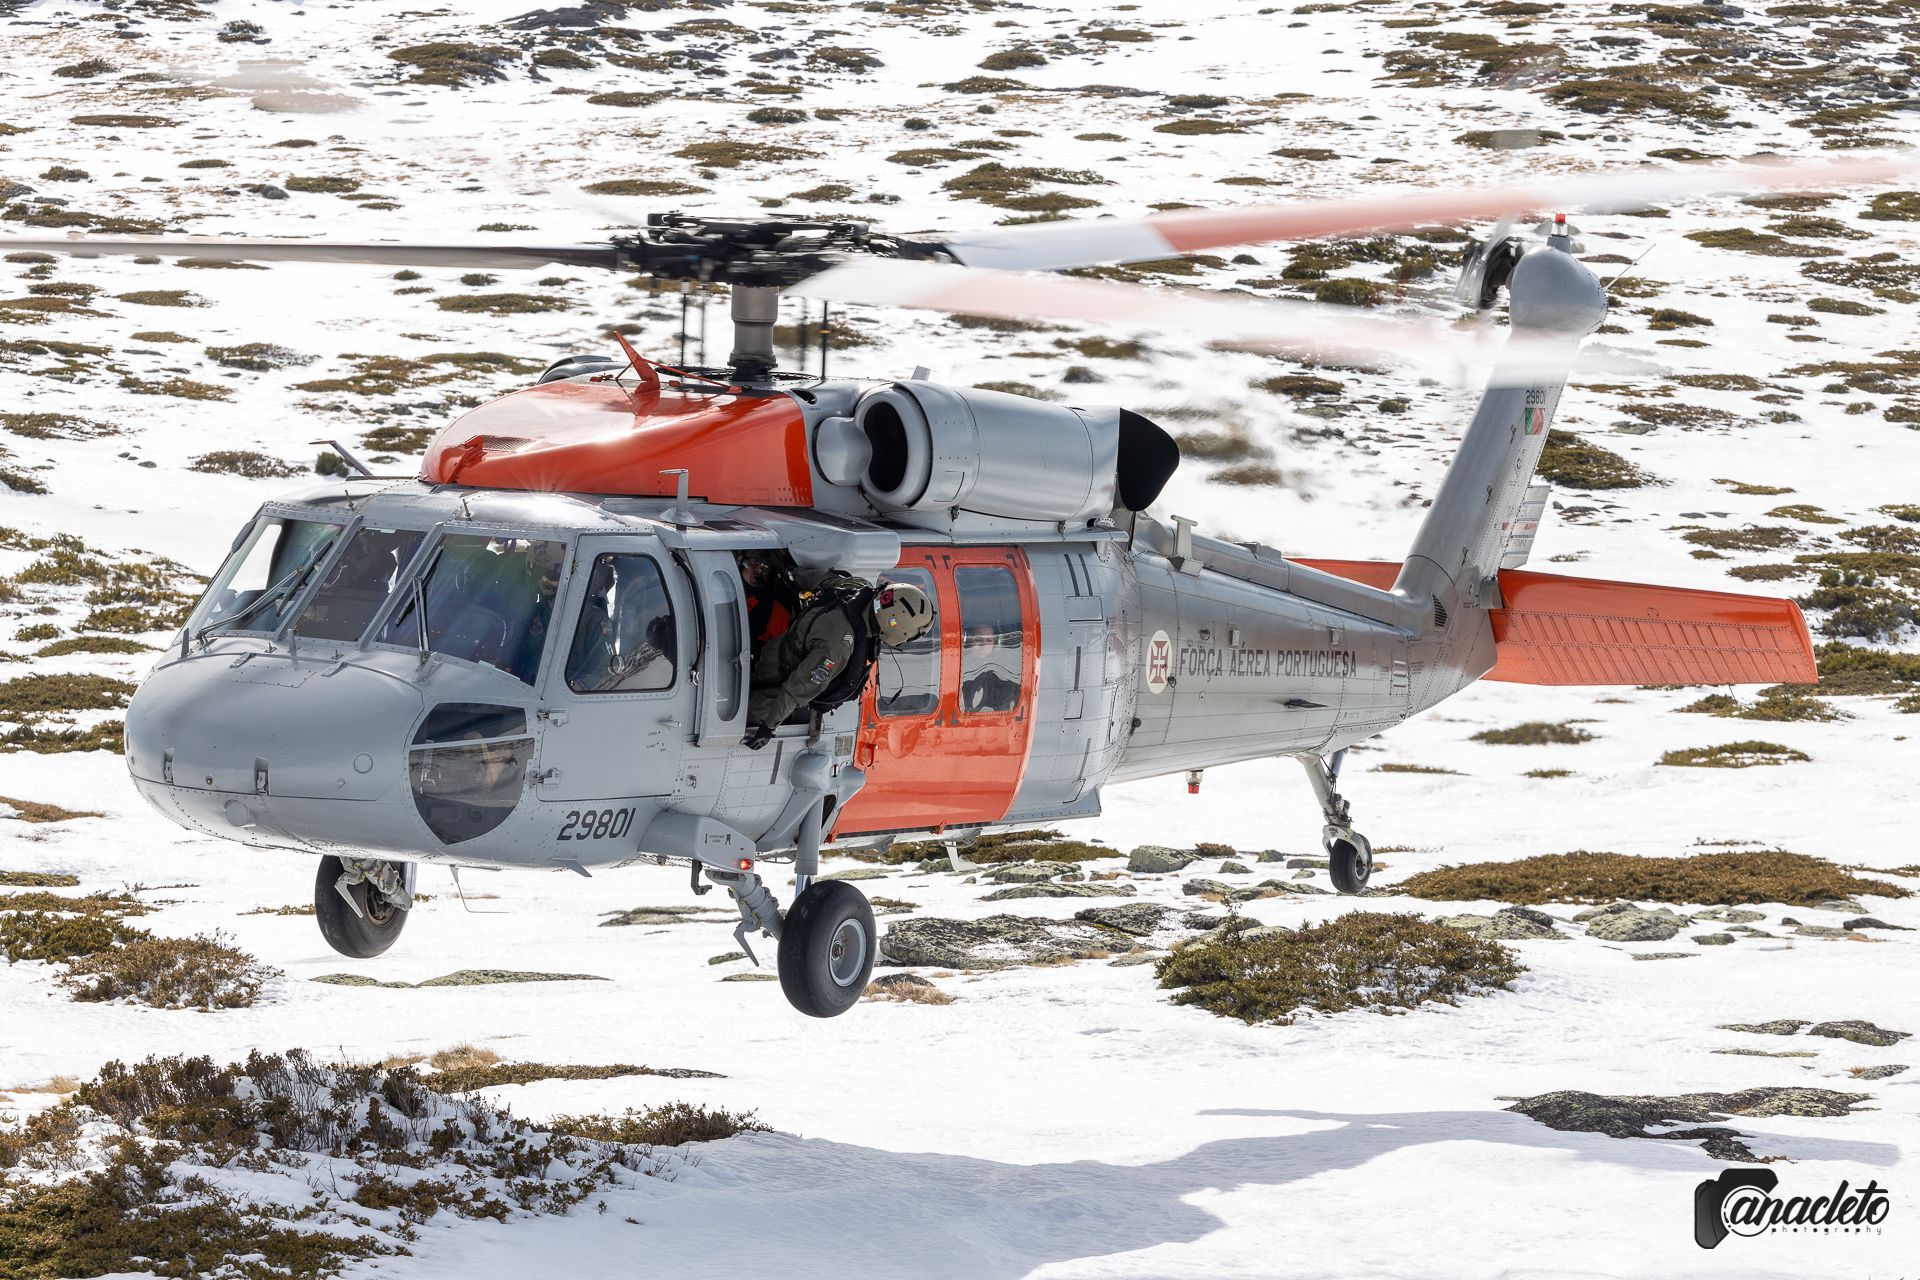
- In the Field: A UH-60 Black Hawk featuring high-visibility orange panels and a gray base, popping powerfully against the freezing blue and white backdrop of the snow-covered Serra da Estrela.
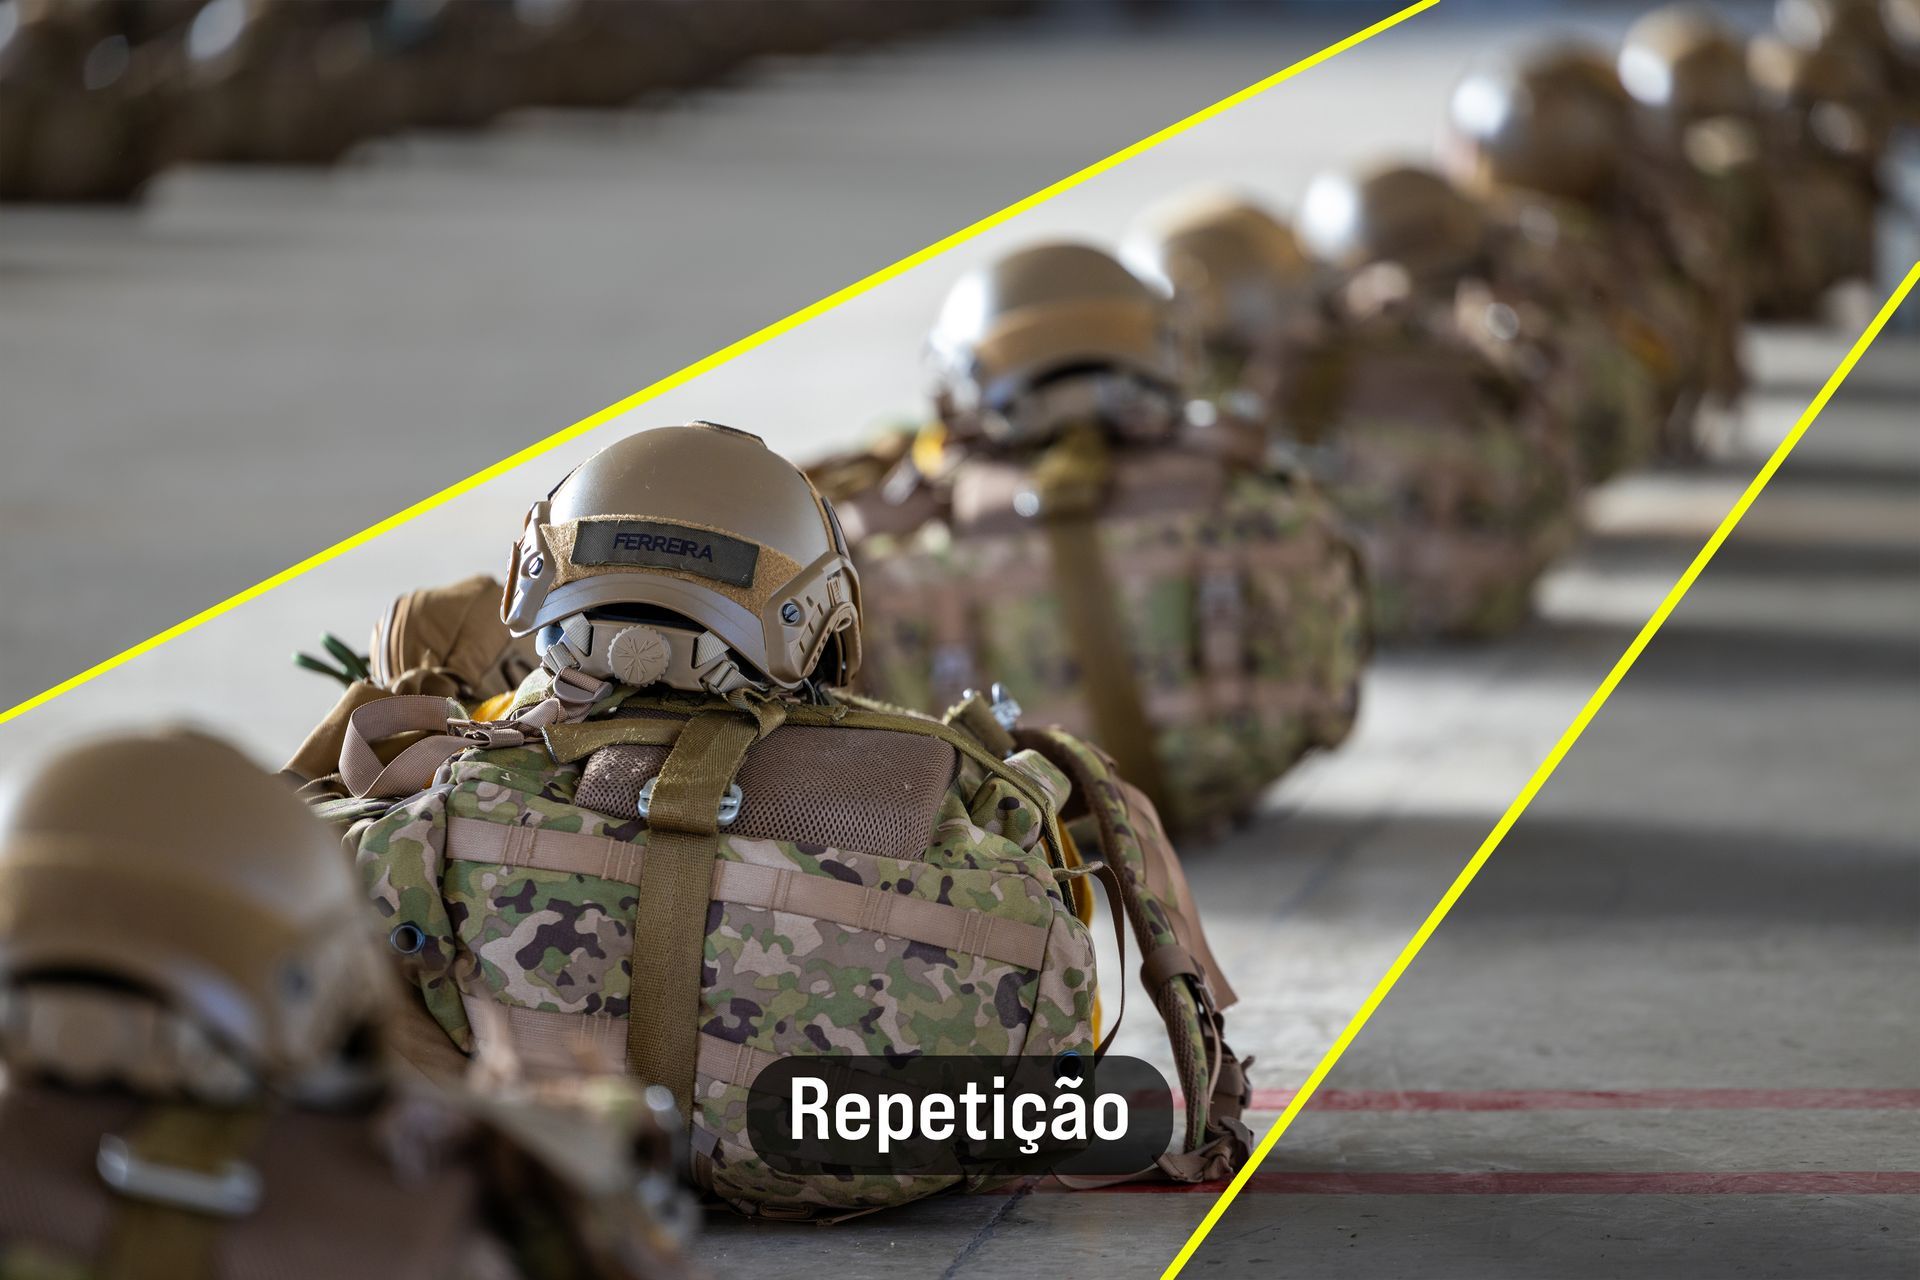
14. Repetition
- The Concept: The human brain loves patterns. Repetition visually communicates numbers, discipline, strict uniformity, and military might.
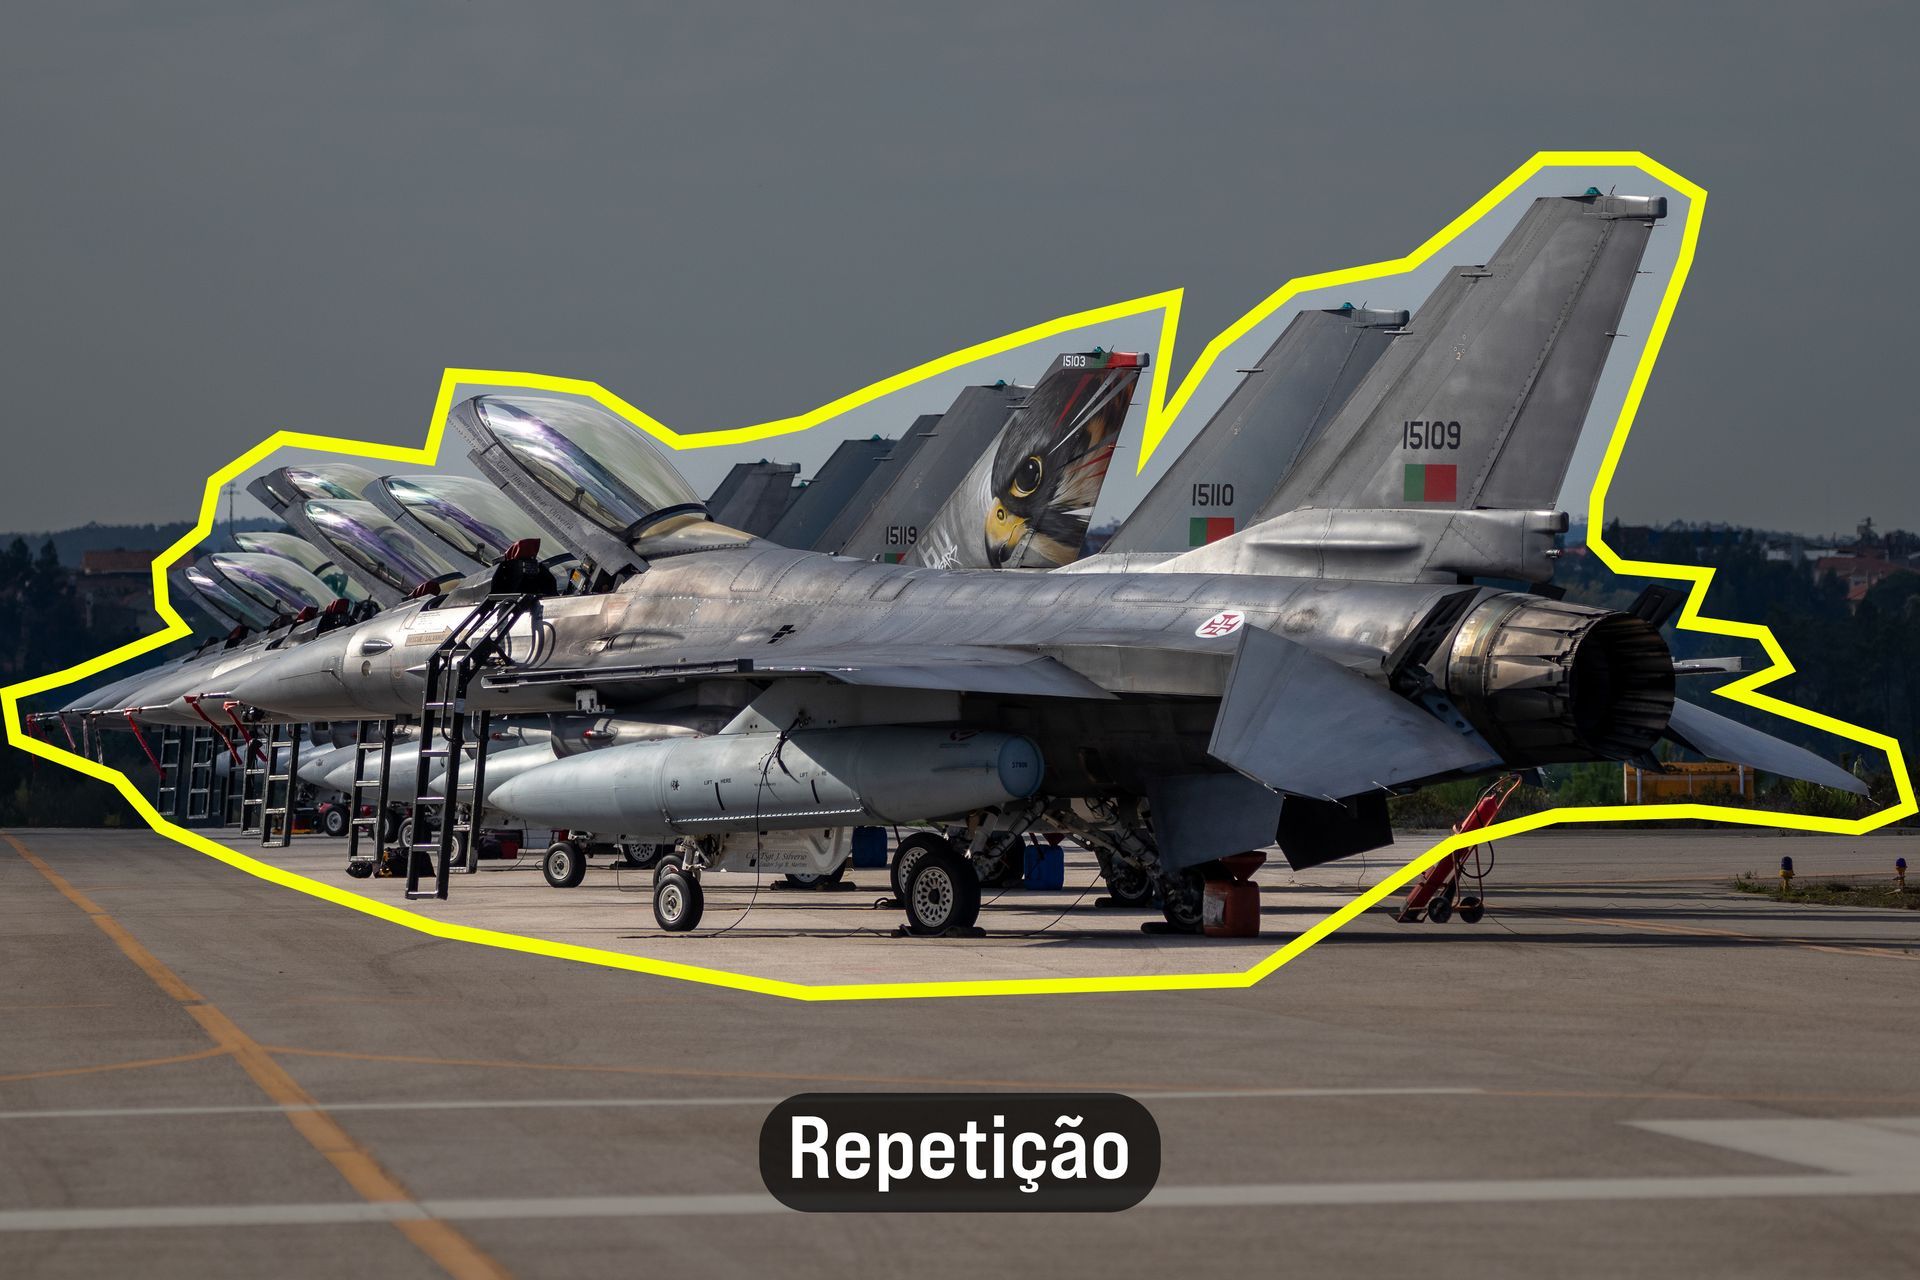
- In the Field (Left): The aggressive geometric repetition of F-16s lined up perfectly on a taxiway.
- In the Field (Right): The strict, uniform layout of paratrooper gear aligned flawlessly on a hangar floor.
15. Rule of Odds
- The Concept: The human brain finds even numbers somewhat artificial and rigid, while odd numbers feel more organic, dynamic, and visually pleasing.
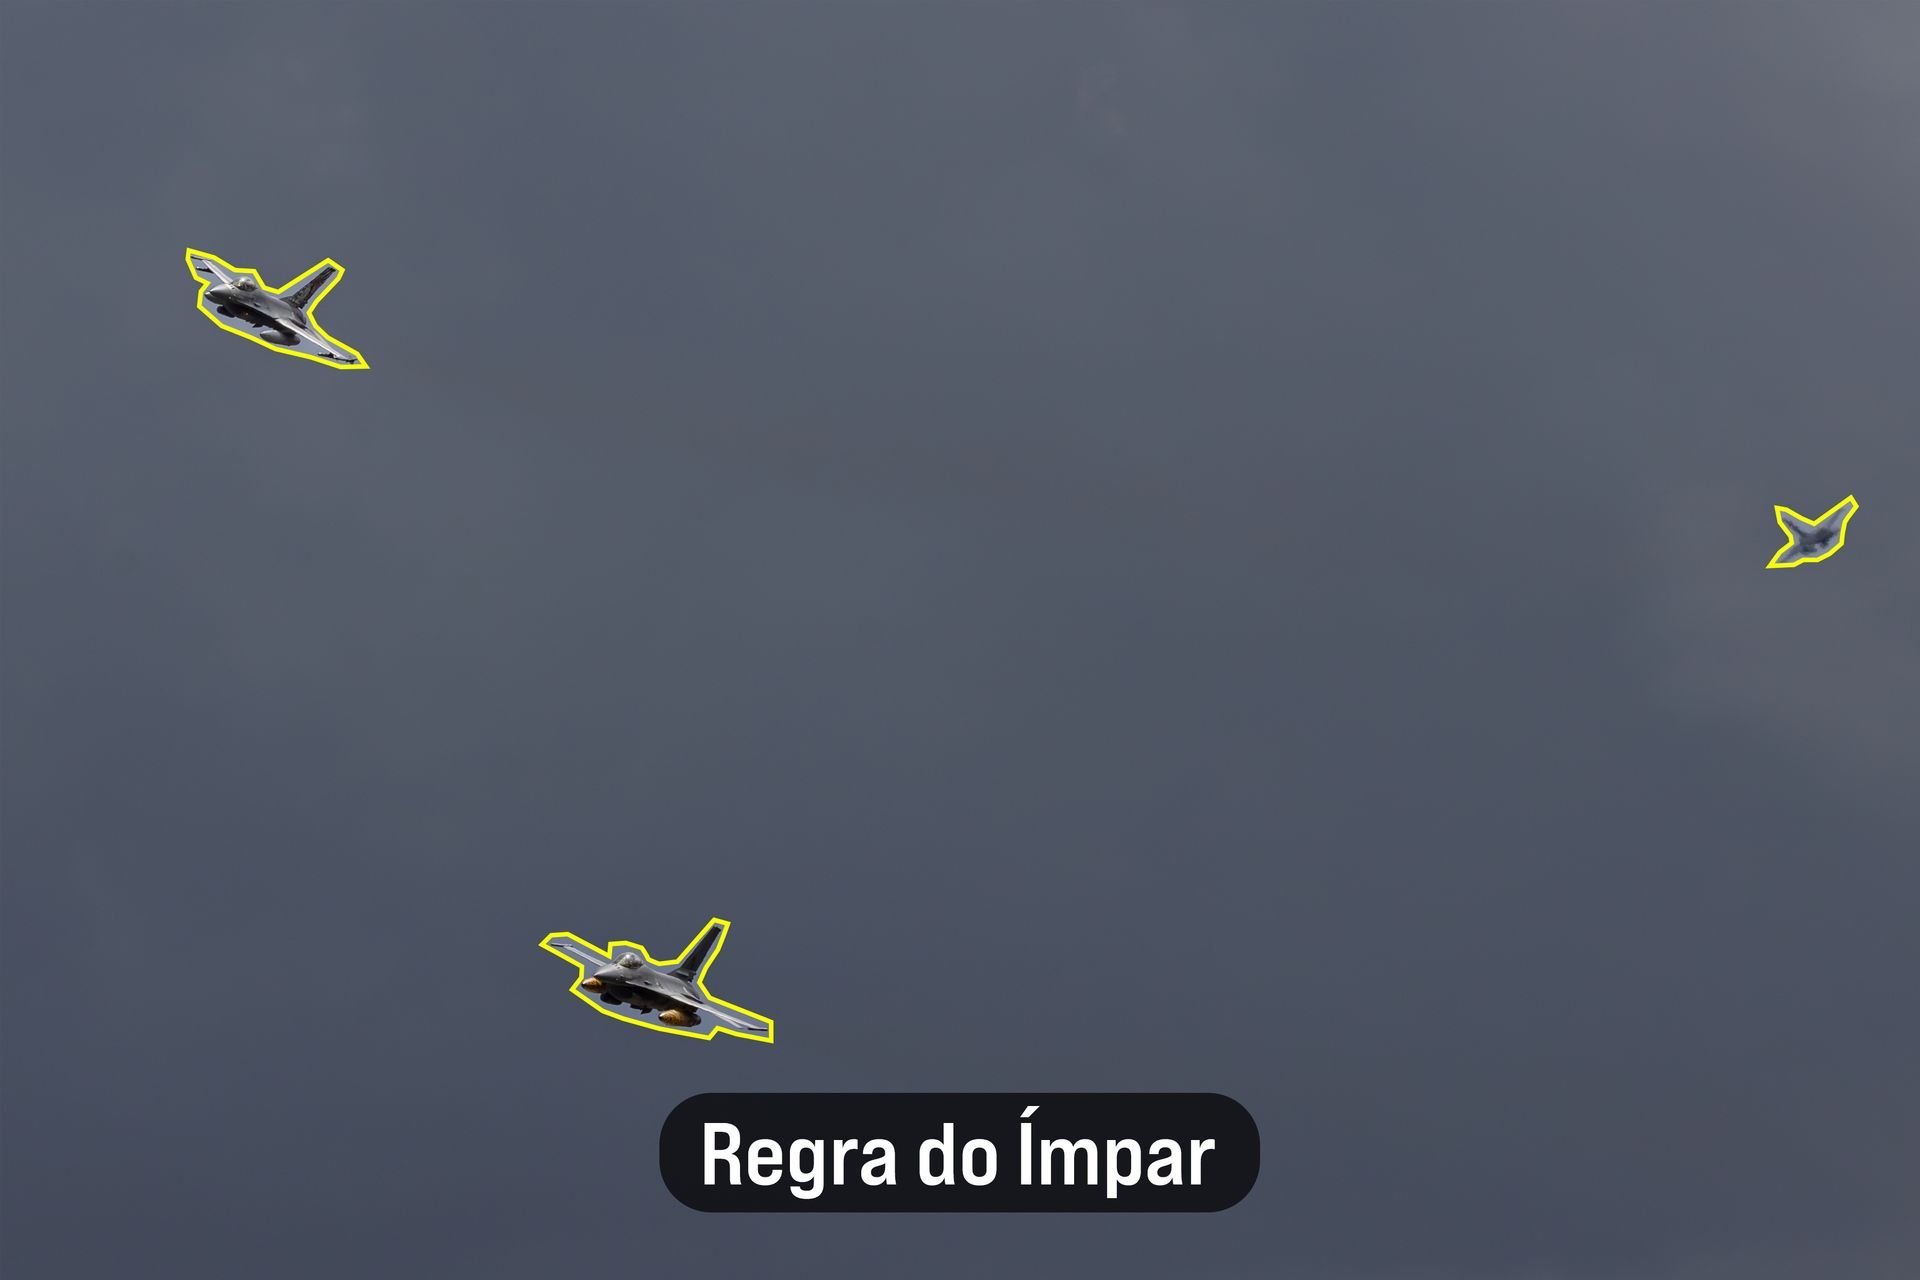
- In the Field: A pair of F-16s flying in formation on the left side of the frame, visually balanced by a third, solo F-16 positioned further away on the right. Three aircraft total, creating perfect visual tension.
3. Focal Length: When the Environment Dictates the Gear
There is a romanticized idea in photography that you should choose your lens purely based on the emotional narrative you want to convey. You might want the intimate, gritty, documentary feel of a 35mm lens, or the dramatic background compression of a 400mm.
In military and aviation photojournalism, that romanticism rarely survives first contact with the operational environment.
The hard truth is this: Logistics, access, and safety perimeters dictate your focal length long before your artistic vision does. Before you mount a lens, you must assess your Area of Operations (AO) and the established Rules of Engagement (ROE) for media. If the safety officer restricts you to a perimeter 200 meters away from the runway, your 35mm lens is useless, no matter how much you love it.
Here is the tactical breakdown of focal lengths and how to deploy them based on your environmental constraints:
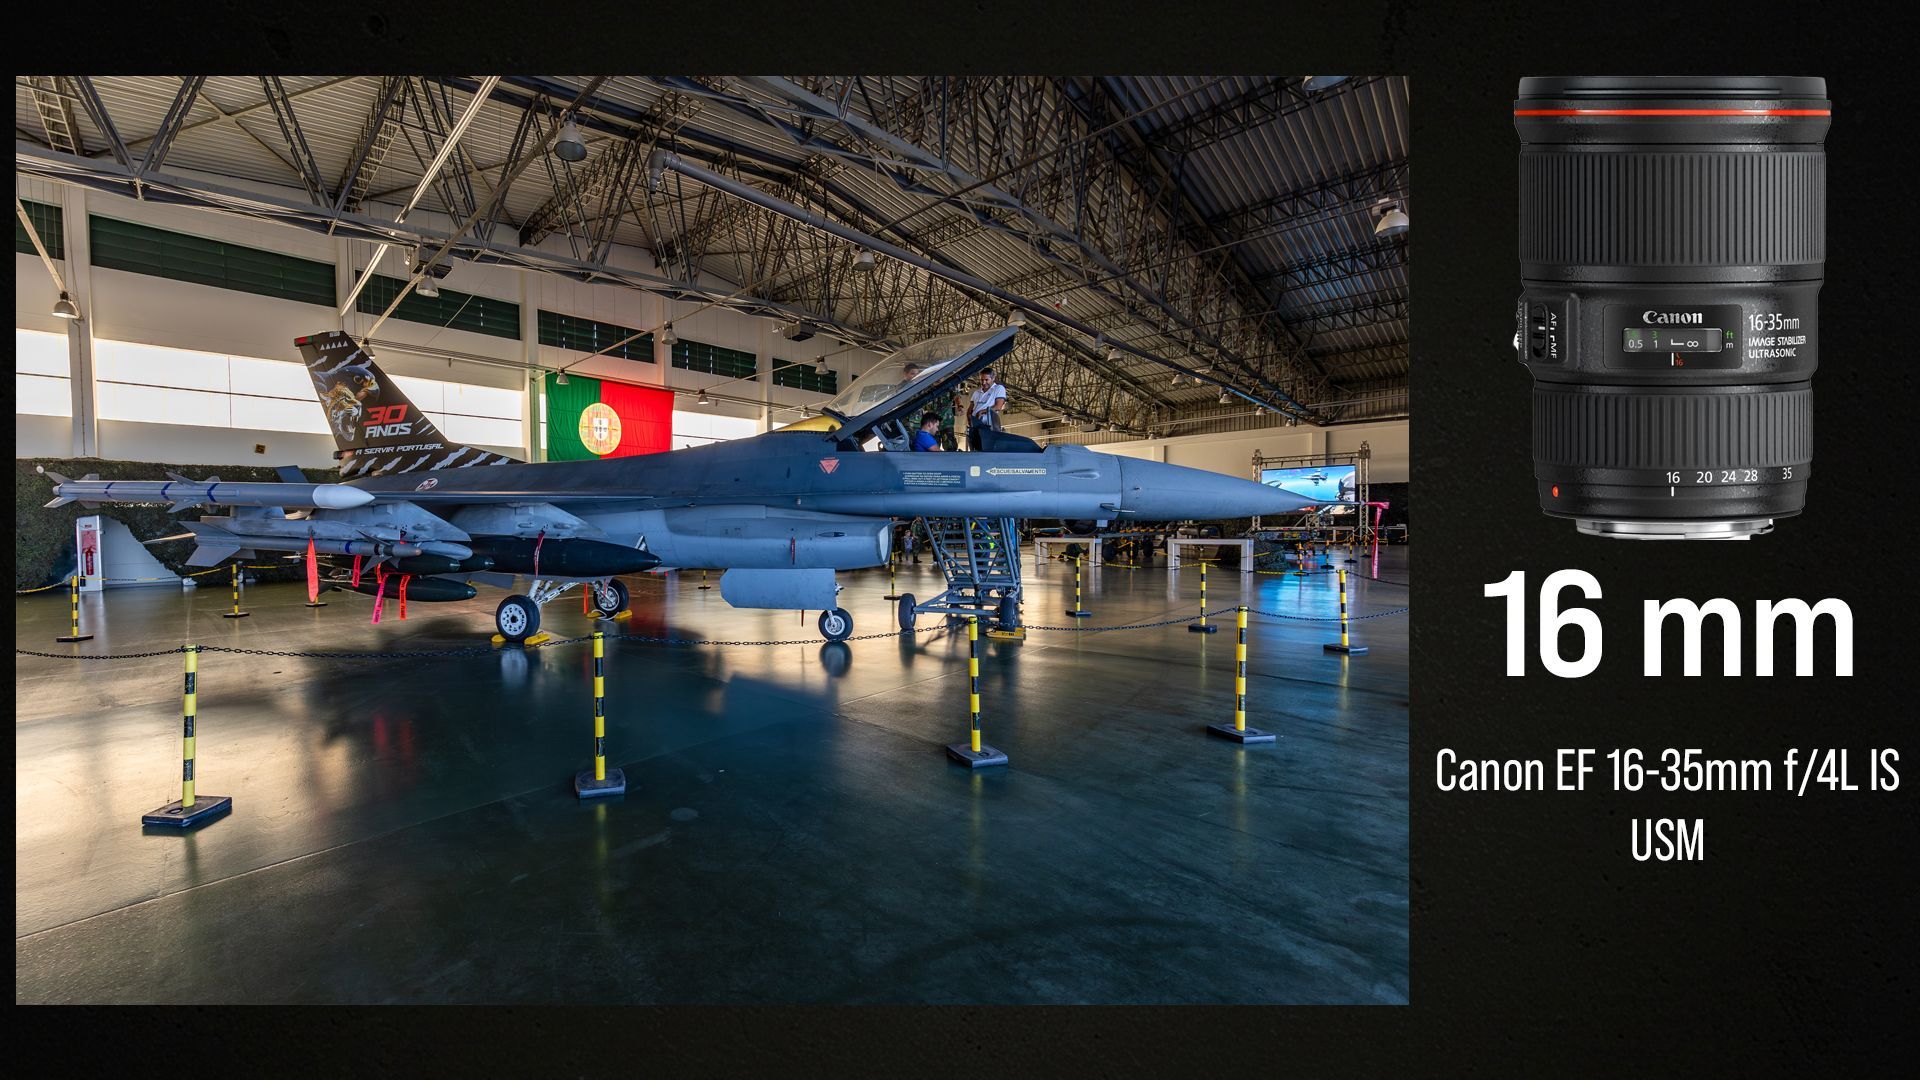
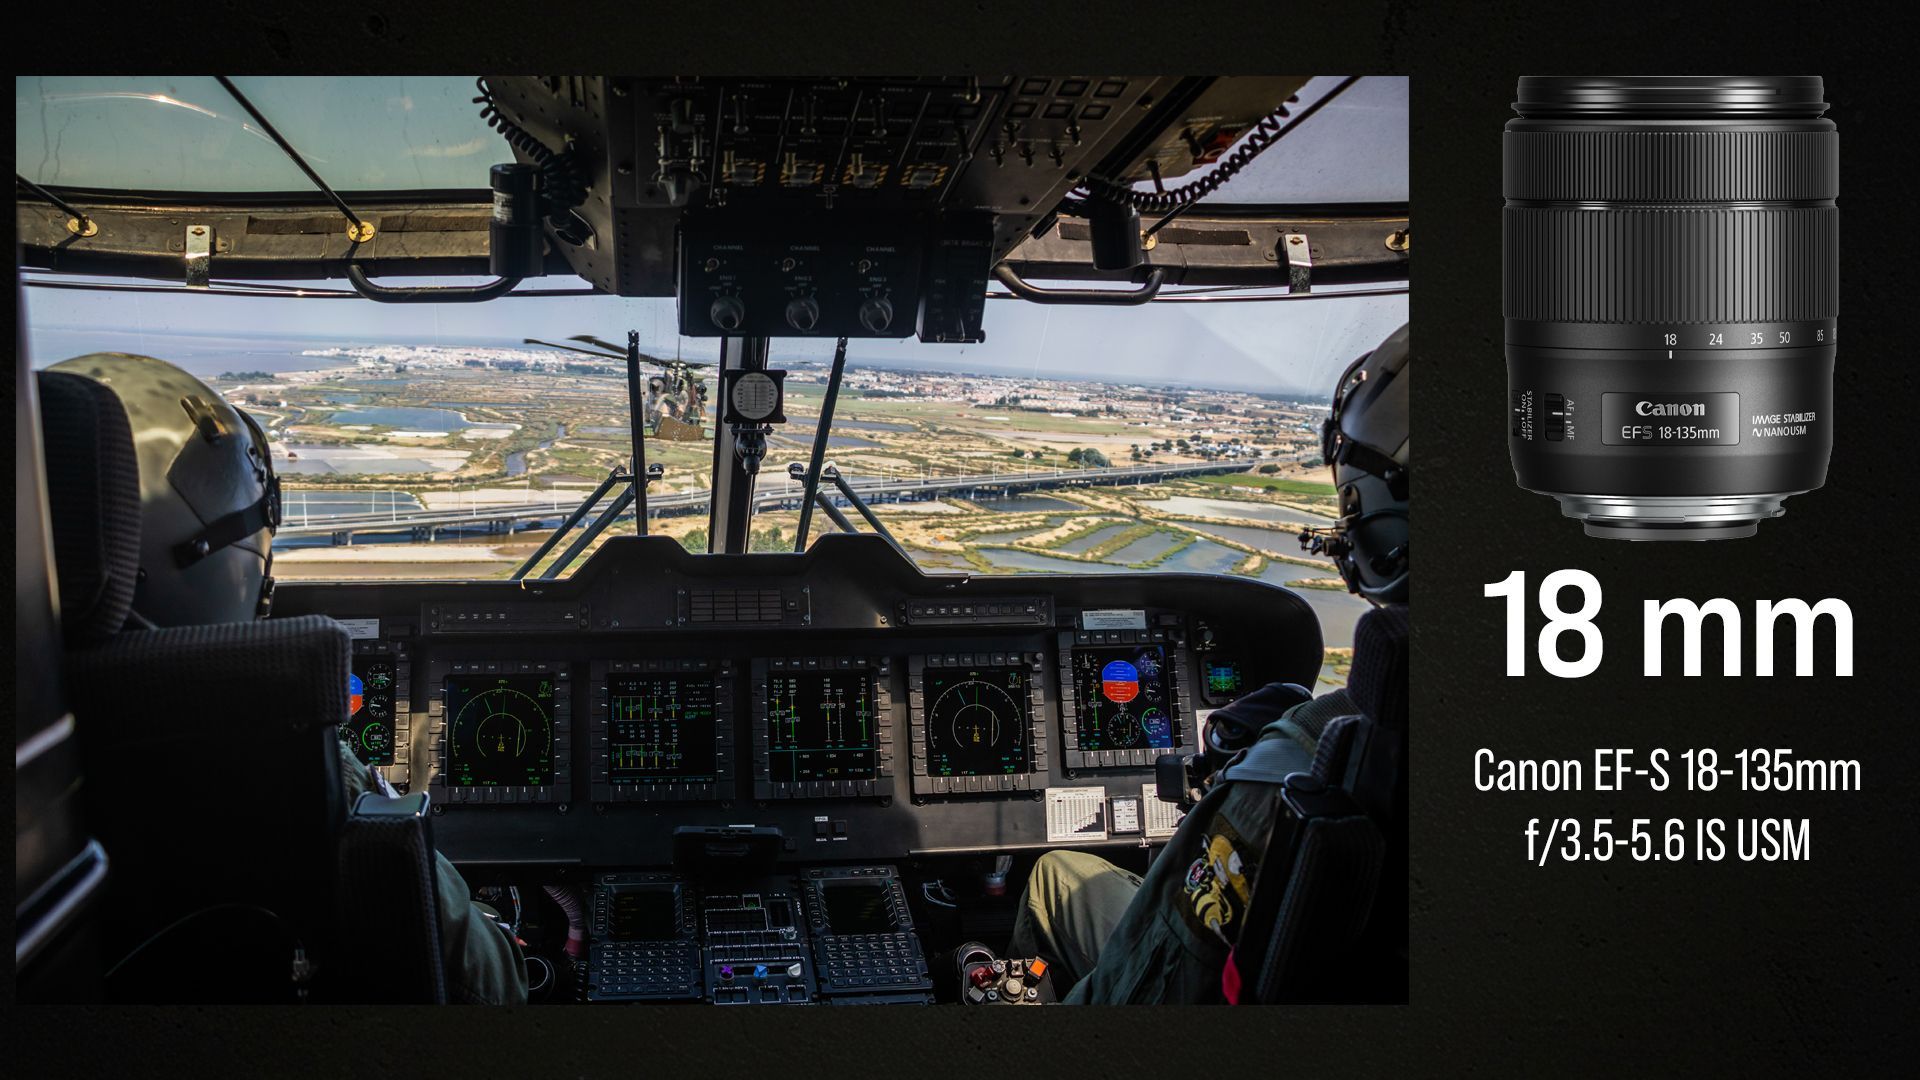
The "Inside Man" (Ultra-Wide to Wide: 14mm - 35mm)
- Operational Environment: You only deploy this glass when you have absolute, unrestricted access. You are strapped into the cargo bay of an A400M, crammed in the back of a Pandur armored vehicle, or moving shoulder-to-shoulder with an infantry squad in a trench.
- The Tactical Effect: These lenses force you to be physically close to the action. They distort the edges and exaggerate perspective, pulling the viewer violently into the scene. It feels claustrophobic, immersive, and highly personal. It screams: "I was right there with them."

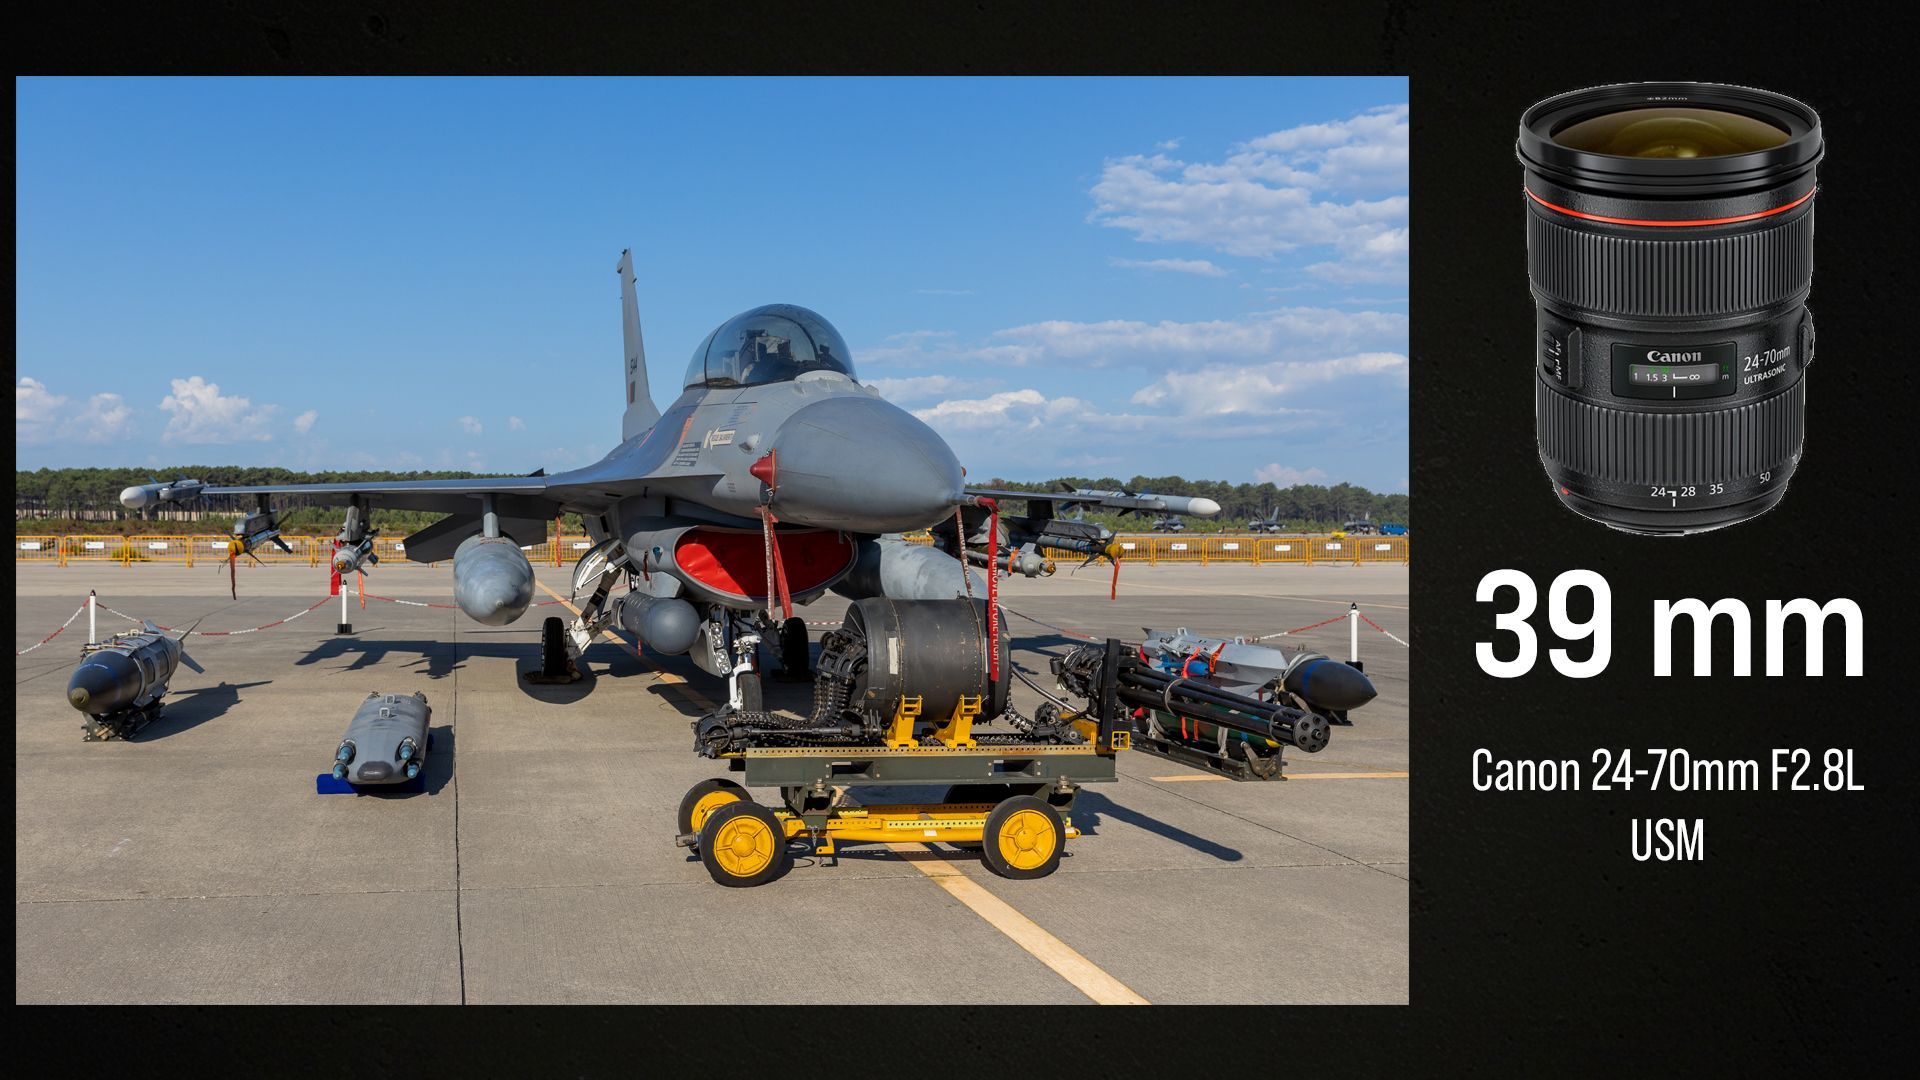
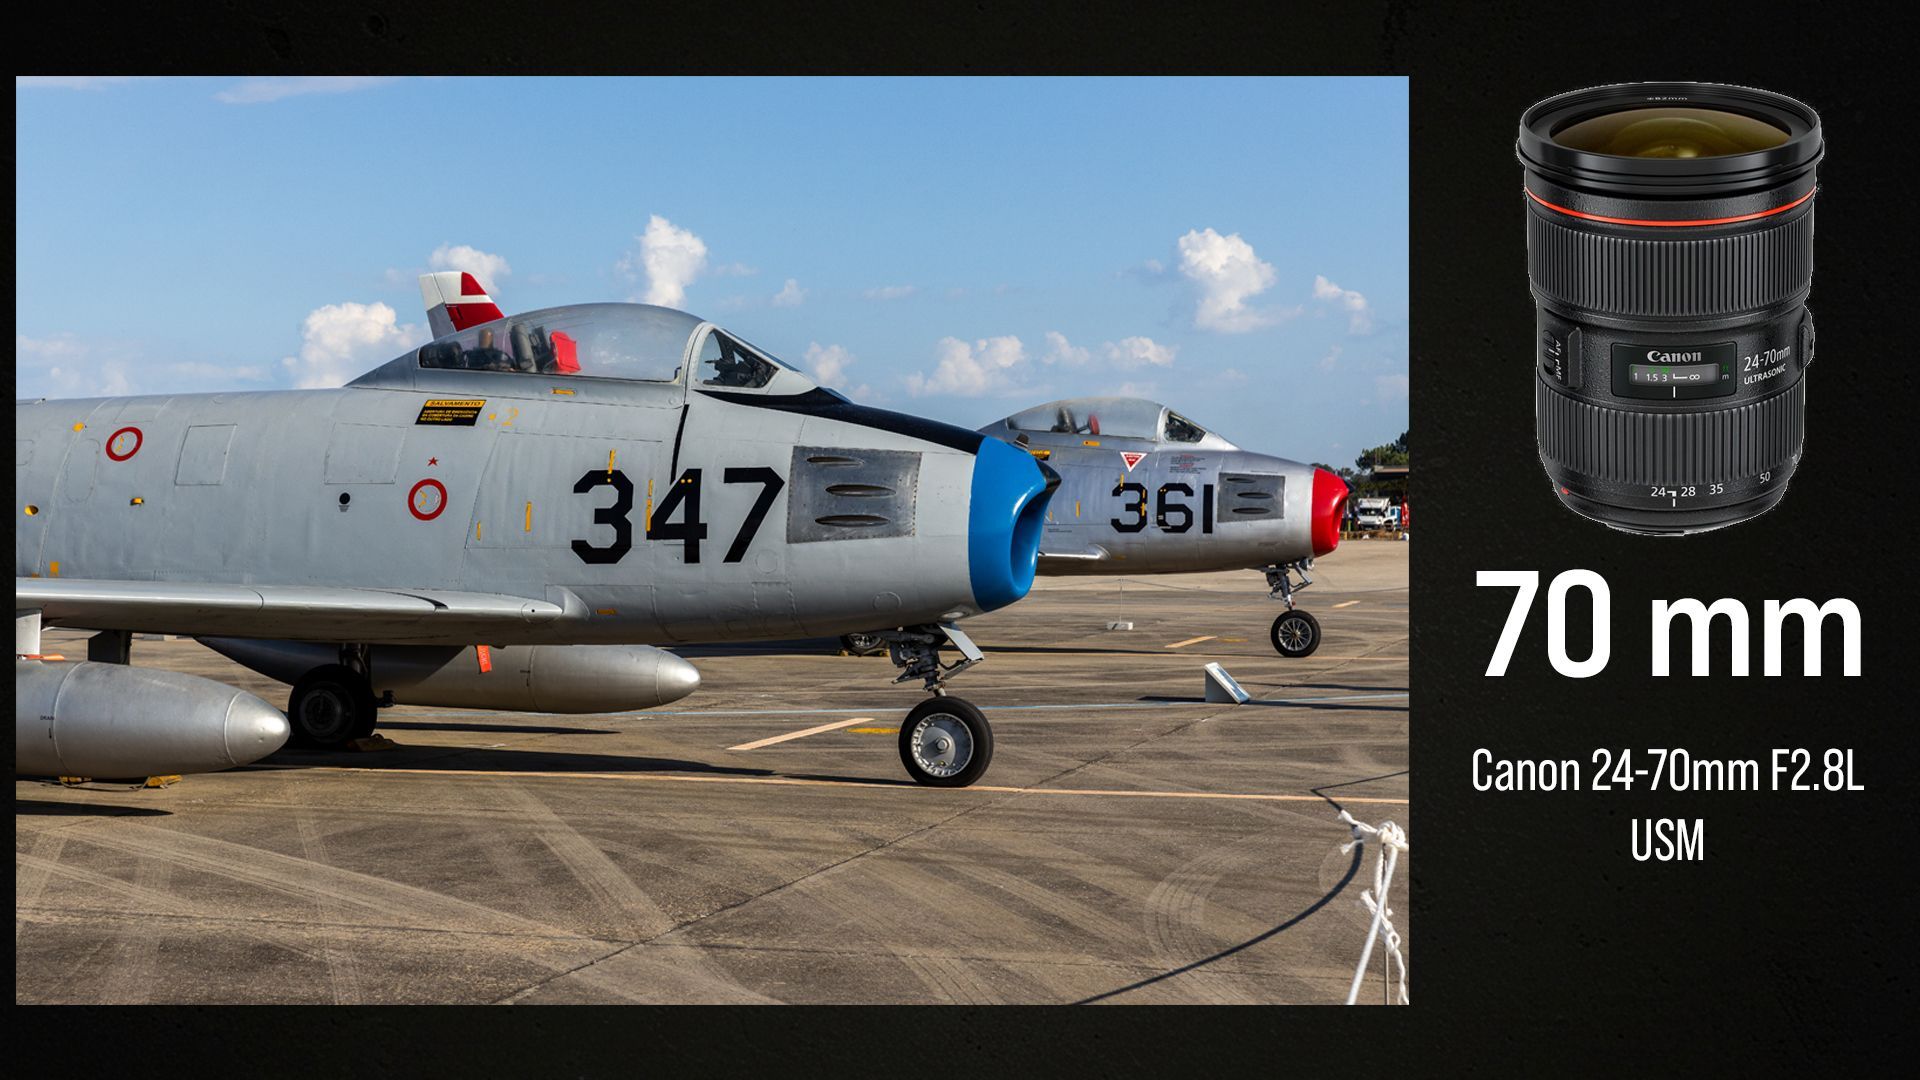
The "Workhorse" (Standard Zoom: 24-70mm)
- Operational Environment: The standard issue for general situational awareness. You use this when you have moderate access - walking the flight line during a pre-flight inspection, attending a briefing, or covering an award ceremony.
- The Tactical Effect: It provides a field of view that closely mimics the human eye. It is versatile, allowing you to capture a wide shot of a helicopter taking off, and quickly zoom in to capture the crew chief's hand signals, all without changing your position.
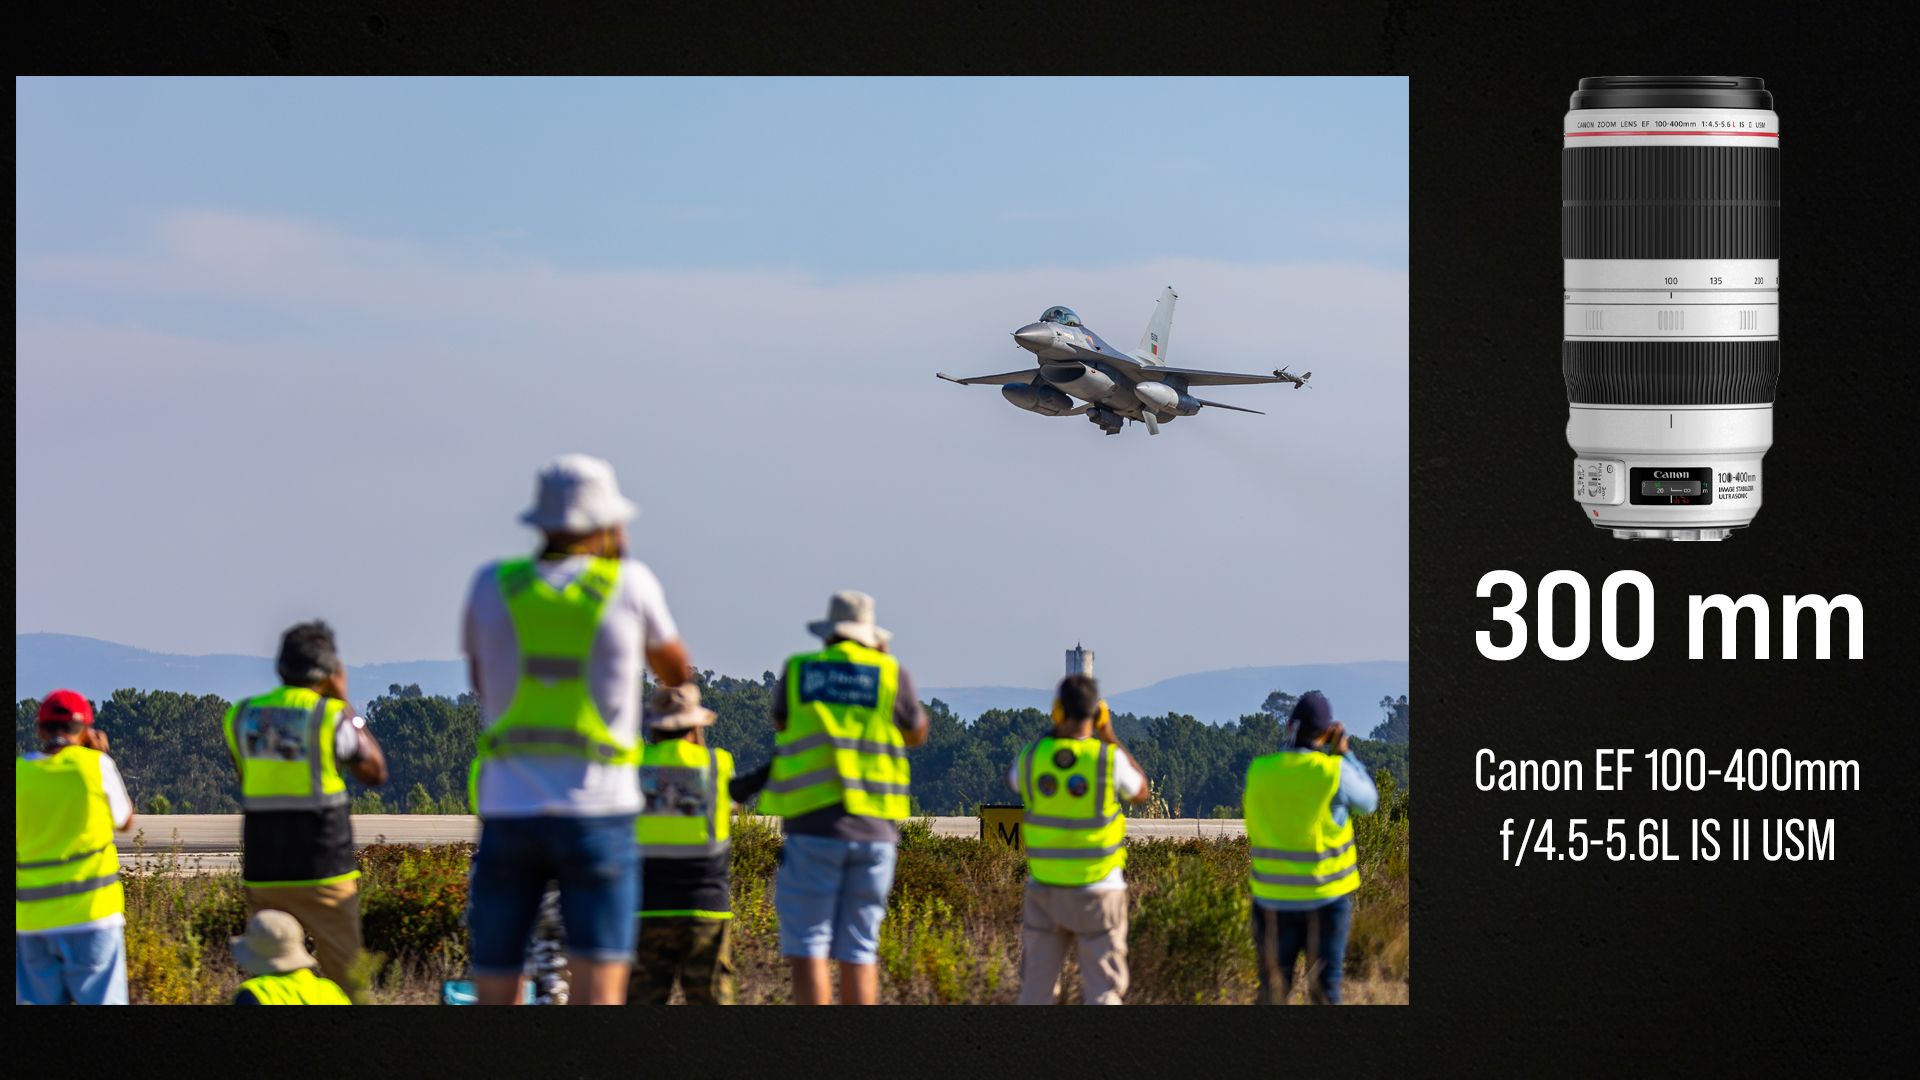
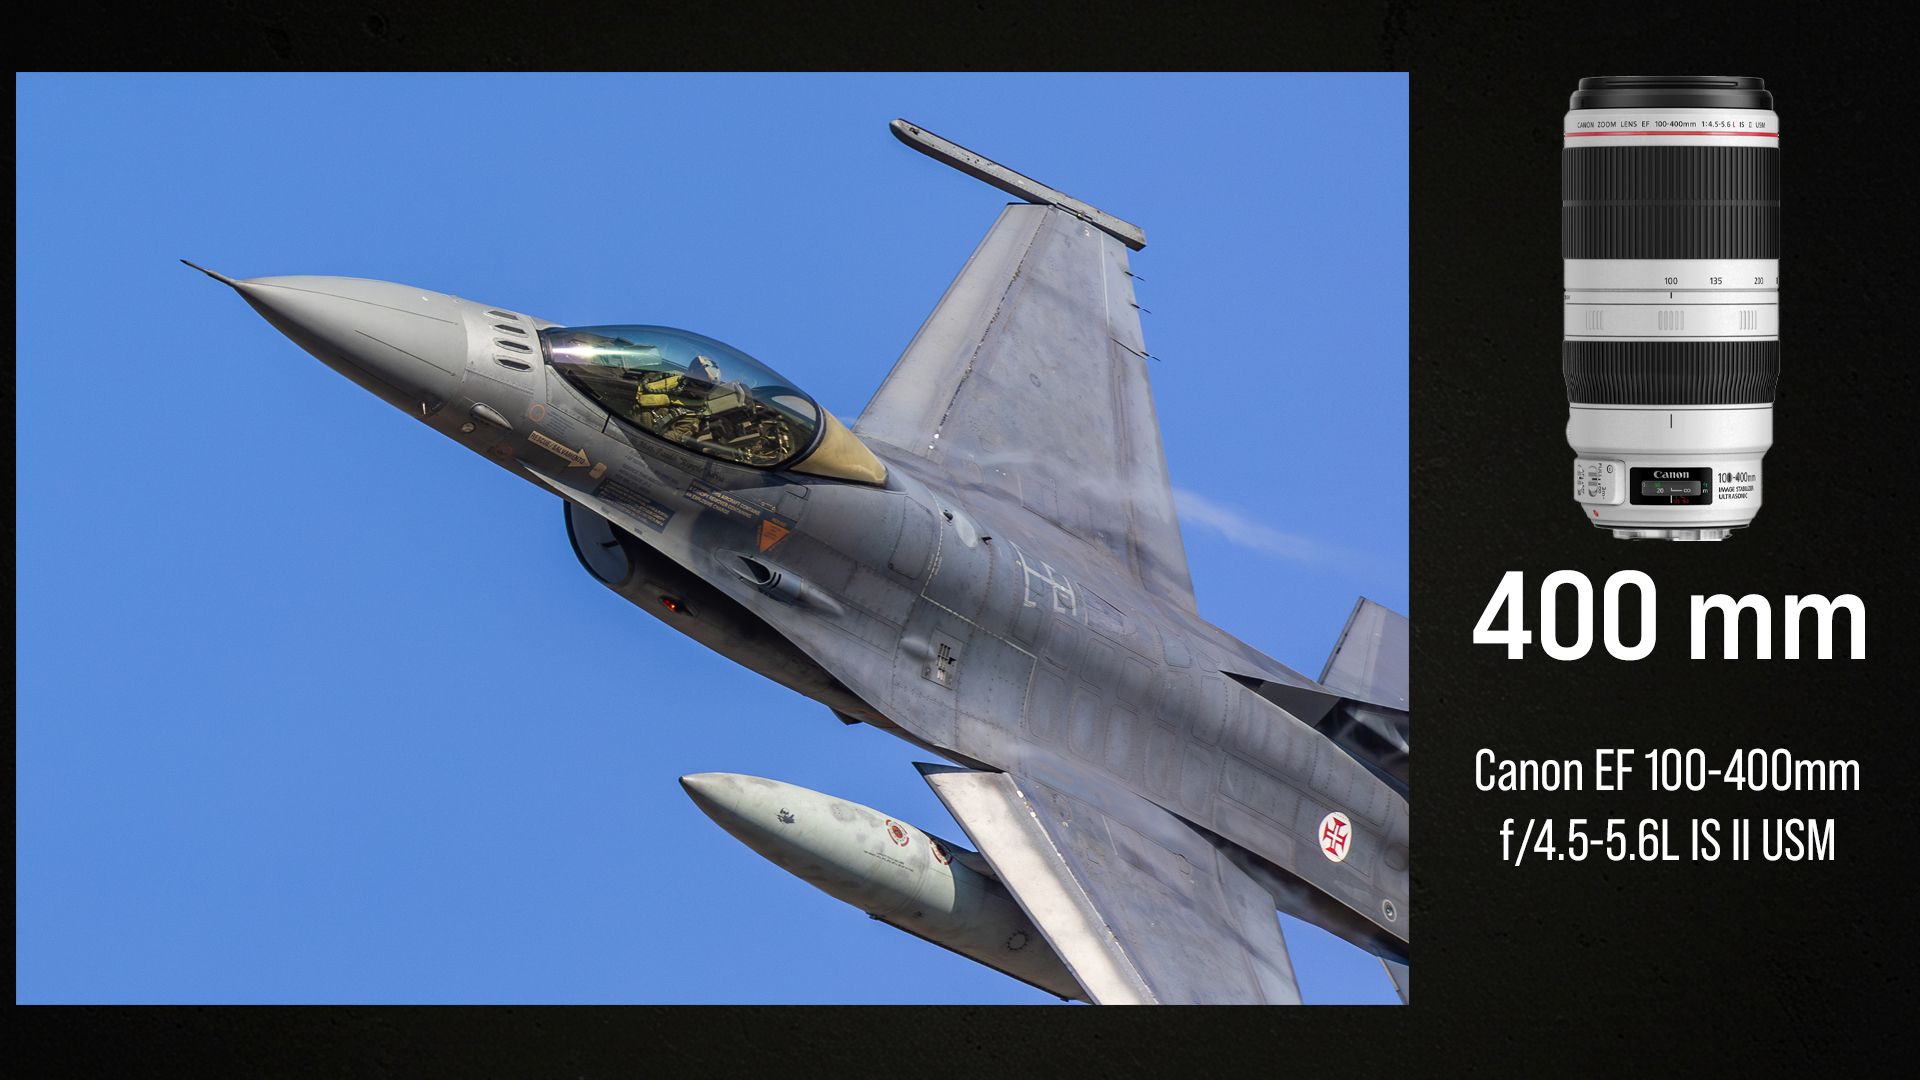
The "Sniper's Optic" (Telephoto & Super-Telephoto: 70-200mm, 100-400mm, 150-600mm)
- Operational Environment: Mandatory when physical distance is non-negotiable. This is your primary weapon for Airshows, strict flight line perimeters, live-fire ranges, or when capturing assets in the air from the ground.
The Tactical Effect (Compression): Beyond just "getting closer" to the subject, telephoto lenses physically compress the perceived distance between the foreground and the background. This is how you make a massive mountain range look like it is looming right immediately behind an F-16, or how you make a dispersed squad of paratroopers look tightly packed and overwhelming in numbers.
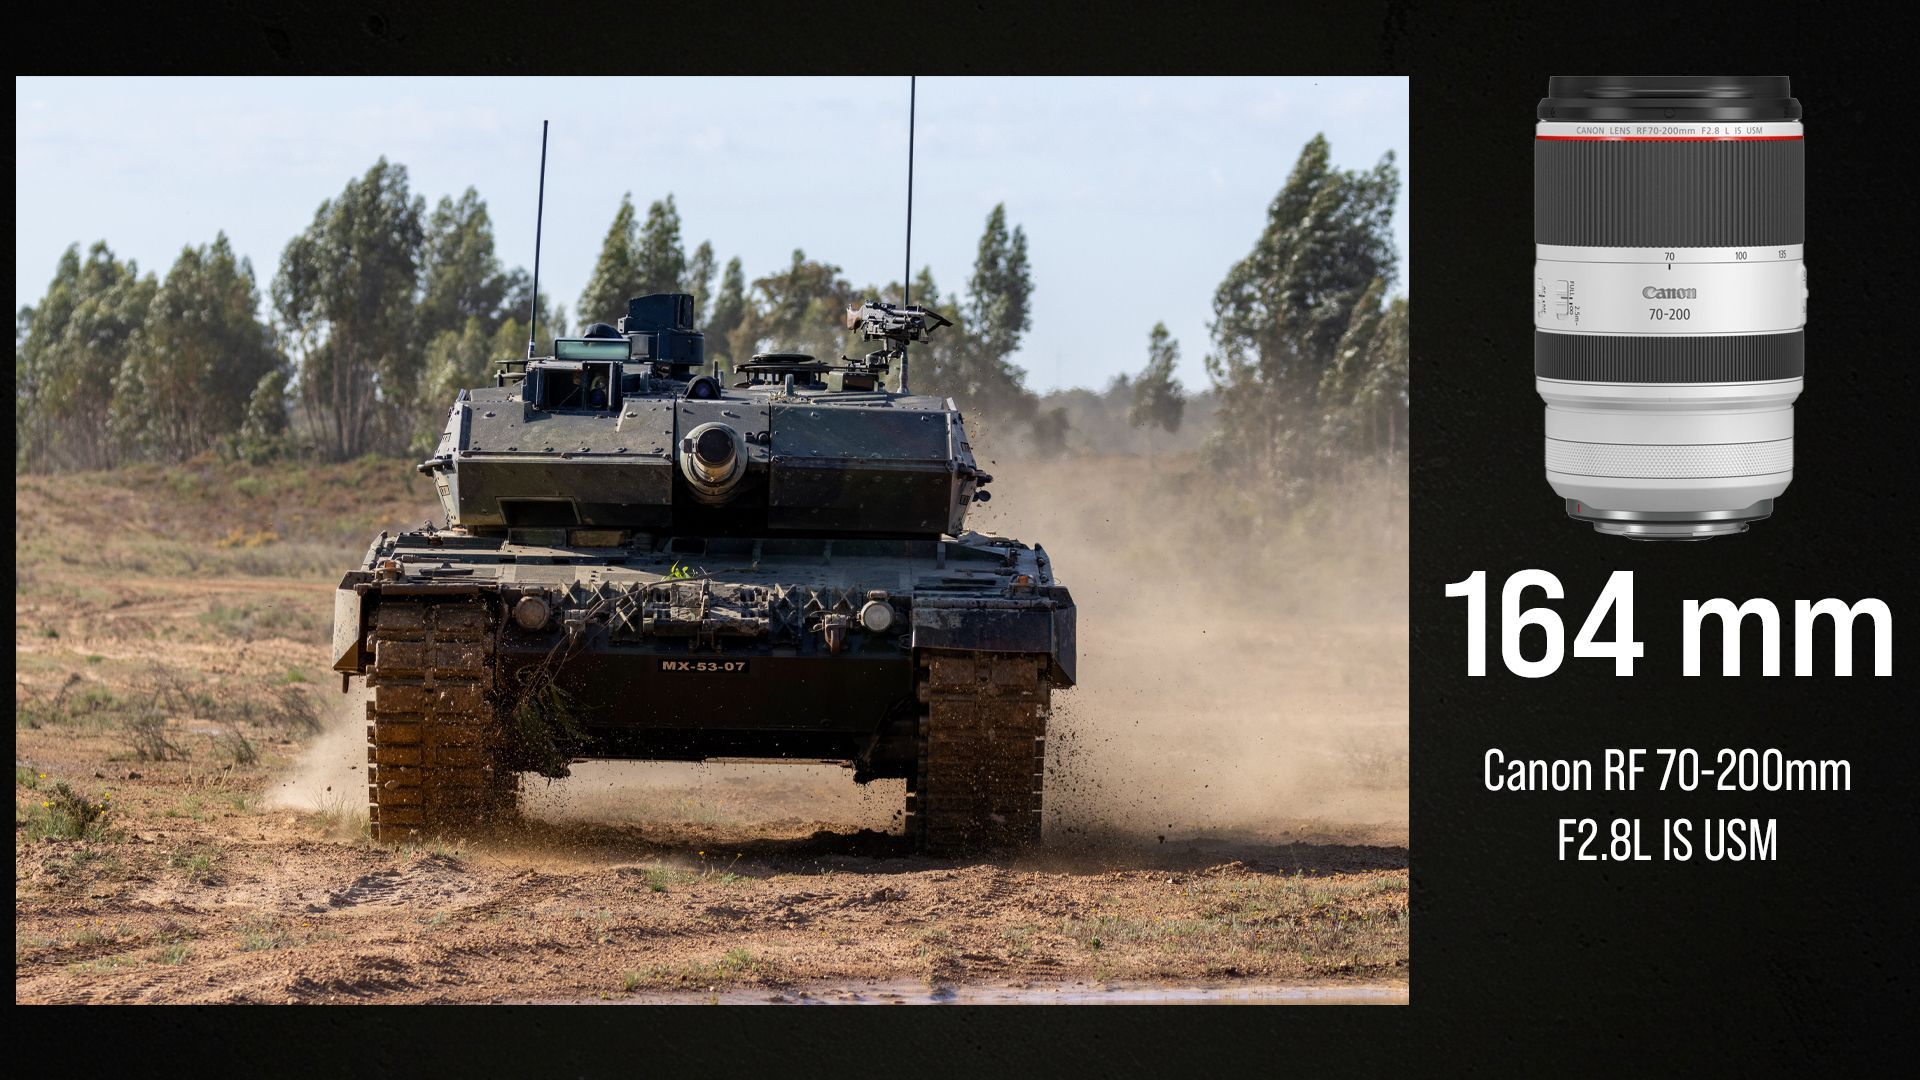

The Golden Rule of the AO: Never fight the environment. If you are stuck behind a crowd line at a Spotters Day with a 70-200mm, don't just shoot tight, repetitive crops of aircraft passing by. Look for environmental compression. If you are stuck in a cramped cockpit with a 16mm, use the heavy distortion to emphasize the sheer complexity of the instrument panels.
Assess the terrain. Understand your restrictions. Choose the weapon that maximizes the story within those limits.
4. The Loadout: Building Your Tactical Kit
The most frequent transmission I get from those entering the field of military and aviation photography is always the same: "What gear should I buy?" It’s easy to get distracted by marketing and megapixels. But in this operational environment, choosing your loadout isn't about collecting the most expensive gear; it’s about preparing for the mission. You wouldn’t bring a knife to a gunfight, and you shouldn't bring a 24mm lens to shoot a fighter jet pulling high-G maneuvers a kilometer away.
Here is how you assess and assemble a functional, mission-ready kit.
4.1. Tactical Criteria: Choosing the Right Body
When evaluating a camera body for aviation and defense photography, ignore the marketing hype and focus on these critical operational stats:
- Burst Rate vs. Hit Rate: A camera that shoots 30 frames per second (fps) is useless if the autofocus can't keep up. Stability and accuracy always trump pure speed. I would rather have 5 perfectly focused shots of a crossing aircraft than 20 out-of-focus mistakes.
- Buffer Capacity: Your camera cannot afford to "jam" during a critical pass. A deep buffer ensures your camera can keep writing data to the card during sustained, high-speed action without locking up.
- Autofocus (Servo/Continuous): This is non-negotiable. Your AF system must be able to lock onto a fast-moving subject and track it relentlessly against complex backgrounds or empty skies.
- The Megapixel Trap: Do not fall into the trap of buying a camera solely for its resolution. A tack-sharp 20MP file will always be infinitely more useful than a blurry 45MP file captured by a slow camera.
4.2. Tactical Advantage: The "Crop Factor" Cheat Code
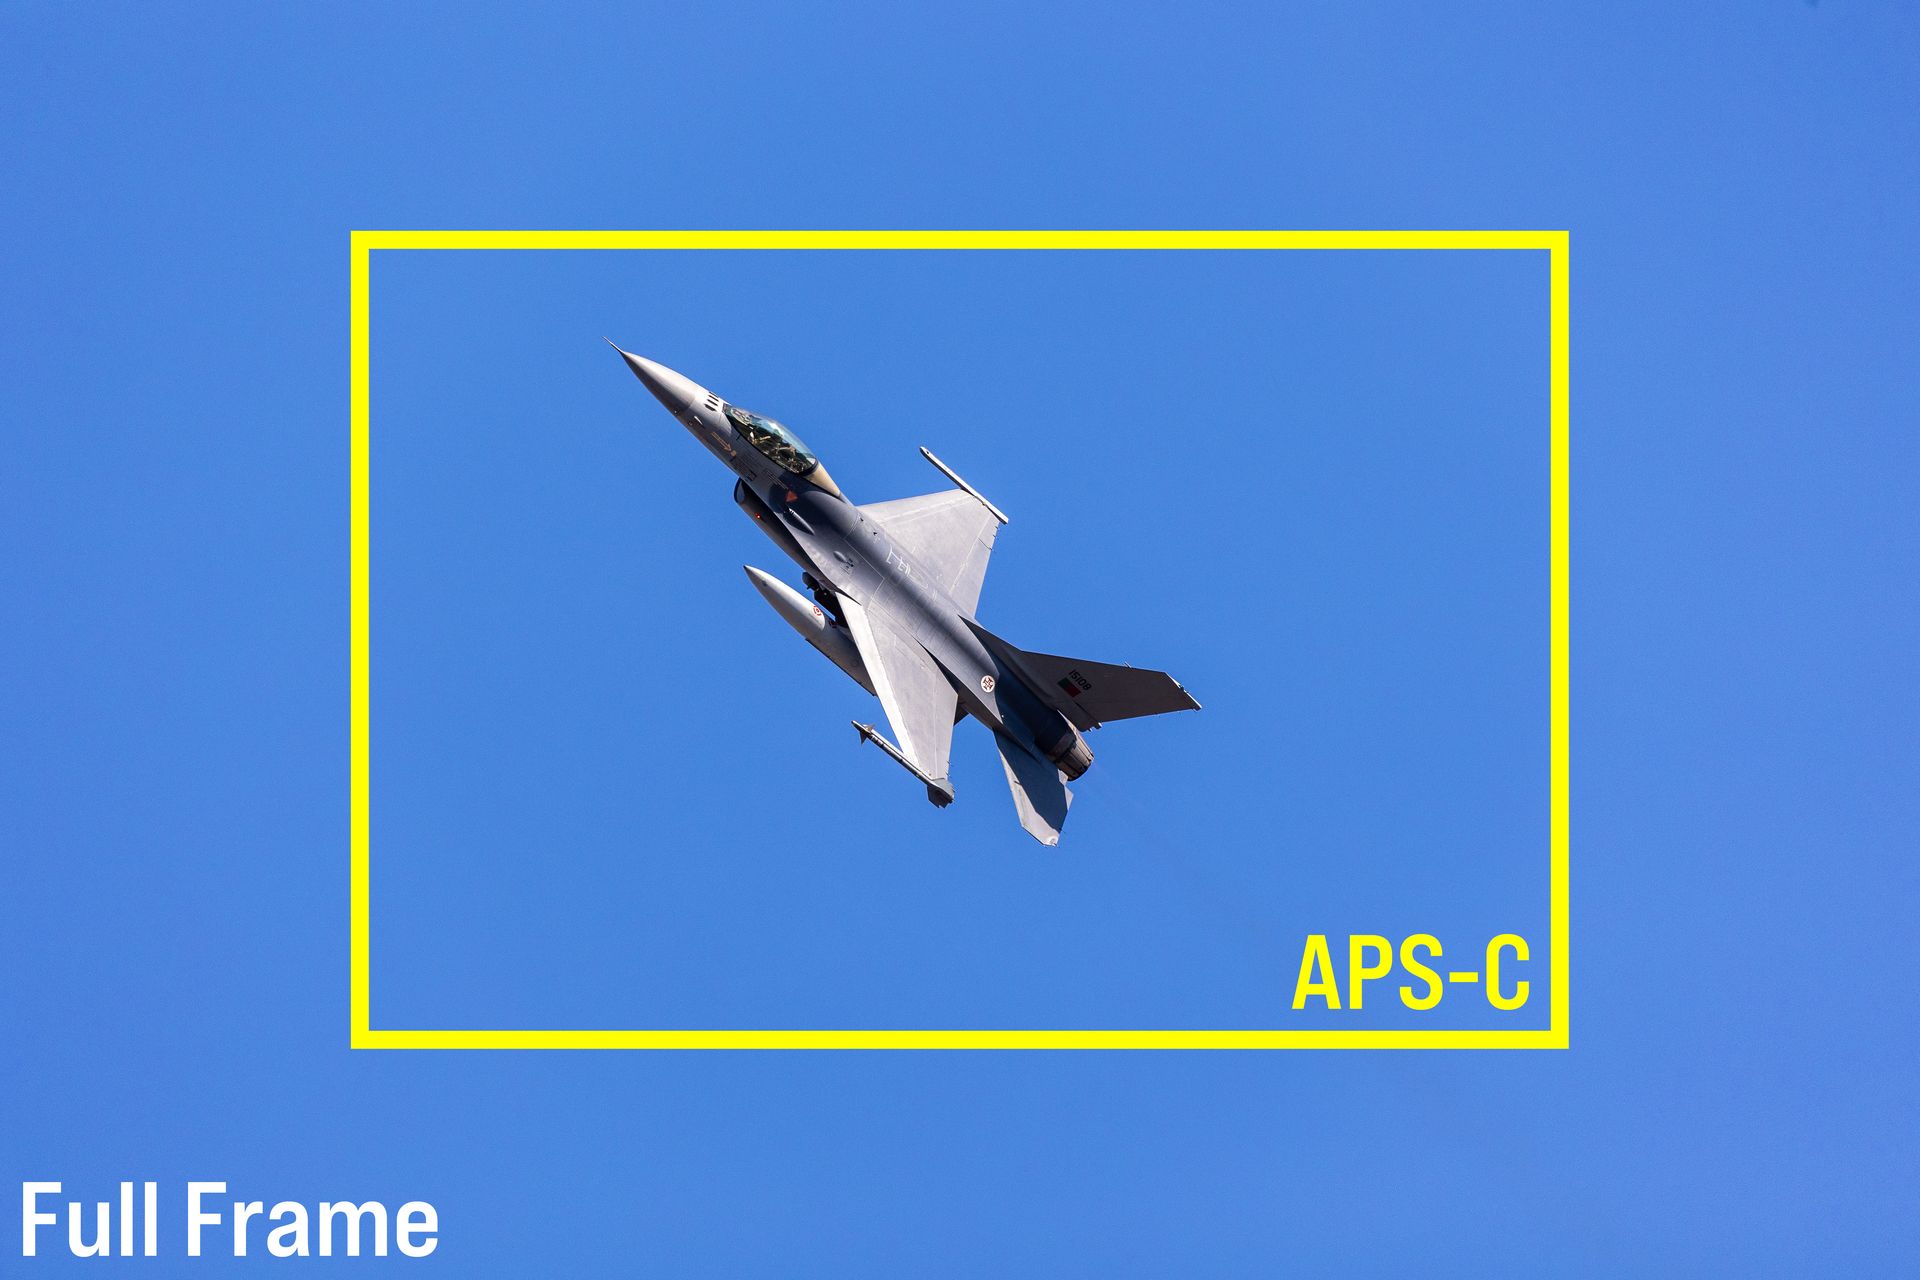
Before buying gear, you must understand the difference between Full-Frame and APS-C (Crop Sensor) cameras. In aviation photography, APS-C sensors offer a massive tactical advantage: reach.
A Full-Frame sensor captures the entire field of view, which often leaves a lot of "dead space" around a distant aircraft. An APS-C sensor (like those found in the Canon EOS R7 or 90D) applies a crop factor (usually 1.5x or 1.6x), essentially acting as a built-in magnifier.
- The Advantage: You gain 60% more reach. A 300mm lens on an APS-C body gives you the field of view of a 480mm lens. It is the ultimate "cheat code" for the flight line.
- The Trade-Off: Smaller sensors generally struggle more in low-light environments (higher grain/noise) and make it harder to shoot ultra-wide angles in cramped spaces (like inside a cockpit or hangar).
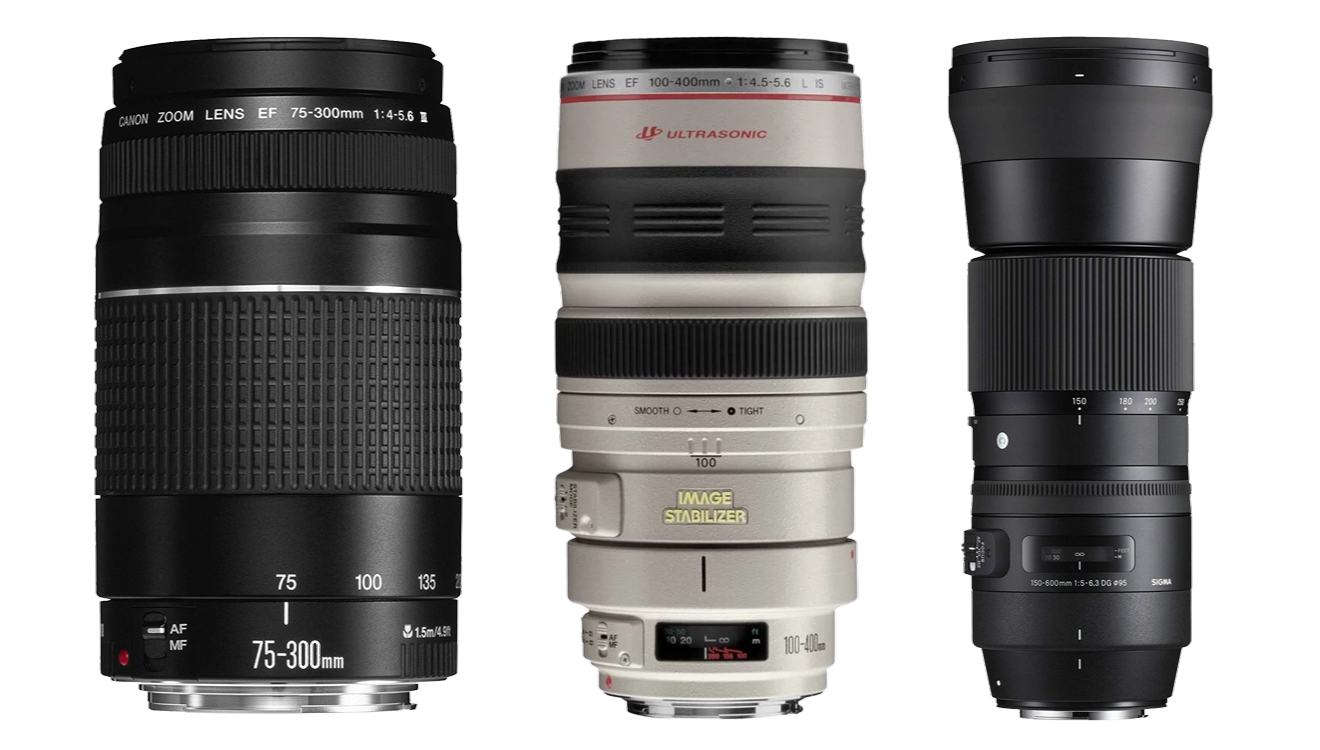
4.3. The Primary Weapon: Telephoto Lenses
In the field, versatility is greater than fixed reach. Dynamic action requires rapid adaptation. While a fixed 500mm prime lens is incredibly sharp, it will "clip the wings" of an aircraft making a sudden, low pass.
You need a reliable zoom. Lenses covering ranges like 100-400mm or 150-600mm are standard issue.
- The Pro Tip: A 70-200mm is mandatory in any kit. Even the f/4 versions are relatively lightweight, affordable, and offer optical quality that destroys most "super-zooms." It is the perfect lens for tight formations and low, fast passes.
4.4. Close Quarters Combat (CQB): Short Range Glass
You cannot shoot a static display or document the inside of a hangar with a 400mm lens. You need dedicated tools for close-quarters work.
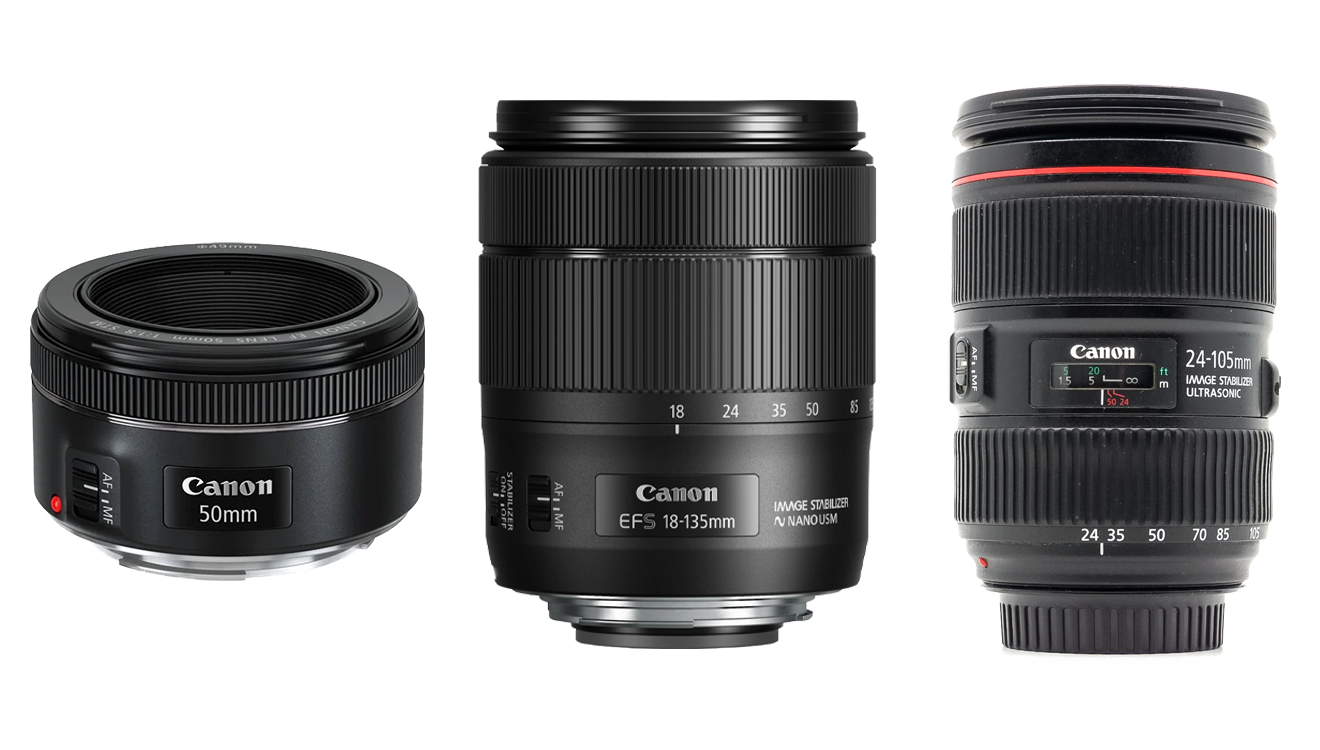
- The Ground Kit (Standard Zoom): Something in the 18-135mm or 24-105mm range is your "Swiss Army Knife." It allows you to shoot a wide environmental shot of a parked C-130 and immediately zoom in to capture the loadmaster's face, without changing lenses.
- The Sidearm (The 50mm f/1.8): Small, cheap, and incredibly fast (bright). This is the lens that saves your life in dark, poorly lit hangars where flash photography is strictly prohibited. Warning: Ensure you know its minimum focusing distance so you don't miss a tight portrait of a pilot because you are standing too close.
4.5. Choosing Your Class: DSLR vs. Mirrorless
You have two main paths when building your system, each with its own tactical advantages.
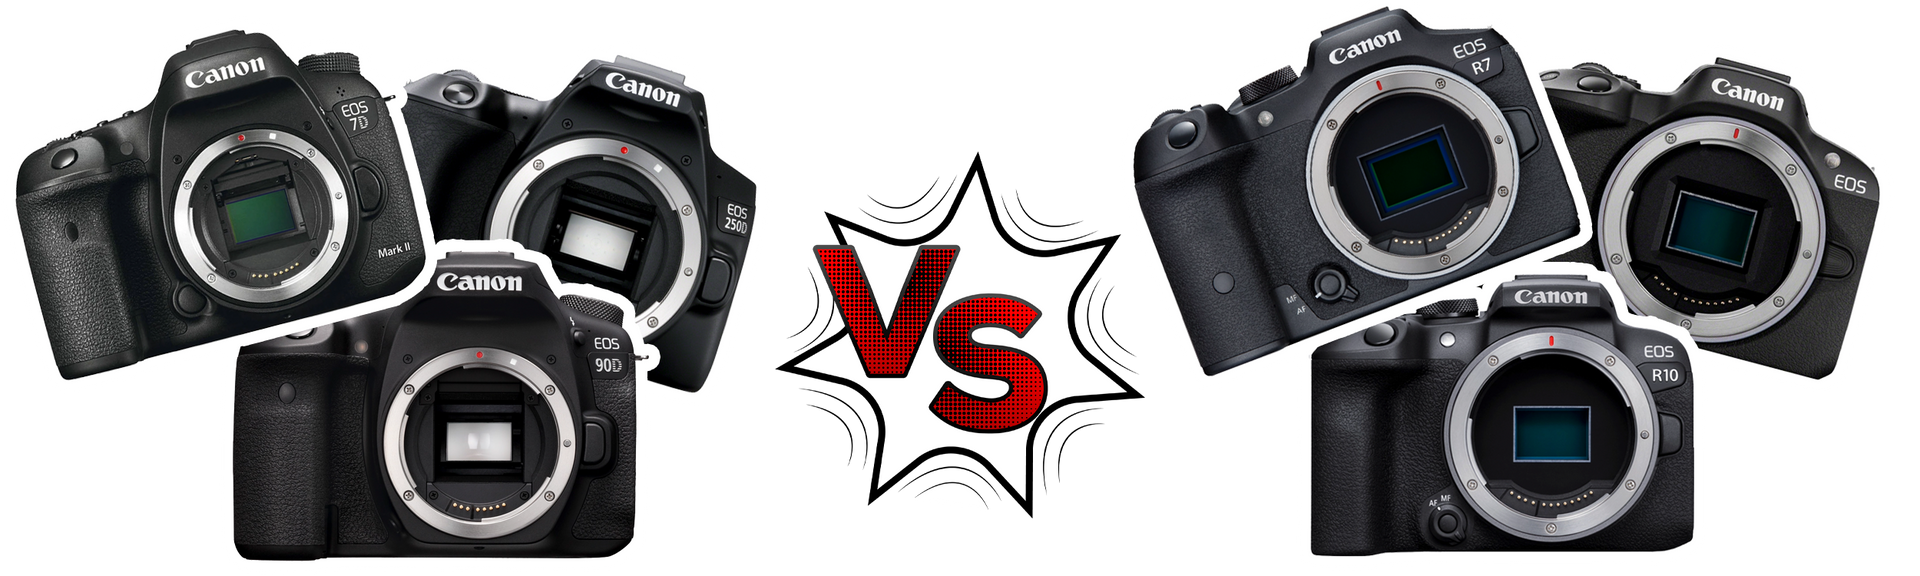
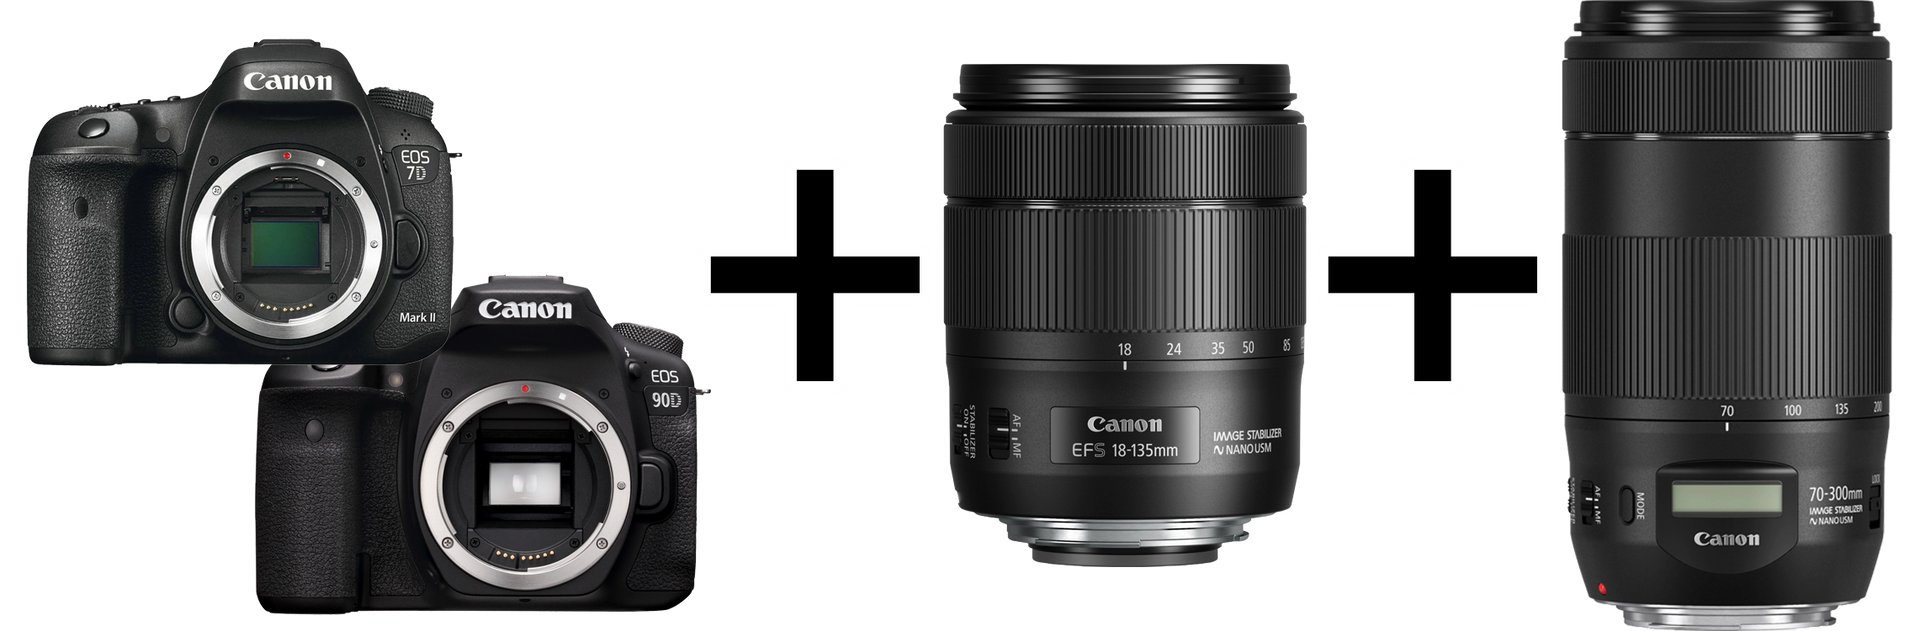
The Veteran (DSLR Systems - e.g., Canon EOS 90D / 7D Mk II):
- Pros: Incredibly budget-friendly right now. The used market is flooded with cheap, high-quality bodies and EF lenses. Excellent battery life.
- Cons: Older autofocus technology and a steeper learning curve (you don't see the exact exposure in the optical viewfinder until you take the shot).
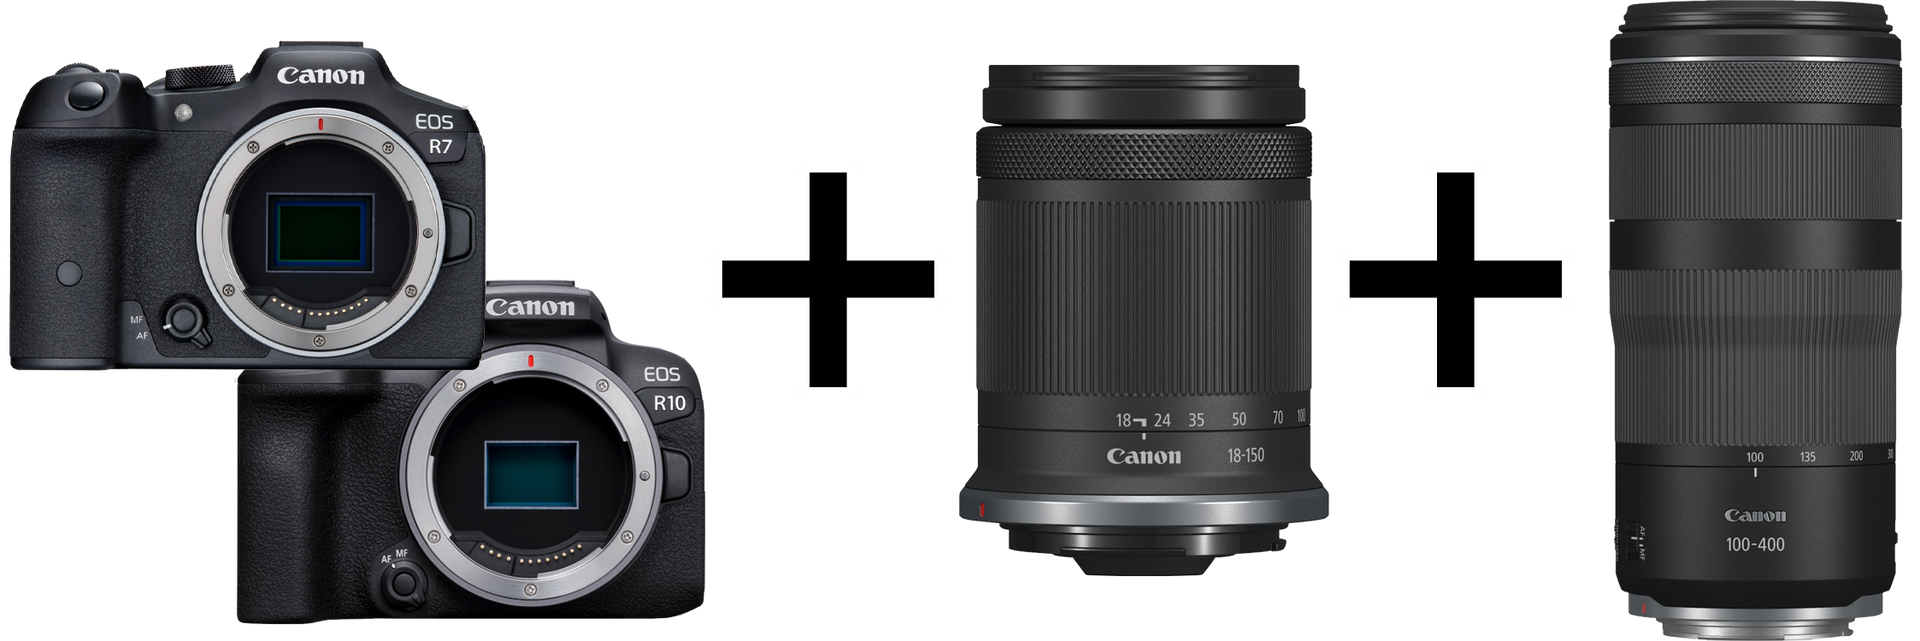
The Future (Mirrorless Systems - e.g., Canon EOS R7 / R10):
- Pros: Advanced AI autofocus that can lock onto aircraft and human eyes automatically (it feels like cheating). The Electronic Viewfinder (EVF) shows your exact exposure before you pull the trigger.
- Cons: Higher initial cost and significantly worse battery life (the sensor and EVF are always draining power).
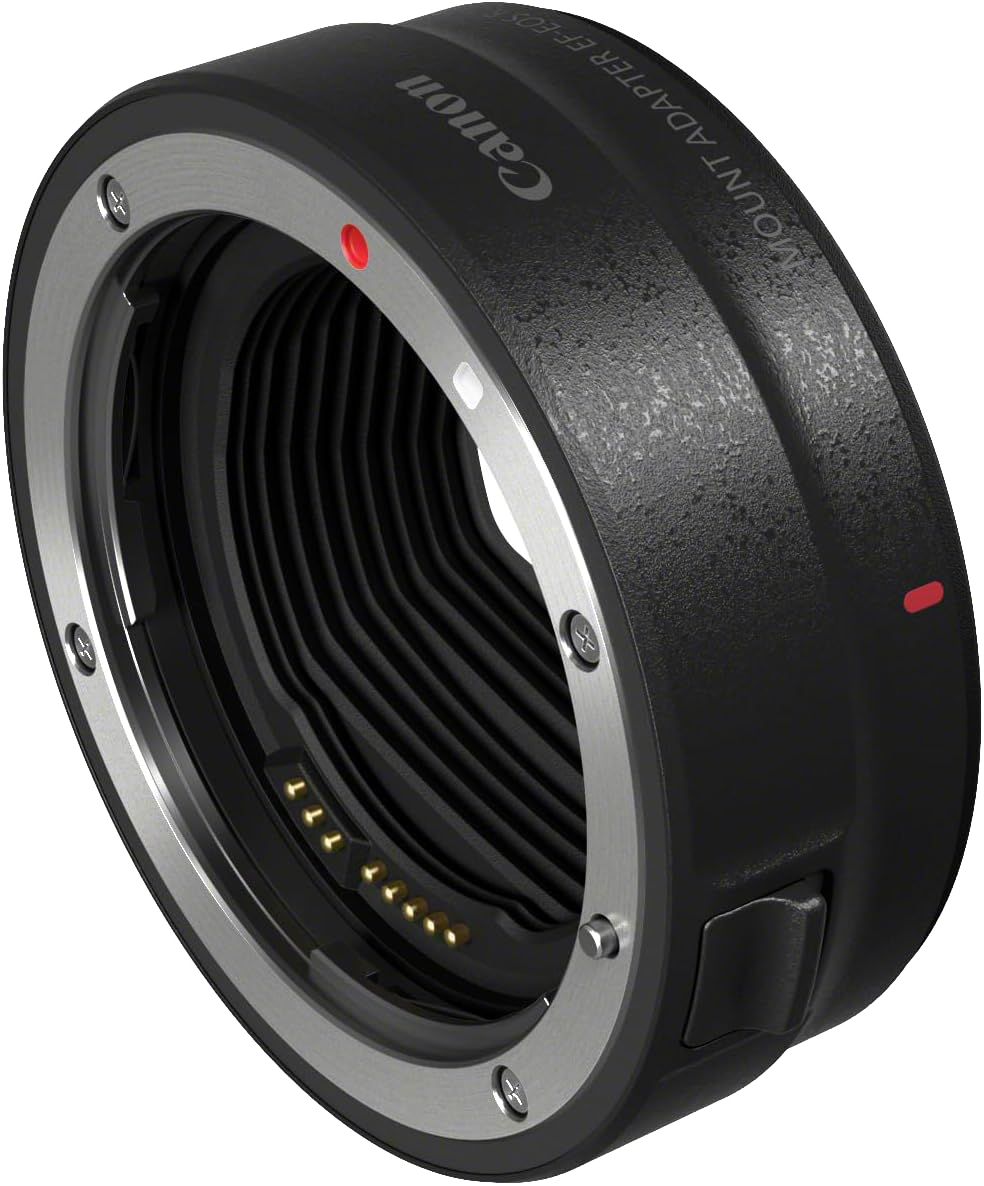
4.6. The System Hack: Cross-Gen Compatibility
You do not need to buy expensive, native mirrorless lenses to get top-tier results. If you shoot Canon, an EF-EOS R adapter costs around €100 ($110). This piece of hardware allows you to mount any older DSLR (EF) lens onto a brand-new mirrorless (RF) body.
- Uncompromised Performance: Many photographers fear that using an adapter will degrade the image or slow down the lens. This is a myth. Because the standard adapter contains no internal glass elements and relies on a purely digital communication protocol, there is absolutely zero loss of optical quality. Performance is fully maintained. In fact, because the new mirrorless AI tracking systems are so advanced, your older EF lens will often focus faster and track moving subjects better on the new body than it ever did on a native DSLR.
- The Math: A new RF 70-200mm f/4 costs roughly €1,800 ($1,950). A used EF 70-200mm f/4 paired with the adapter costs around €600 ($650). You get the exact same photo, blazing-fast autofocus, and you save €1,200 ($1,300) to spend on travel, airshow tickets, or a faster memory card.
4.7. Recommended Loadouts
- The Scout (Budget DSLR / ~€800 - €1200 (Used Market): Canon 90D or 7D Mark II (Used) + EF-S 18-135mm (Statics) + EF 70-300mm IS II (Action).
- The Ace (Modern Mirrorless / ~€1400 - €2200 (Used/New)): Canon R10 or R7 + RF-S 18-150mm (All-in-one) + RF 100-400mm IS USM.
Your Turn Begins Now
Before you commit your budget, remember the fundamental doctrine of photographic investment: Invest in glass, not in silicon. A high-end lens is a long-term asset. It will maintain its optical superiority and resale value for a decade. A camera body is a rapidly depreciating computer. Mounting a cheap lens on a €6,000 ($6,500) body is like putting budget tires on an F-16; you will never reach operational speeds. Always prioritize the quality of the "glass".
The Reality of the Expert Level: While it is true that "the person behind the camera makes the shot," we must be honest: gear does matter once you reach a certain level of expertise. There will come a day in your career where your technique is flawless, your panning is smooth, and your timing is perfect - but you still miss the shot. You'll miss it because your entry-level buffer was full, your autofocus couldn't track a jet breaking the sound barrier, or your sensor couldn't handle the low light of a tactical night extraction.
At that elite level, high-end gear (like a stacked-sensor body) isn't a luxury - it’s a mission requirement. It provides the consistency and reliability that a professional demands when there are no "second takes."
Your Mission Path:
1. Start with what you have: Master the fundamentals of light and composition.
2. Invest in Glass: Buy the best telephoto zoom your budget allows.
3. Break the Ceiling: Only upgrade your camera body when you can prove that its mechanical limitations are the only thing standing between you and a world-class photograph.
The best equipment is the one that doesn't get in your way. Now, get out to the flight line, train your aim, and execute the mission.
5. Readout Speed: The Invisible Lag of Your Sensor
When transitioning to modern Mirrorless systems, photographers are immediately drawn to the "Silent Mode" (Electronic Shutter). The ability to shoot at 20, 30, or even 40 frames per second in absolute silence feels like a massive tactical advantage.
However, if you deploy this feature on the flight line without understanding the underlying physics, you will fall into a trap. You will encounter the silent enemy of aviation photography: The Rolling Shutter Effect.
Source: Sony
5.1. How the Sensor Sees the World (The Scanner Theory)
To understand the problem, you must understand how your camera reads light. Unlike the human eye, standard mirrorless sensors do not capture the entire image at the exact same instant.
They read the light from top to bottom, line by line - exactly like an old office document scanner. The fatal flaw? It is not instantaneous. If the subject moves faster than the sensor can read those lines, by the time the camera reaches the bottom of the frame, the subject is no longer in the same physical position it was when the scan started.
5.2. The Electronic Shutter Trap: Benchmarking Latency
We all want to use the Electronic Shutter for its extreme burst rates. But the reality is that conventional sensors possess a severe latency (readout speed) that cannot keep up with aviation action.
The Danger Zone (Readout Latency Benchmarks): The higher the number in milliseconds (ms), the slower the sensor, and the worse the distortion will be.
- Canon EOS R / RP: ~80.0ms (Very Slow - Guaranteed "Jell-O" effect)
- Nikon Z7 II: ~62.5ms
- Canon EOS R7: ~31.3ms (Slow)
- Sony a7 III / a7 IV: ~26.8ms
- Canon EOS R5 / R6: ~15.5ms to 19.7ms (Better, but will still deform fast propellers)
If you shoot a static aircraft parked on the tarmac with these cameras in Electronic Mode, the image will be flawless. But if you photograph screaming propellers or execute a fast pan? The physics break.

Readout Speed data compiled by Dennis A. Mook (blog “The Wandering Lensman”)
5.3. Visual Anomalies on the Battlefield
When you mix slow readout speeds with high-speed aviation, you generate three distinct visual anomalies:
1. Rotor Distortion (Helicopters): The tip of a helicopter blade moves incredibly fast, easily exceeding the sensor's read speed. As the camera scans downward, the blade physically changes position. Result: The sensor renders a severe, unnatural curvature to the rotor blades that does not exist in reality.
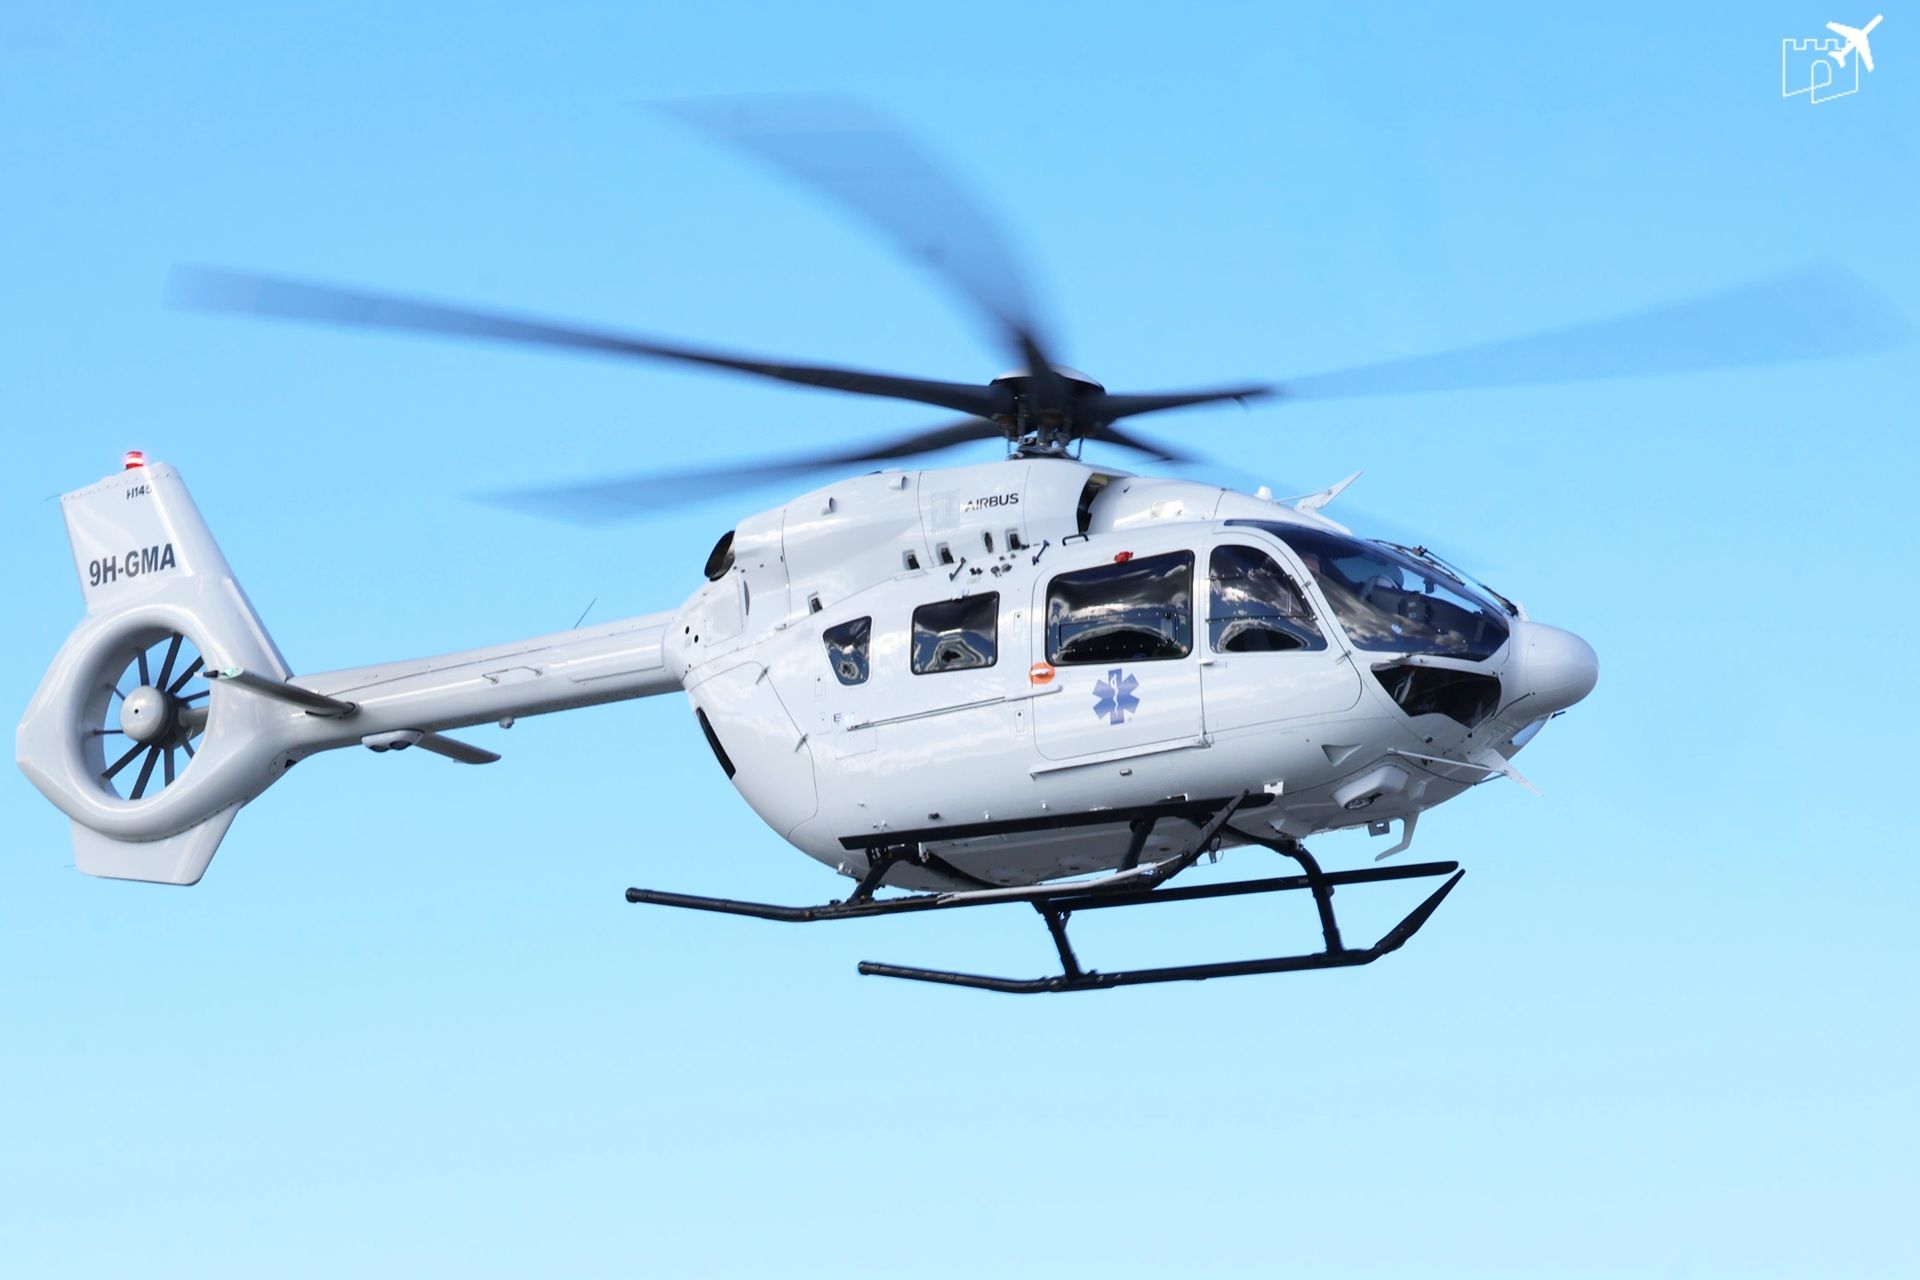
Photo kindly provided by Dinis (Instagram: @movimentos_castelobranco)
2. Turboprop Distortion: Similar to helicopters, the angular velocity of an aircraft's turboprop outpaces the electronic shutter.
Result: The blades acquire a sharp, impossible bend, completely destroying the geometry of the aircraft.
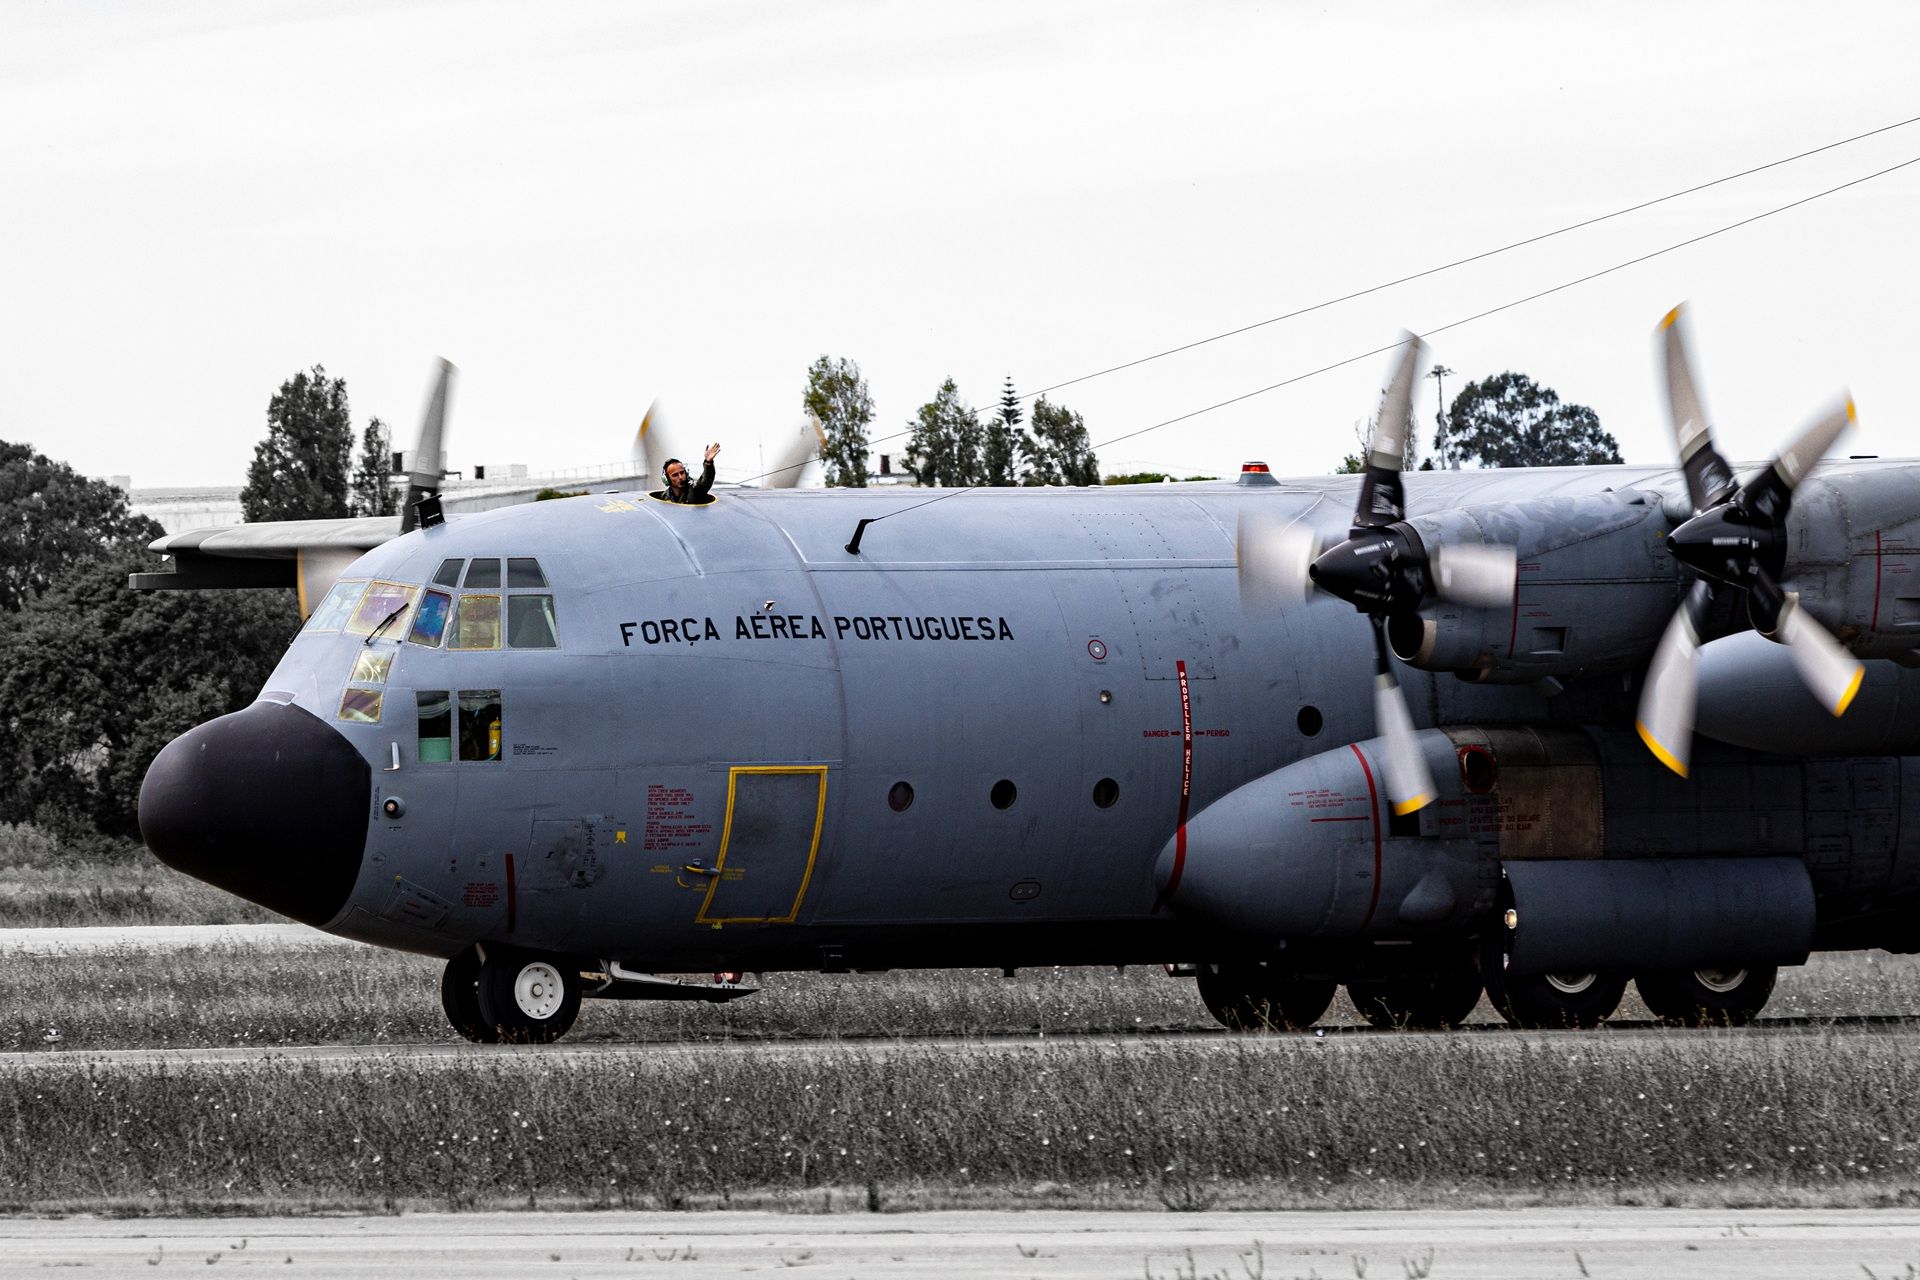
Photo kindly provided by Douglas Alcantara (Instagram: @alcantara_spotter)
3. The Leaning World (Lateral Speed Distortion): This happens during an aggressive panning maneuver to track a fast jet. Because the camera is moving laterally faster than the sensor reads vertically, the top of the background is recorded at a different moment than the bottom. Result: Buildings, light poles, and trees in the background slant diagonally across the frame.
Photo kindly provided by Douglas Alcantara (Instagram: @alcantara_spotter)
5.4. Tactical Countermeasures (Zero-Cost Solutions)
You do not need to buy a new camera to fix this; you just need to alter your operating mode.
- Mechanical Shutter ⚙️: Physical curtains drop over the sensor, blocking the light and preventing the line-by-line scanning exposure. Result: Complete elimination of propeller and rotor distortion. Trade-off: Acoustic noise and a lower maximum burst rate (FPS).
- Electronic First-Curtain Shutter (EFCS): The tactical compromise. The exposure initiates electronically but terminates mechanically. Result: Zero distortion with reduced internal camera vibration.
⚠️ THE GOLDEN RULE OF THE FLIGHT LINE: In the presence of helicopters, turboprops, or when executing aggressive panning: Turn the Silent/Electronic Mode OFF.
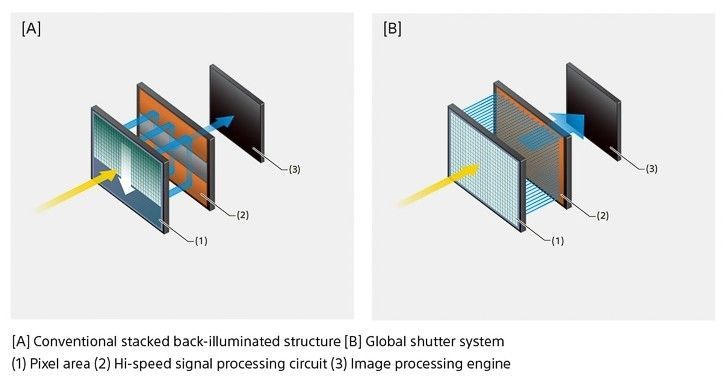
5.5. The Elite Standard: Stacked BSI & Global Shutter
If your mission parameters require total silence, massive burst rates, and geometric perfection, you must upgrade to elite-tier hardware.
1. Stacked BSI Technology (The Speedsters) This architecture unites a Back-Illuminated (BSI) sensor with memory physically stacked directly onto the chip. Data processing becomes nearly instantaneous.
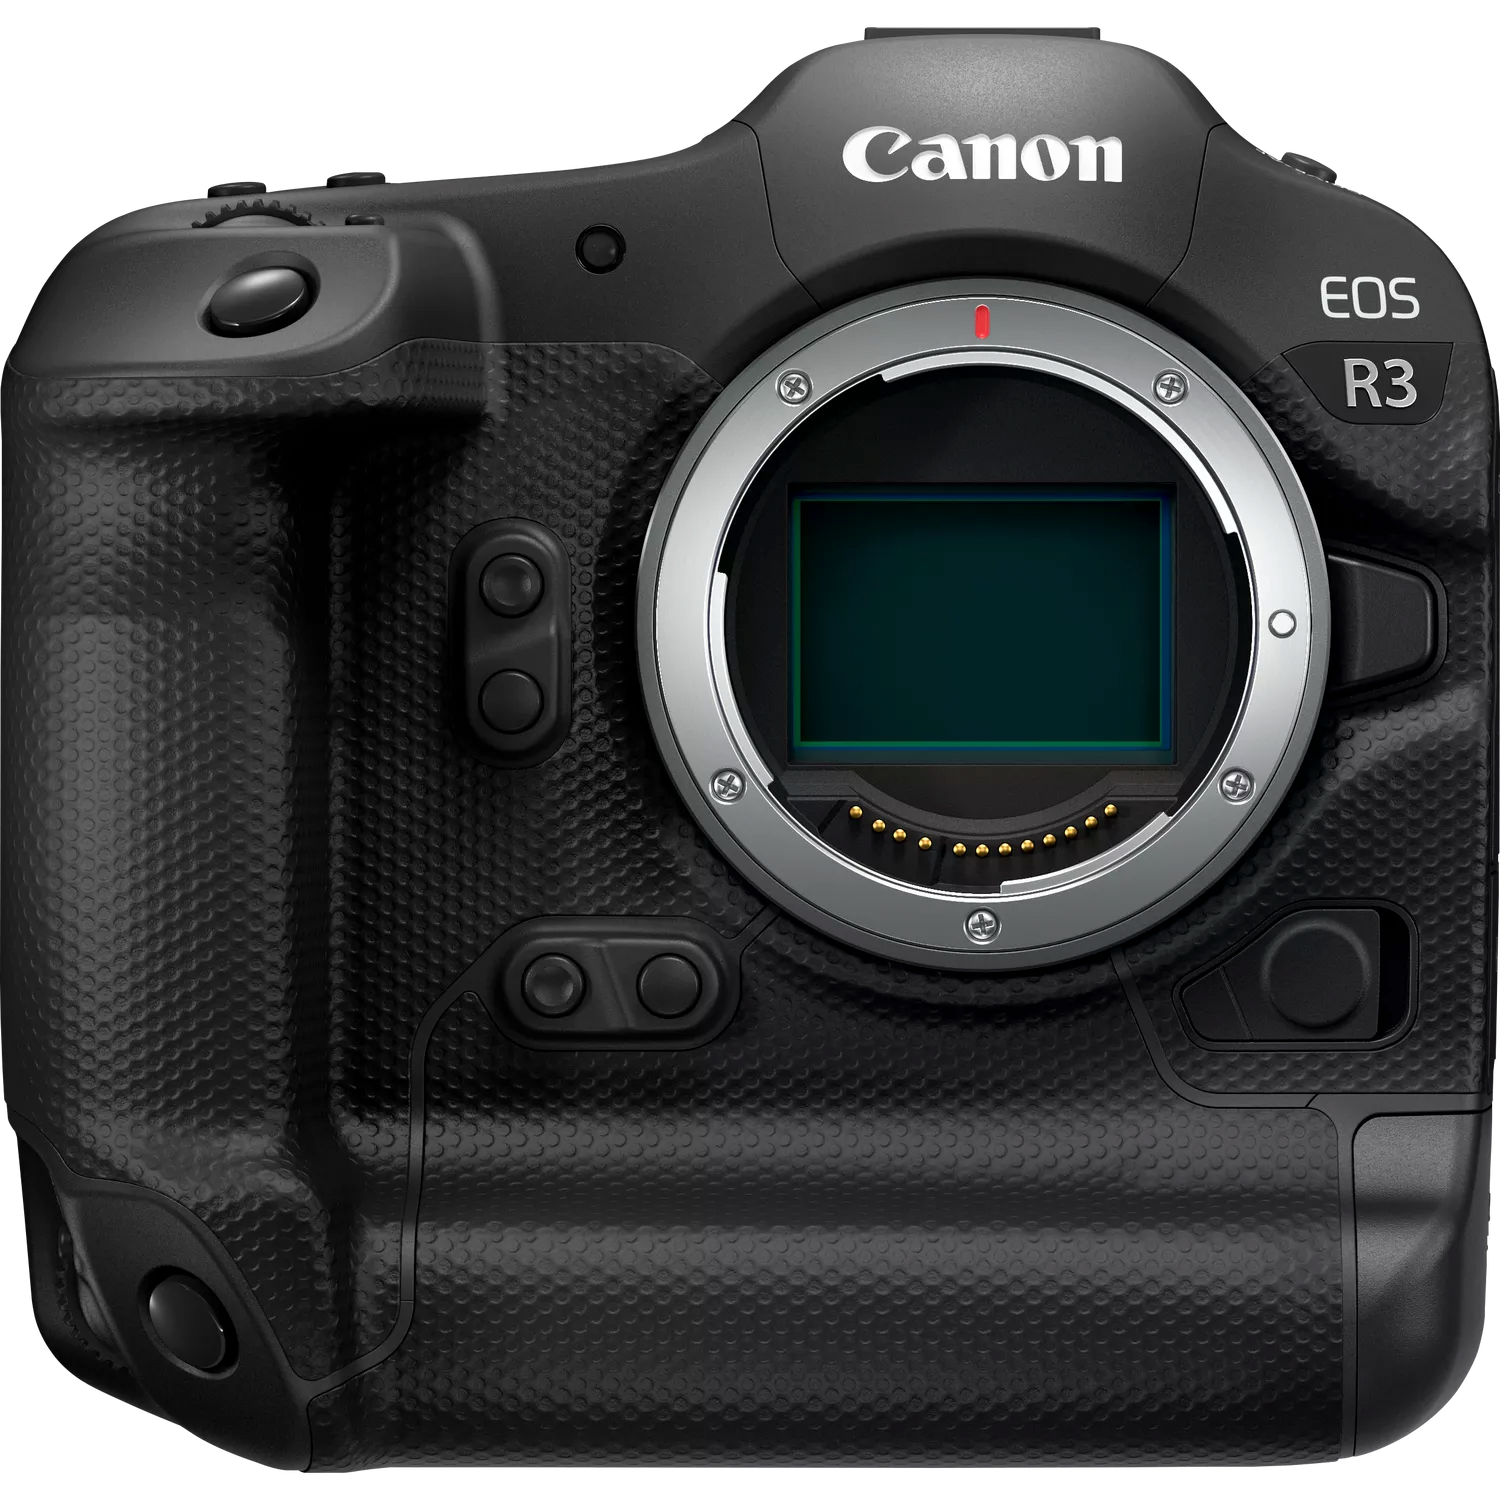
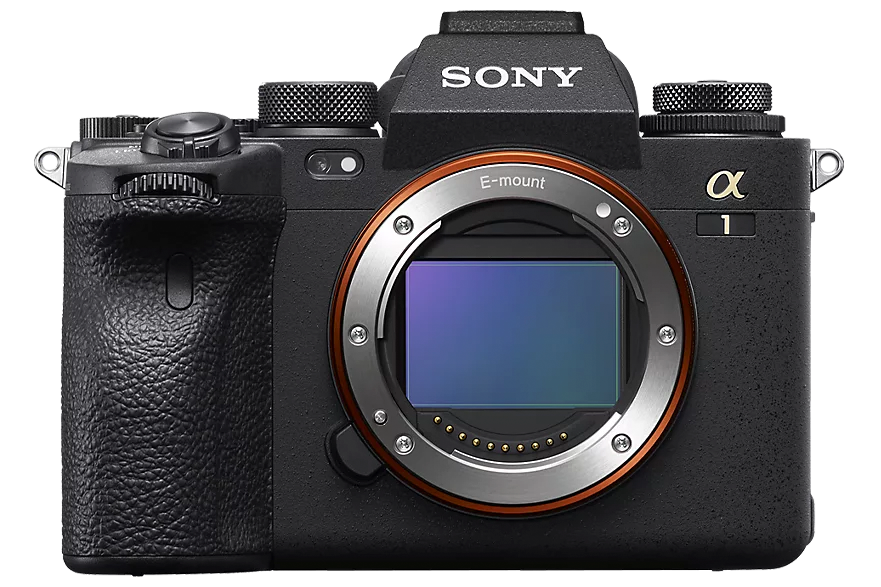
- The Benchmarks: Nikon Z8/Z9 (~4.0ms), Sony a1 (~4.2ms), Canon EOS R3 (~5.5ms).
- The Result: You can shoot electronic bursts at 30 fps or higher, completely silently, with virtually zero distortion on propellers.
2. Global Shutter (The Final Revolution) Cameras like the Sony a9 III eliminate the "scanner" problem at the source. A Global Shutter reads every single pixel on the sensor at the exact same microsecond.
- Superpowers: Readout time is 0ms. Distortion is physically impossible, even at shutter speeds of 1/80,000s. You also achieve total flash sync at any speed without needing High-Speed Sync (HSS).
- Disadvantages: Slightly lower dynamic range (more noise at base ISO) and a massive price tag - expect to invest around €7,000 ($7,500) for the body alone.

It is rarely the camera that ruins the photograph; it is the operator's incorrect choice of firing mode for the scenario. Know your gear. Know when you can abuse the electronic speed for a silent strike, and when you must fall back on the mechanical shutter to preserve the integrity of the aircraft.
6. Memory Cards: Decoding the Alphabet Soup
You can have the fastest mirrorless camera body and the sharpest telephoto lens in the world, but if your memory card cannot keep up, your gear is effectively neutralized. In military and aviation photography, the memory card is your magazine. Using a slow card is almost as bad as having no card at all because you risk missing the shot.
If your camera's internal buffer maxes out and the card struggles to write the data, your shutter jams. A fighter jet breaks right, the action unfolds, and you are left standing on the flight line staring helplessly at a blinking red light. To prevent this, you must look past the marketing and learn to decode the intricate "alphabet soup" printed on the label.
6.1. The Anatomy of a Memory Card
When you look at a modern SD card, it is covered in acronyms and numbers. To choose the right weapon for the mission, we need to break down what each section actually means.
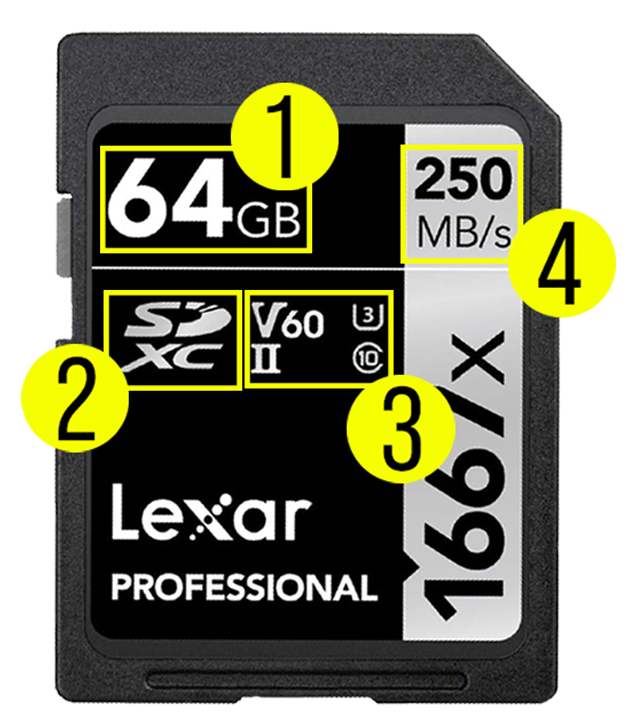
Legend: 1 - Storage Capacity 2 - SD Card Type 3 - Speed Class & UHS Bus Interface 4 - Max Read Speed
6.2. Mission Specs: Format and Capacity (Legend 1 & 2)
Many photographers ignore the fine print, but these letters define the card's foundational architecture. You will typically see either SDHC or SDXC.
SDHC (High Capacity) cards range up to 32GB and use an older file system (FAT32) that limits individual files to a maximum of 4GB. On a modern shoot, this is a severe limitation. For high-performance cameras, SDXC (Extended Capacity) is the mandatory tactical standard. These cards range from 64GB up to 2TB and utilize the exFAT file system, which handles massive files effortlessly and ensures workflow fluidity. As a general rule, avoid 32GB SDHC cards entirely to prevent running out of space in the middle of a deployment.
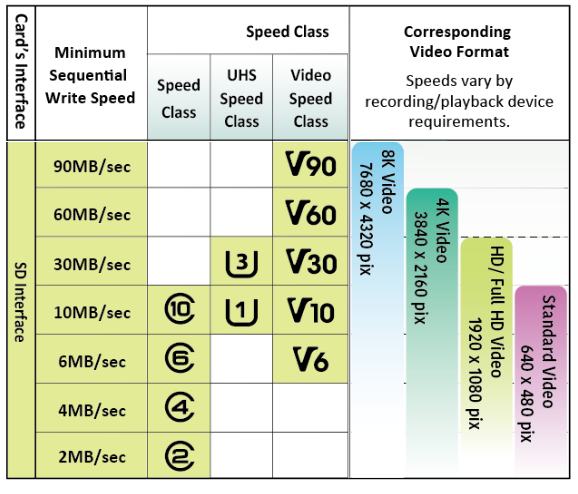
6.3. The Data Highway and Speed Classes (Legend 3)
This section of the card is packed with symbols that dictate how fast the card can actually perform under continuous fire.
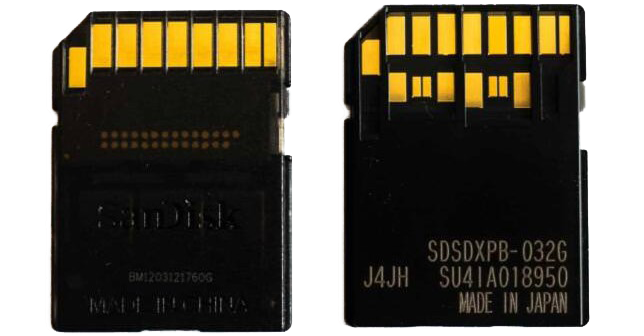
First, look for the Roman numeral (I or II). This indicates the UHS Bus Interface, which you can think of as the number of lanes on a data highway. UHS-I (with a single row of pins on the back) is the older standard. It works, but it aggressively bottlenecks the buffer discharge on newer cameras. UHS-II is the tactical choice; its second row of pins allows for massive read and write speeds, keeping your camera firing smoothly.
UHS-I vs. UHS-II
Alongside the bus interface, you will find the Speed Classes. Over the years, this classification has evolved:
- The Legacy Hierarchy (C and U): You might see a C10 (Speed Class 10) or a U1 / U3 (UHS Speed Class). While a U3 card guarantees a minimum write speed of 30 MB/s and used to be the 4K standard, it often struggles with the heavy RAW bursts of modern aviation photography.
- Modern Speed Ratings (The "V" Class): Forget the "U"; the V-Class (Video Speed Class) is now in command. This number guarantees the minimum sustained write speed. A V30 is fine for single shots but chokes on long bursts. For most aviation shooters, the V60 (60 MB/s) is the sweet spot - the workhorse that handles fast bursts reliably without destroying your budget. If you are operating a flagship camera body, however, the air supremacy of a V90 (90 MB/s) card is mandatory to clear your buffer instantly.
Source: Sony
6.4. The Great Illusion (Legend 4)
See that massive number highlighted on the label, boldly claiming something like "280 MB/s"? That is the ultimate marketing trap. Unless specified otherwise, that large number almost exclusively indicates the READ speed - how fast you can transfer photos to your computer once you are back home.
What actually matters in the field is the WRITE speed (how fast the camera records the photo onto the card). A card might advertise a 280 MB/s read speed but only write at a sluggish 90 MB/s. If you buy a card based solely on the massive number printed on the box, you are buying a card that is fast at the desk but dangerously slow in the trenches.
6.5. Tactical Redundancy & Heavy Artillery
The number one beginner mistake is spending their entire budget on a single, massive memory card (like a 512GB V30) to hold 5,000 photos. This is a severe tactical risk. If that card corrupts or physically breaks, you lose the entire trip. It is the equivalent of putting all your ammunition into one magazine that jams.
Instead, embrace the rule of redundancy. It is infinitely better to buy two 64GB or 128GB V60 cards. If one fails, you have a backup. Warning: Buy these only from official photography retailers. A suspiciously cheap card on Amazon is likely a counterfeit that will fail when you need it most.
When SD is Not Enough: CFexpress Eventually, high-end cameras outpace even the fastest SD cards. When the UHS-II hits its physical limit around 300 MB/s, CFexpress takes the lead. These are essentially miniaturized NVMe SSDs for your camera. While SDs are "fast," CFexpress cards (Type B for Canon/Nikon, Type A for Sony) are nearly "instant," boasting speeds up to 1700 MB/s. They offer virtually zero buffer lag and superior heat dissipation. If your camera is equipped with a CFexpress slot, use it. It puts you in a completely different operational league.
7. RAW vs. JPEG: The Tactical Choice
The debate between shooting RAW or JPEG is heavily documented, but in the realm of military and aviation photography, it is rarely a matter of artistic preference. It is a tactical decision regarding how much "Intel" you want to bring back to the debriefing room. If you think of image formats as field intelligence, the difference becomes immediately clear.
A RAW file is exactly that: raw, unanalyzed intelligence. It records 100% of the light and color data that hit the sensor. Out of the camera, a RAW file is incredibly heavy and often looks "flat" or unappealing. However, it preserves every single piece of data intact for you to process and analyze later.
A JPEG, on the other hand, is the "Final Report." The camera's internal computer processes the image on the spot - applying contrast, saturation, and sharpening - and then permanently discards the rest of the data to save space. It is fast and lightweight, but once that report is filed, you can no longer alter the underlying facts.
7.1. Saving the Mission: Exposure and Color Precision
In real-world operational scenarios, lighting is entirely unpredictable. You might be shooting a dark fighter’s fuselage heavily backlit by a glaring sun. The RAW format offers a massive operational margin of error. It allows you to aggressively "lift" deep shadows to reveal rivet details on the aircraft or pull back blown-out skies to save cloud textures. In a JPEG, that unrecorded information is lost forever; if an area is completely shadowed, it remains a black void.
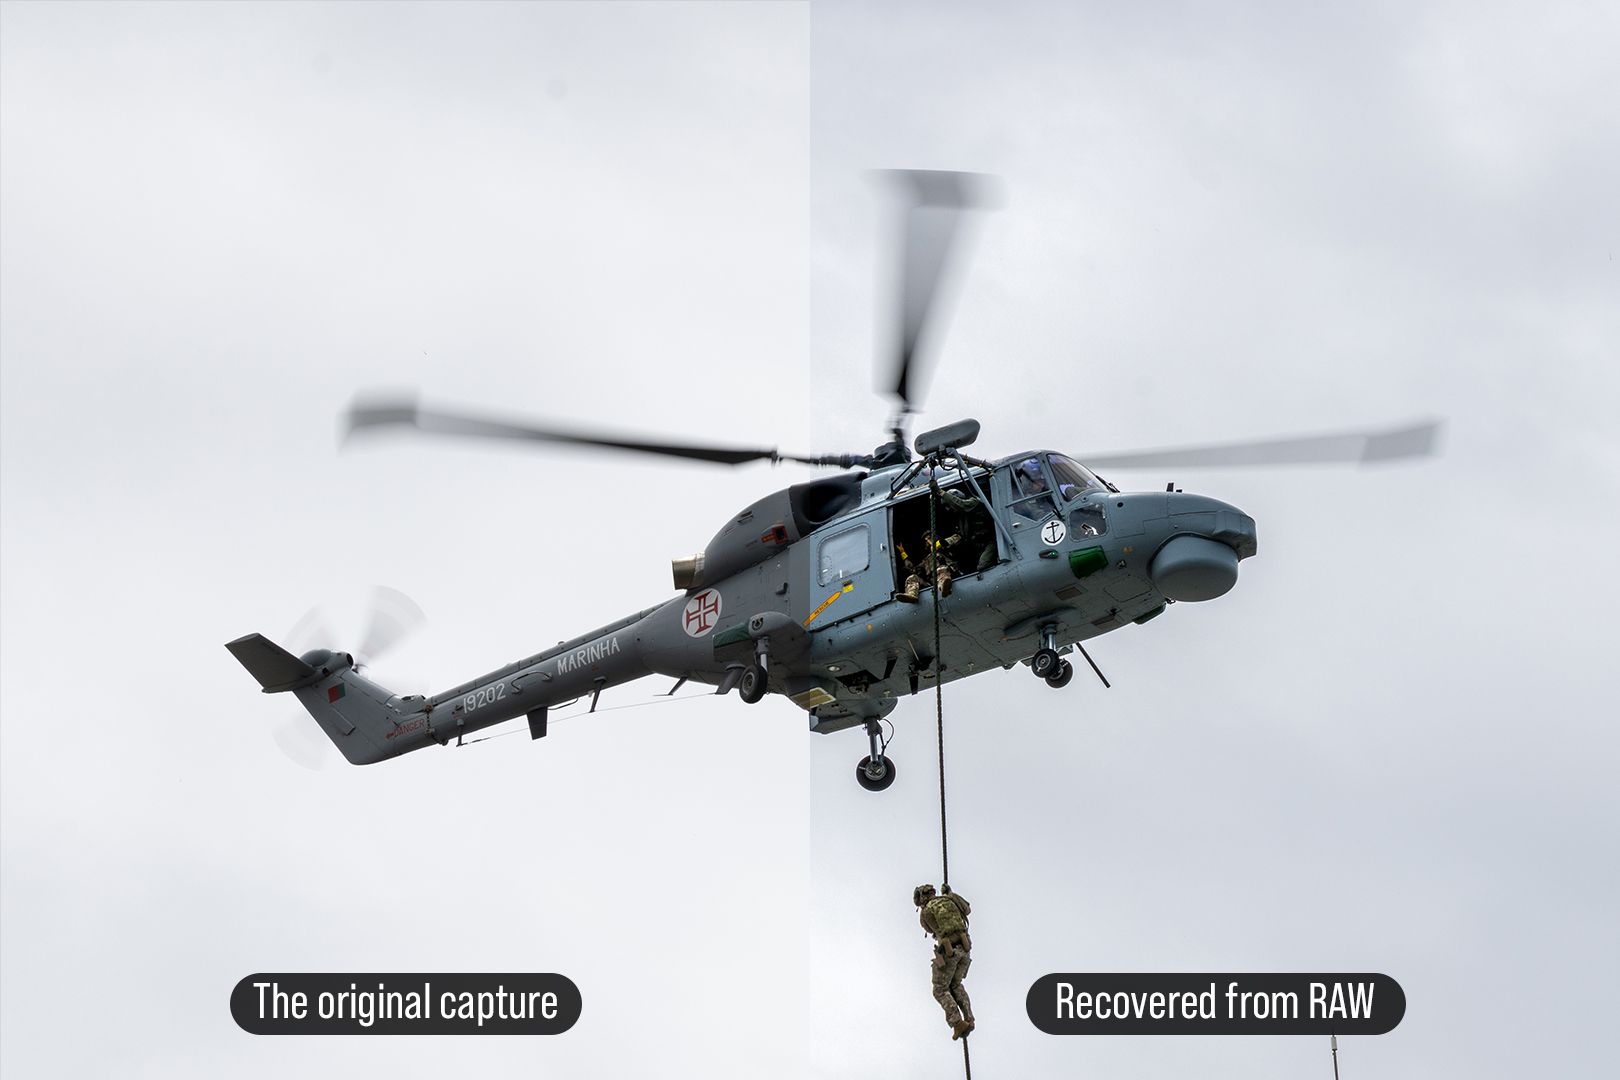
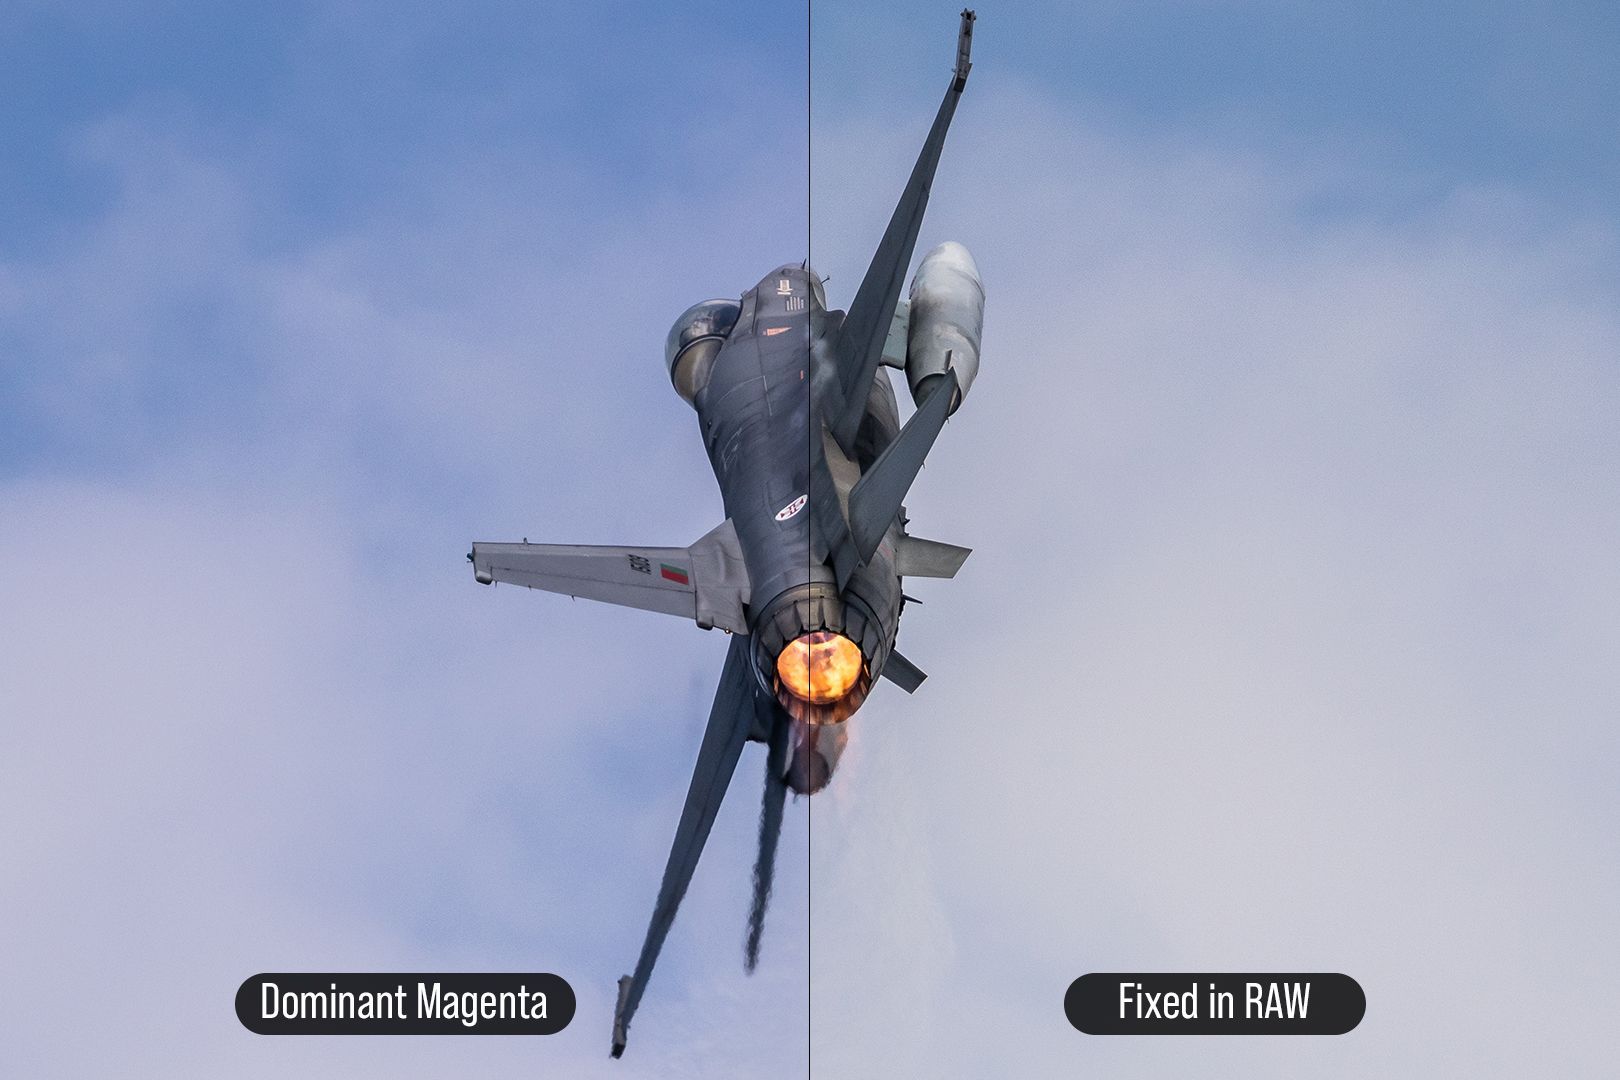
The same principle applies to color accuracy. Capturing the exact "Tactical Gray" of an F-16 is notoriously difficult because ambient light (like the heavy magenta or yellow artificial lights inside a maintenance hangar) easily tricks the sensor. In a RAW file, White Balance (Temperature and Tint) is simply a mathematical adjustment. You can neutralize any color cast in post-production and restore the aircraft's true colors with zero loss of quality. In a JPEG, that color cast is "baked in." Attempting to force heavy color corrections on a JPEG during editing will quickly break the file and introduce aggressive digital noise.
7.3. The Redundancy Protocol (RAW + JPEG)
When an aircraft makes a high-speed, single pass, there is no second chance to pull the trigger. In these moments, redundancy is your greatest asset. Setting your camera to shoot RAW + JPEG simultaneously guarantees the best of both worlds.
The JPEG serves as an immediate "Sitrep" (Situation Report) - it is ready to be transferred to your phone for a quick share or to verify sharpness on the spot. Meanwhile, the RAW file acts as your "life insurance," safely stored on the card as the master matrix, awaiting heavy post-production when you return to base.
Warning on Logistics: Executing this dual-format protocol demands significant storage space and fast write speeds. This is where the V60 or V90 memory cards we discussed in the previous section become absolutely mission-critical.
7.4. Rules of Engagement
If you want to maintain absolute control over your work, establish these Rules of Engagement for your loadout. Engage the RAW (or RAW + JPEG) protocol whenever the mission involves:
- Extreme Lighting: Harsh backlighting, blinding skies, or deep shadows on the fuselage.
- Critical Colors: Artificial hangar lighting or the need to preserve exact military camouflage tones.
- High-Value Targets: High-speed passes or unique formations where a reshoot is impossible.
- Post-Production Intent: Any image you plan to heavily edit, aggressively crop, or print in high resolution.
The golden rule of the flight line is simple: The sensor captures the light. The RAW file stores the data. Do not let the camera's internal computer make the final decisions for you.

Wrapping Up: Season One & What's Next
This concludes the first season of our Aviation & Defense Photography Guide. From nailing your composition and understanding focal lengths to decoding the alphabet soup of memory cards, you now have the knowledge, the gear strategy, and the workflow to make the most of your time on the flight line. But our work doesn't stop here.
1. Send Your Suggestions (Season Two is GO) Over the next 30 days, I will be gathering ideas for Season Two directly from you on my Instagram Stories. What topics do you want us to cover next? Night photography operations? Editing workflows? Advanced panning techniques?
Send a Direct Message to my Instagram or Facebook with your requests. Your suggestions will dictate the exact topics I prepare for our next series of posts.
2. Share with the Community A good photographer doesn't keep all the secrets to themselves. If you know a fellow spotter who is constantly struggling with warped propellers, full camera buffers, or flat compositions, send them this link. Share this guide with your photography groups, tag your friends, and let’s make sure everyone is bringing their best shots back from the next airshow.
Stay sharp, keep your glass clean, and I'll see you out there on the flight line. ✈️📸